
AWS EBS is particularly well-suited when you have persistent data storage needs, such as databases. In addition, since consistent backups are most important in production, EBS becomes an obvious choice since it allows you to create point-in-time `crash consistent‘ snapshots of the volumes. These are helpful when you want to restore data to a specific point in time. Using AWS, you can backup data with crash-consistent snapshots. However, it is important to note that AWS recommends stopping all instances before taking a snapshot in order to achieve application-level consistency.
However, stopping a production server is usually not an acceptable option. In addition, when an application-consistent snapshot is taken, it is also important that the backed up data is verified. In the case of data loss, it should have correct and durable data available in backup. N2WS Backup & Recovery also offers an option that allows you to recover the backed up volumes. In this article, we will demonstrate SQL database backup, verification, and recovery for a MySQL database running on an EC2 instance with EBS volumes.
Step-By-Step
We are going to perform the following steps:
- Start with a running EC2 instance and a special storage volume for MySQL database attached to it
- Configure Instance for automated backup with N2WS
- Write a script that verifies the backup data using MySQLCheck function
- Configure N2WS CLI
- Write a script on this new instance
- That will recover the instance from the last N2WS backup. It will launch an instance from last snapshot using N2WS CLI
- Connects to newly restored instance
- Run the script that verifies data with MySQLCheck
- Print the results that will display its success or failure
Let’s Start:
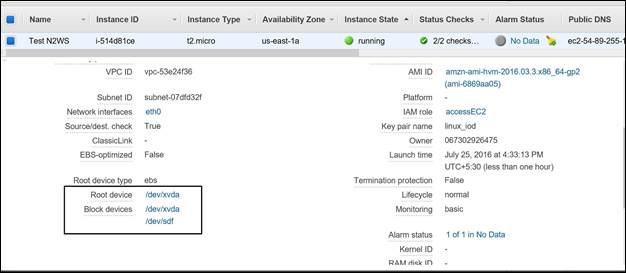
- We have launched an EC2 instance and installed MySQL on that instance. An additional volume is also attached.
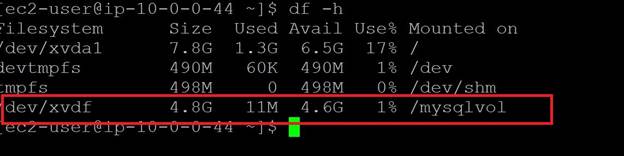
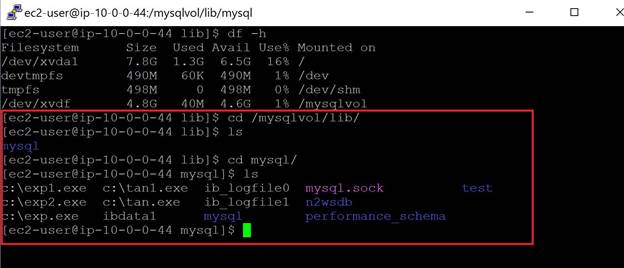
- Install MySQL on the Linux and configure it so that all data files are stored in the additional volume. To achieve this step, you can also refer here.
- We have to set up the existing account with N2WS to configure the Instance for automated backup with N2WS. Create a policy and identify the backup target. Do you have a N2WS Account? Start your 30 days Free Trial Here
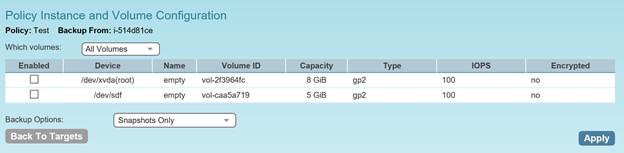
- As you can see in the image below, we have identified our instance for backup. The policy will automatically initiate the backup of the volumes attached to the instance.

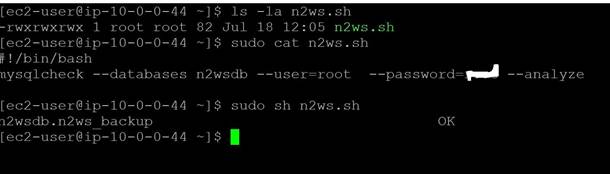
- With this instance, write a script that verifies the MySQL data. The command mysqlcheck is useful for this.We will then run the command as below:mysqlcheck –databases n2wsdb –user=root –password=XXXX –analyzeIn this case, the database we created is for MySQL. We have created a script named n2ws.sh and have provided the username and password in the script in order to allow the connection with the MySQL database.
- We now want to set up a process that will automate the backup verification and initiate the restoration. Fortunately, N2WS provides Command Line tools that can be used to restore the data. To work with N2WS, you should have python installed on your machine.Run the command “python –version”. The recommended version is 2.7 [do not use a version above 3]

- To configure CLI of N2WS, you should enable the authentication key for N2WS CLI. The key can be enabled within the notification settings in the N2WS console.
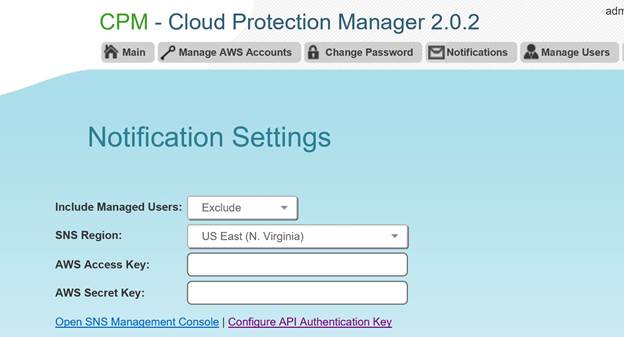 Click Configure API Authentication Key and copy the key.
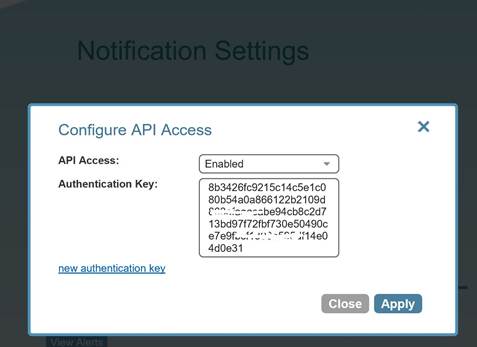
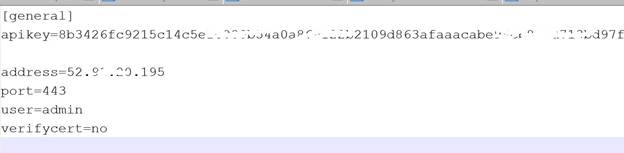
- The N2WS CLI consists of cpm_cli.py (python script) & cpm_cli.cfg (configuration.) We have also configured the cpm_cli.cfg file with authentication key, server IP and username.
- Write a script on this new instance. The script will use the CLI N2WS (cpm_cli.py) for various steps as below: [The N2WS CLI returns output in JSON format]
- First get the latest backup ID using command.python /home/ec2-user/cpm_cli.py get-backup-by-time
- Get the instance ID for which this last backup was takenpython /home/ec2-user/cpm_cli.py get-backup-info –backup-id=<<backup ID>>
- Using this backup ID and instance ID restore the backuppython /home/ec2-user/cpm_cli.py recover-instance “–backup-id=<<backup ID>> –instance-id=<< Instance ID>> –placement subnet –ip-address “new” –subnet=<<subnet ID>> –key-pair=$<<Key Pair>> –instance-type=<<Instance Type>>The above command will recover the instance from last N2WS backup. It will launch an instance from last snapshot using N2WS CLI.The output will be in a JSON format. Parse it to get the instance ID of a new instance. Here, we have not mentioned the security group in the above command, so it will launch the instance with the same security group using the original instance ID (The Instance from which backup was created and restored).
- Using AWS CLI, get the IP address of newly launched Instance ID. [You will need to install AWS CLI on current machine]aws ec2 describe-instances –instance-id=<<New Instance ID from step ‘9.C’>> –query “Reservations[*].Instances[*].PrivateIpAddress” –output=text –region us-east-1
- The newly launched instance will be in the same subnet and will have the IP address from the subnet range. Since it is launched from the backup of the instance, which was launched in step #1 (the original instance with MySQL), it will also have mysqlcheck installed and data configured on additional EBS. This instance will also have the script (n2ws.sh) that we created in step #5.
- Connect to this new restored instance using SSH. [Note: We are using option where every time N2WS CLI assigns a new private IP on instance launch but if the IP was assigned to some previous instance and we use it again to connect sometimes it will give error. Refer SSH error for more information.]
- Run the script to verify backup and capture the output.
- If the output is successful or if there is any error, it will show it in the corresponding message.
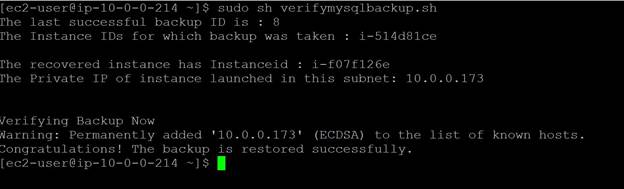
The above screen shows the successful output of a backup verification script. The advantage of the script is that you can schedule this using cron job or even use N2WS to automate the verification process after each backup.If you are using automation, remember to terminate instances once recovery verification is completed on a new instance.It is important to note that since CLI outputs data in python, we have installed atool called jq for parsing the JSON data. You can also install the same tool on AWS Linux using
Command “sudo yum install jq”
- During the whole process checking the N2WS console, you will find that it also lists the last backup data.
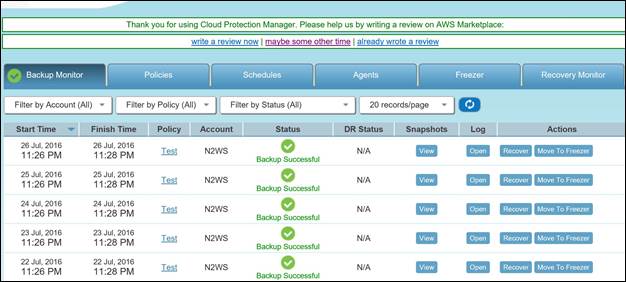
- We can also verify that both volumes were backed up.
 We are also attaching the script for your reference.
https://drive.google.com/open?id=0B_i6vDoecuJ9MFZKcXo1MEpXWjQ
Final Note
The database always plays a key role in any production application. It is important that the database is backed up regularly. Learn how to automate your backup process. It is more important that whenever something is backed up, it should be verified after restoring so that, in the time of DR, it should be available and durable.
In this article, we have demonstrated how you can restore the data backup with N2WS using N2WS CLI. The script can restore the backup instance as well verify the data on that instance.
N2WS Backup & Recovery is an enterprise-class backup, recovery, and disaster recovery solution for EC2. It uses existing EBS volume and RDS database snapshot abilities to automatically take snapshots at regular intervals. Additionally, you can set up policies and schedule backups for various targets. N2WS helps manage snapshots with policies. For example, if you have multiple snapshots, the older ones may be irrelevant. With N2WS, you can configure a policy to delete the snapshots after a certain period. This also helps in cost savings and effective backup management.
Try N2WS Backup & Recovery Free Trial for 30 days today (no credit card needed).
Read Also