You can use AWS Elastic BeanStalk to flexibly and quickly deploy web applications built in Java, Node.js, Python, Ruby, PHP, or .NET. The great thing about AWS Elastic Beanstalk is that it provides an easy-to-use interface to manage your apps, while still offering plenty of options for configuration and customization. With AWS Elastic BeanStalk, you can reduce the amount of operational overhead required when deploying web applications and focus more on true DevOps deployments.
In this article, we’ll cover how to get up and running with a simple PHP application in AWS Elastic BeanStalk. I’ll show you how to create an application, view your environment, deploy a new version of an app, change the configuration, and clean up your AWS environment.
Prerequisites
One of the nice parts about AWS Elastic BeanStalk is that it is included in the AWS Free Tier of applications! This means that the prerequisites for running this service are fairly straightforward:
- You must have an AWS Account
That’s it! Since AWS Elastic BeanStalk is available in all regions, the initial setup of Elastic BeanStalk is a breeze. It is a simple service to get started within AWS.
Create an AWS Elastic BeanStalk app
Since creating an application is out of the scope of this document, we will use the AWS example PHP application that you can download for yourself here. Once downloaded, log in to your AWS Management Console and find the Elastic BeanStalk service in the main menu under “Compute” resources.

Once in the AWS Elastic BeanStalk menu, click “Create New Application” to get started. Here, we will provide a name and a short description for our simple PHP application.

Once named, click create and we will get started building the environment for the application to be deployed into. To do this, click “Create one now” on the following screen:

Setting up the environment
For our environment selection, we have two options. The first option is for a web server environment, and the second is for a worker environment. The most significant difference is that the web server environment serves a website or API that responds to HTTP requests, whereas the worker environment is more like a listener to react to messages from an Amazon SQS queue.
Since our application is a PHP application serving a simple website, we’ll choose the web server environment. Once the web server environment is selected, we are given the configuration and customization options for the environment.

For the environment information, the application name is prepopulated from the previous screen. The environment name can be customized in case you have nomenclature in your environment that you prefer to use. You’re able to specify a custom domain, or you can leave it blank for a default value, as well as give your environment a description. Keep in mind, you can recycle environments, so if you have multiple PHP applications, you’ll want to name it so that you’ll remember that.
Choosing the base configuration type
Under the base configuration heading, we’ll select the “PHP Preconfigured Platform” since AWS already has one maintained for us. You can choose to use a custom platform if you want to create and publish one for your use. Depending on your application, this may be a useful option.
For our code, we’ll upload the code that we downloaded earlier. You can also choose to publish a “sample app” in this menu if you didn’t download the code from earlier. Also, if you’re looking to load a previous version of the code you’ve uploaded, you can specify that with the “Existing Version” code, and select the appropriate option.
Lastly, you’ll notice the “Configure More Options” button at the bottom. If you look here, you can configure high availability or custom hardware settings. By default, this value is the lower cost, “free tier eligible” service. For our sample app, this will surely suffice.
Once we’re satisfied with our configuration options for the environment, we click “Create environment.” You can view on the next screen that the environment gets created and started.

Viewing and Configuring your Environment
Now that the environment is successfully deployed, let’s go back and view it to see what all is available to us for monitoring the service. We can visit this by selecting “Elastic BeanStalk” from the AWS Management Console dashboard, then clicking on our EB environment we’d like to view. Once we’ve done that, we’re taken to the Elastic BeanStalk Dashboard menu. Here, we can see the most recent events that have happened to our environment, a simple health check, as well as the version of code currently deployed, and essential environment configuration details.
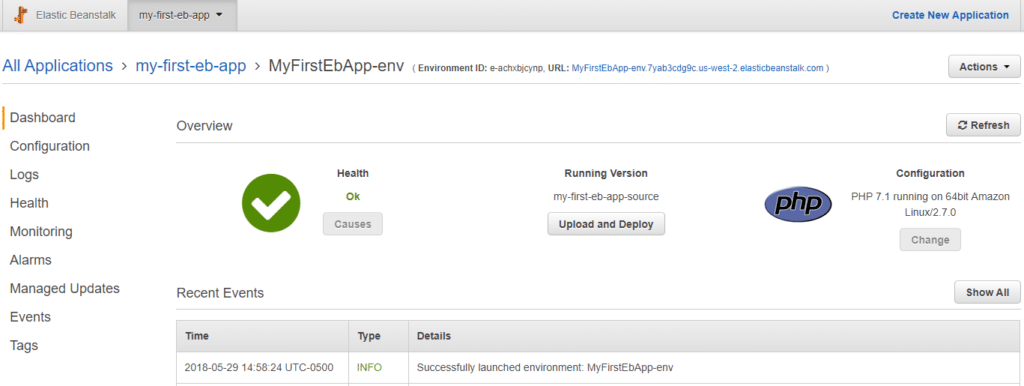
The simplest way to check the service deployment is by going to the URL provided in the top dashboard menu of the Elastic BeanStalk environment. For our deployment, we’ll see the PHP application that we deployed, which is a success message for our first deployment.

Let’s drill down into this menu further to see how all we can manually configure the environment.
Configuration
Much like in the initial setup, we can view and modify the configuration options for the environment, like the instance types, security settings, a configured load balancer, and more.
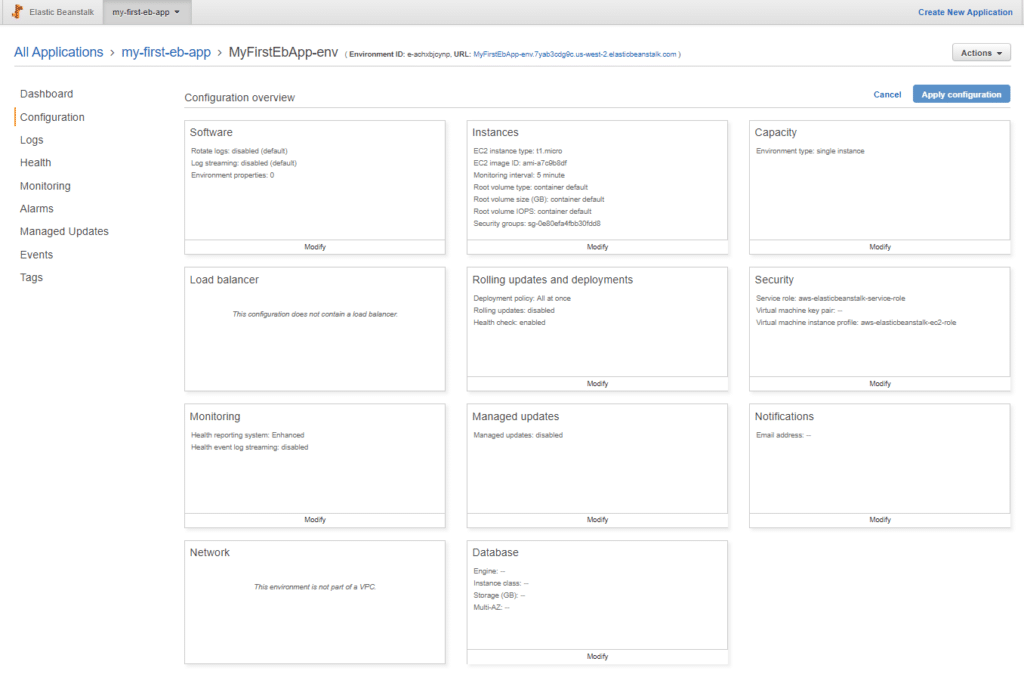
To reconfigure our environment, we can just select “Modify” on the settings we want to change, and save them into our environment to be redeployed.
Logs
For logging, if configured and enabled, we can request the logs from the Elastic BeanStalk environment. If we’re troubleshooting a problem, we can select the “Last 100 Lines” option for our logs, and get to the matter right away. There is also a “Full logs” option for a complete view of the environment.
Health
We can view an enhanced view of the Health check from the dashboard from within this sub-menu. Here, we can see each running instance of our Elastic BeanStalk deployed application, and take appropriate actions in unhealthy instances.
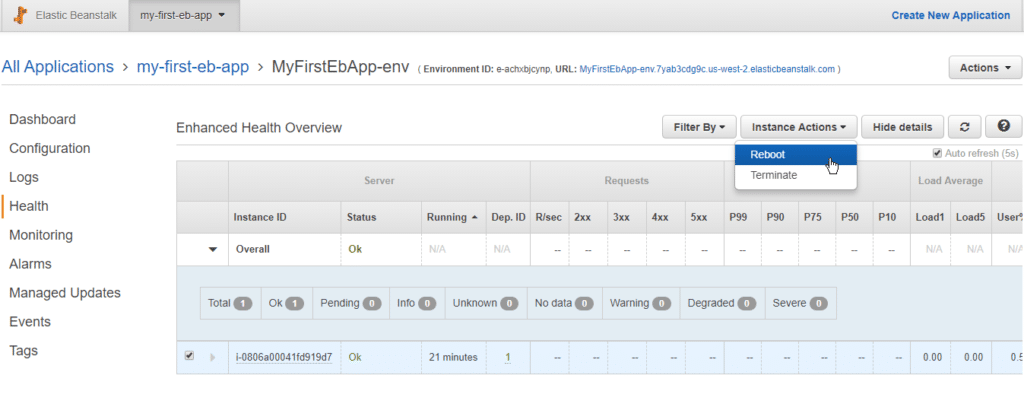
This health check gets more complicated the more instances you have running, so there are also advanced filtering and selection options for the health check.
Monitoring
Under the Monitoring tab, we have access to resource utilization statistics across your environment. In addition to the defaults, you can create custom CloudWatch metrics to report on from this dashboard. This is a quick view to monitor usage of your environment.
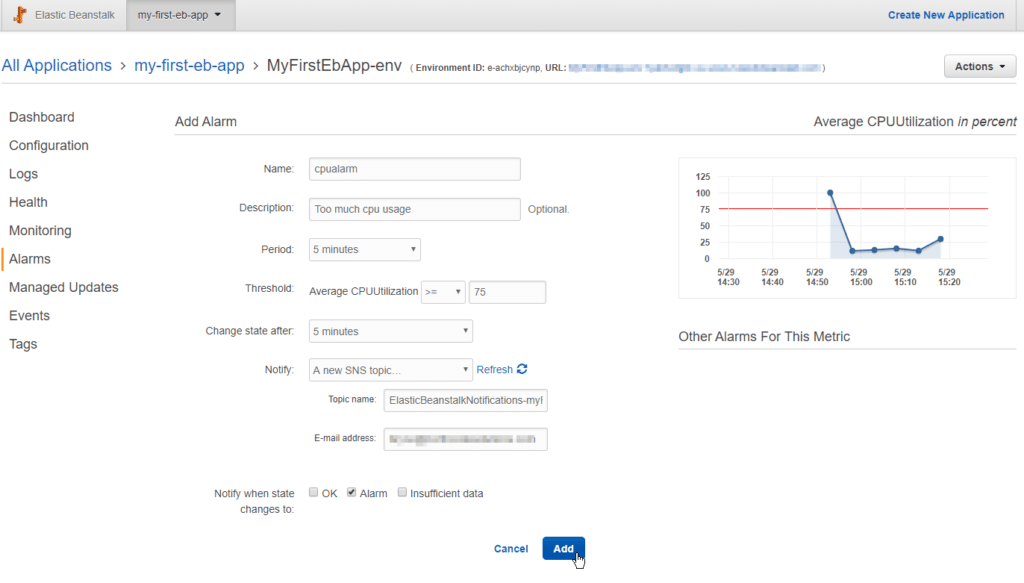
You can also, from this menu, create Alarms for each CloudWatch check that you’ve configured. Do this by clicking on the bell icon next to the metric you’d like to create an alarm for.
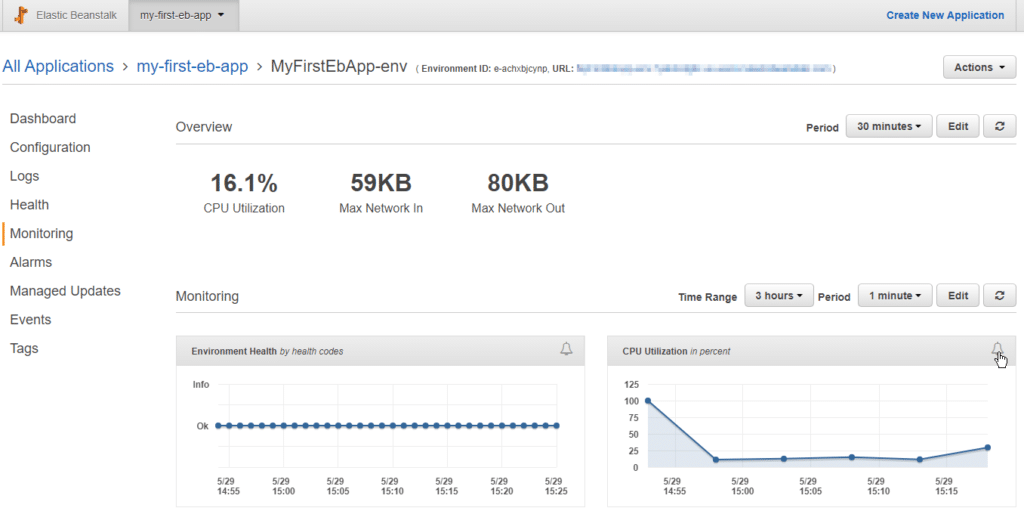
Once clicked, you can create a configuration to notify you of the alarm status based on an SNS topic which you can quickly create from this menu as well. Once you configure your rule, click “Add” to add the alarm to the monitoring dashboard.
Alarms
Once the alarm is created, we can visit the “Alarms” sub-menu to view the alarm status as well as any associated graph to the metric being monitored. Once the initial alarm creation is completed, alarms can be modified from this menu as well.
Managed Updates
Managed Updates is a configuration option available in the Configuration menu. Here you can see the update settings configured by your environment. You can view the schedule the updates are to run on, whether the updates include minor updates as well as patches, and whether or not updates will destroy old instances and create new ones.
Events
The events menu details environment updates and instance creation. Think of it as a simple logging system for your Elastic BeanStalk environment. Here, you can sort your events view by time and severity so if you want to view critical errors over the last 30 minutes, you could do so to quickly troubleshoot anything wrong in your environment settings.
Tags
The tagging menu is useful once we have several different deployed apps across our environment. By using tagging, you can add unique keys and values to sort and filter your application deployments in Elastic BeanStalk. In the long run, this reduces operational overhead because you can apply your future scripts to the environments by tag to update, manage, or reconfigure them in bulk.
Deploying New Code
Manually deploying new code with AWS Elastic BeanStalk is very simple. In the environment dashboard for your application deployment, select the “Upload and Deploy” button under “Running Version”

Once selected, navigate to the new .zip of your code on your machine and upload. Be sure to give your code a meaningful version label as well, such as “v2” or “1.0.01”

When you click deploy, your new code will be pushed out to your running instances, and you’ll be automatically taken to a page to monitor the deployment.
Manual rollbacks
To roll back your application to a previous version, we have to take a step back in the breadcrumbs in the Elastic BeanStalk dashboard.

Once here, you can select the “Application Versions” sub-menu. Then select the version of code you’d like to deploy and click “Deploy”.

From this menu, you can also upload new code, delete bad versions of code, and even set a code lifecycle policy for retention and deletion.
Automations
If an automated process sounds better to you than manually uploading code repeatedly, there are options for that. Using services like AWS CodeDeploy or Jenkins, you can automate the deployment of your code to Elastic BeanStalk from a version control management system of your choice.
Cleaning up AWS
The cleanup of the operations we’ve created today is pretty simple as well. Now you should have an Elastic BeanStalk application up and running in your AWS environment. Although this is fine being used for free tier, to avoid being charged in the future we should probably remove it.
To do this, let’s revisit the Elastic BeanStalk dashboard by clicking Services -> Elastic BeanStalk in the top of the AWS Management Console. Once here, we can identify our application, select “Actions”, then “Delete application”

Summary
Congratulations! You’ve just created a simple AWS Elastic BeanStalk deployment. You’ve seen how to modify and configure the service on the fly as well as how to clean up the environment. And you did this without needing to configure a management server, auto-scaling, or templates for deployment. So now you know how to very quickly spin up and tear down the service from scratch.
Looking for an AWS Data Protection solution?