
Editor’s note: Updated the article to cover recent market trends as of 2026.
What Is an Azure Disaster Recovery Plan?
A disaster recovery plan includes measures to minimize the effects of a disaster, enabling an organization to maintain or quickly resume mission-critical functions. It outlines procedures for dealing with sudden disruptions such as natural disasters, cyberattacks, or any event that could cause the loss of data or infrastructure.
In the Azure cloud, a common way to plan and automate disaster recovery processes is Azure Site Recovery (ASR). ASR is a service provided by Microsoft that ensures business continuity by orchestrating the replication, failover, and recovery of virtual machines and physical servers. It enables organizations to protect their applications and data from disruptions by replicating them to another location, whether that be within the same data center, to a secondary site, or to Azure cloud.
This service supports a broad range of operating systems and workloads, offering flexible replication options and integrated recovery plans. ASR simplifies the disaster recovery process by automating the replication and failover tasks. It provides a reliable recovery point objective (RPO) and recovery time objective (RTO), ensuring minimal downtime in the event of a disaster.
This is part of a series of articles about Azure disaster recovery.
In this article:
- Azure Disaster Recovery Trends and New Developments
- How Do Disaster Recovery Plans Work in ASR?
- Quick Tutorial #1: Creating and Customizing Recovery Plans in Azure Site Recovery
- Quick Tutorial #2: Testing Your Azure Disaster Recovery Plan with DR Drills
- Azure Site Recovery Limitations
Azure Disaster Recovery Trends and New Developments
Azure disaster recovery planning is evolving from basic VM replication toward broader cloud resilience management. Microsoft now positions resiliency as a unified practice that includes zone resilience, high availability, backup, disaster recovery, and ransomware protection, rather than treating disaster recovery as a standalone process. This reflects a larger shift in Azure environments: organizations are expected to continuously assess their protection posture, monitor risks, and recover workloads across multiple failure scenarios.
Important developments include:
- The growing integration between Azure Site Recovery and Azure Monitor: Azure Site Recovery now surfaces built-in alerts through Azure Monitor for critical events such as unhealthy replication, failover failures, and agent expiration. These alerts can be viewed through Azure Business Continuity Center, Azure Monitor, or Recovery Services vaults, and routed to notification channels such as email, ITSM tools, webhooks, and SMS. This makes disaster recovery more operational and proactive, helping teams identify replication or recovery issues before an actual outage occurs.
- Security as a larger part of Azure disaster recovery strategy: Azure Site Recovery supports disaster recovery for trusted launch virtual machines, which are designed to help protect workloads against advanced and persistent attack techniques. This is especially relevant as more disaster recovery plans account not only for infrastructure failures and regional outages, but also for cyber incidents such as ransomware, compromised boot chains, and unauthorized changes to critical systems.
- The move toward centralized business continuity visibility: Azure’s resiliency tools are increasingly focused on giving organizations a single view of their protection estate, including backup, disaster recovery, security level, monitoring, reporting, and recovery readiness. For enterprises running distributed or hybrid environments, this helps standardize recovery planning across workloads and reduces the risk that individual systems are protected inconsistently.
How Do Disaster Recovery Plans Work in ASR?
Azure Site Recovery simplifies disaster recovery by automating the replication, failover, and failback of virtual and physical machines. The process begins with setting up the source environment, where the machines to be protected are identified and configured for replication.
Here’s an overview of the workflow:
- Initial replication: Once machines are selected for protection, ASR performs an initial replication. This involves copying the entire data set from the source to the target location. The target can be another Azure region or an on-premises data center. This step ensures that the secondary site has an up-to-date copy of the source environment.
- Continuous data replication: After the initial replication, ASR continuously synchronizes changes from the source to the target location. This continuous replication ensures that the target environment remains current and reduces data loss in the event of a failover.
- Replication policies: Administrators can configure replication policies to define the frequency of recovery points, retention periods, and bandwidth usage. These policies help manage the replication process and ensure it aligns with the organization’s recovery point objective (RPO).
- Failover process: During a failover, ASR orchestrates the process of switching operations from the primary site to the secondary site. This can be initiated manually or automatically based on predefined criteria. The failover process involves starting the replicated machines in the target environment and ensuring they are operational.
- Failback process: Once the primary site is restored, ASR can reverse the replication direction, enabling the data and operations to be moved back to the original site. This failback process is critical for returning to normal operations and involves synchronizing changes from the secondary site back to the primary site.
- Testing and validation: ASR allows for non-disruptive test failovers, which enable organizations to validate their disaster recovery plans without affecting production environments. These tests help ensure that the recovery plan works as expected and meets the defined RPO and RTO.
Quick Tutorial #1: Creating and Customizing Recovery Plans in Azure Site Recovery
Create a Recovery Plan
To create a recovery plan in Azure Site Recovery, follow these steps:
- Navigate to Recovery Plans: In the Recovery Services vault, choose Recovery Plans (Site Recovery) and then +Recovery Plan.
- Specify Plan Details: In the Create Recovery Plan window, provide a name for the plan. Choose a source and target based on the machines included in the plan, and select Resource Manager for the deployment model. Ensure the source location has machines enabled for failover and recovery.
- Select Failover Source and Target Options:
- Azure to Azure: Select the appropriate Azure region for both source and target.
- VMware to Azure: Select the configuration server for the source and Azure for the target.
- Physical machines to Azure: Select the configuration server for the source and Azure for the target.
- Hyper-V to Azure: Select the Hyper-V site name for the source and Azure for the target.
- Hyper-V (managed by VMM) to Azure: Select the VMM server for the source and Azure for the target.
- Select Virtual Machines: Under Select items virtual machines, choose the machines or replication group to add to the plan, then click OK. Machines are added to the default group in the plan.
- Finalize the Plan: Select OK to create the recovery plan.
When creating a recovery plan, take note of the following considerations:
- Recovery plans can be used for both failover to Azure and failback from Azure.
- Machines included in the plan must be enabled for failover and recovery.
- Plans can include VMware VMs and Hyper-V VMs managed by VMM.
- All VMs in a recovery plan must replicate into a single subscription. For different subscriptions, create separate recovery plans.
Add a Group to the Plan
To add additional groups to your recovery plan, follow these steps:
- Customize the Plan: Under Recovery Plans, right-click the plan and select Customize. By default, all machines are initially placed in Group 1.
- Add a New Group: Click +Group to add a new group. Groups are numbered sequentially as they are added, with a maximum of seven groups allowed.
- Move Machines to Groups: Select the machine you want to move, click Change group, and then choose the new group. Alternatively, right-click the group name, select Protected item, and add machines to the group. Note that each machine or replication group can belong to only one group within a recovery plan.
Customize the Recovery Plan
To customize a recovery plan with scripts or manual actions, follow these steps:
- Integrate Scripts: If replicating to Azure, integrate Azure automation runbooks into the recovery plan. For Hyper-V VMs managed by System Center VMM, create a script on the on-premises VMM server and include it in the plan.
- Adding Actions: In the recovery plan, select the step where you want to add the action. Specify whether the action should occur before (pre-action) or after (post-action) the machines in the group start after failover. Click Insert action, then choose Script or Manual action.
- Define manual action or script:
- Manual Actions: Provide a name and instructions for the manual action. The person running the failover will follow these instructions. Specify whether the manual action applies to all types of failover (Test, Failover, Planned failover), then click OK.
- Script Actions: For failover to VMM script, type the relative path to the share where the script is located. For Azure Runbooks, specify the Azure Automation Account and select the appropriate runbook script.
- Test the Plan: Run a test failover to ensure that the script or manual action functions as expected.
Here are 5 tips that can help you better utilize Azure Site Recovery (ASR) for disaster recovery plans:

Quick Tutorial #2: Testing Your Azure Disaster Recovery Plan with DR Drills
What Are Disaster Recovery Drills in ASR?
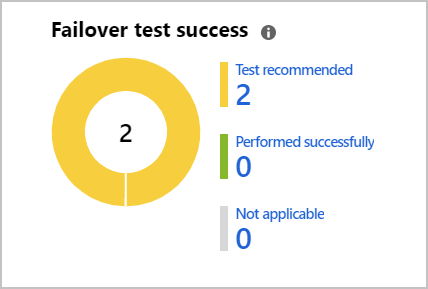
Azure Site Recovery actively prompts users to conduct disaster recovery drills via the Site Recovery dashboard, helping maintain readiness for real disaster events.
A DR drill is a simulation exercise designed to verify the effectiveness of your disaster recovery plan. This drill aims to ensure that your organization can restore data and services within the stipulated recovery time objective (RTO) and recovery point objective (RPO).
The RTO defines the maximum acceptable duration of time that your IT systems can be offline, while the RPO sets the maximum acceptable amount of data loss measured in time. For example, an RPO of one day means you should have daily backups and be able to restore data up to the last backup.

Create a Failover Test
Creating a failover test involves setting up an isolated virtual network to avoid impacting your production infrastructure. Here’s a step-by-step guide:
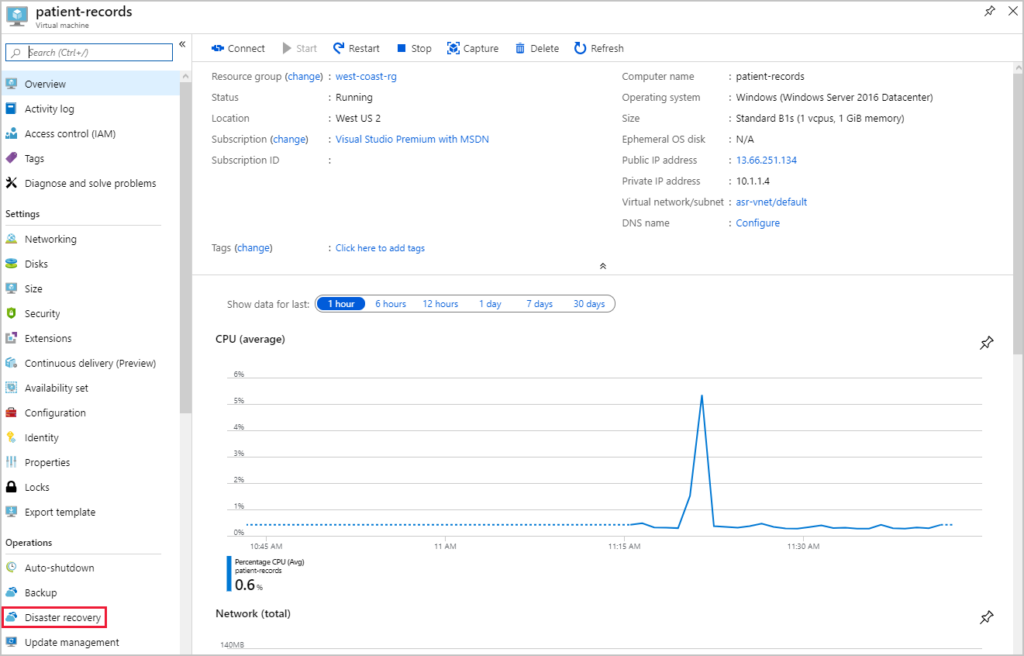
- Open the Target VM: Navigate to the virtual machine (VM) you want to test, such as a VM named “patient-records”. Filter resources by type to find virtual machines, and select the relevant VM from the list.
- Access Disaster Recovery Settings: In the resource menu, scroll to Operations and choose Disaster Recovery. A new pane called Replicated items will appear.
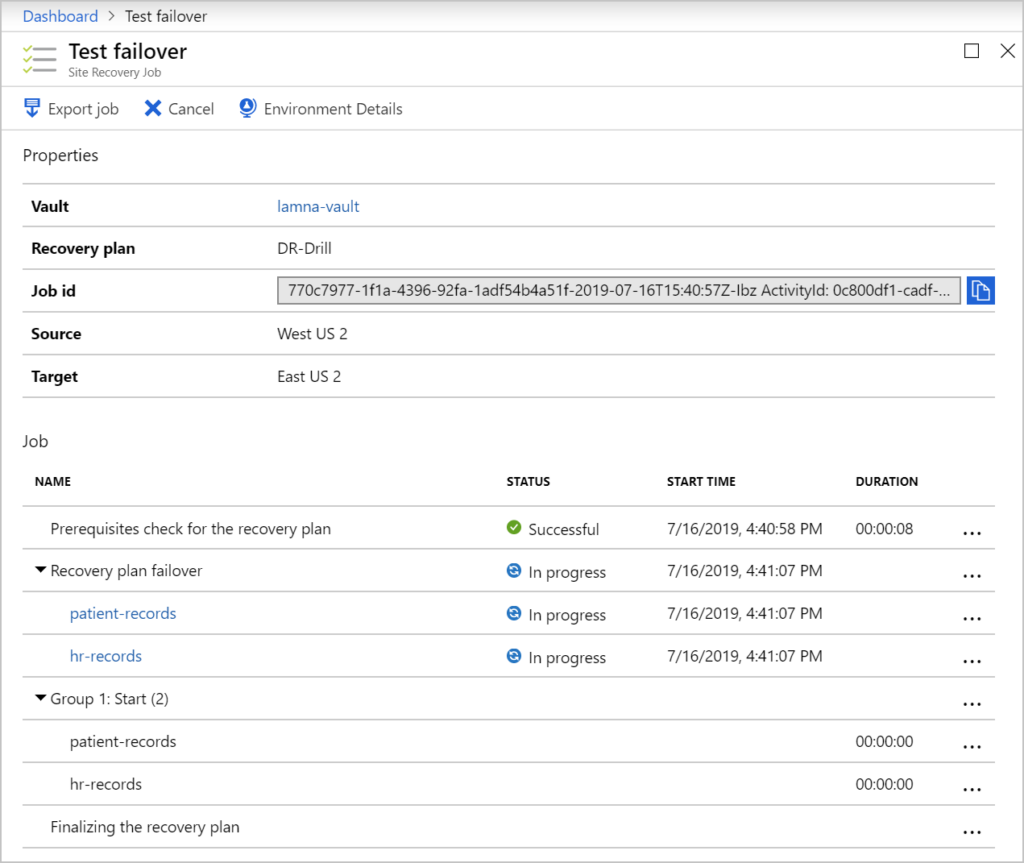
- Initiate Test Failover: Wait until the status field shows Protected, then click on Test Failover from the top menu bar. Choose your virtual network from the Azure virtual network drop-down and click Test failover.
- Validate the Test: Monitor the progress on the Site Recovery jobs page by checking the Notifications icon. Once the failover is complete, verify that the VM appears under Virtual Machines in the recovery region. Ensure the VM is running correctly, is appropriately sized, and mirrors the source VM.
- Cleanup After Testing: After validating the test, delete the replicated VM by selecting Cleanup test failover on the Disaster Recovery pane. Add notes about the test outcome and check the box for Testing is complete to finalize the cleanup. Then click OK.
Enable Flexible Failover for Multiple Machines
Azure Site Recovery allows you to perform DR tests for multiple VMs simultaneously. You can create recovery plans encompassing various VMs, enabling you to test different infrastructure combinations as needed.
Here’s how to manage these tests:
- Create a Recovery Plan: Include multiple VMs in a single recovery plan. This plan allows for flexible testing policies and scenarios.
- Run Failover Tests: Execute the failover tests as often as necessary, ensuring each VM and combination is adequately tested. Track the execution of these tests via the failover dashboard.
- Cleanup After Tests: Similar to single VM tests, clean up after completing the failover tests. Use the test cleanup option available for the entire recovery plan to ensure all components return to their original state.
By conducting these drills and tests, organizations can ensure their disaster recovery solutions are capable of handling actual disaster scenarios.
Azure Site Recovery Limitations
Azure Site Recovery is a strong disaster recovery solution for workload replication and failover, but it’s important to understand where it fits, and where it doesn’t. In practice, ASR is designed primarily for replication-based recovery, not as a full backup and recovery platform.
Because of that, there are a few important limitations to keep in mind when using the service.
Key limitations to be aware of
- No in-region disaster recovery scenarios
ASR is focused on cross-region replication and failover, which means it doesn’t address certain in-region recovery or granular recovery needs within the same environment. Given most restores are on the folder or file level, this creates a critical business continuity gap. - Replication without Point-In-Time Backups
ASR continuously replicates workloads, which is great for availability scenarios, but it doesn’t replace the need for point-in-time backups, long-term retention, or historical recovery points. - Limited protection against data corruption or ransomware spread
Because changes are continuously replicated, issues like accidental deletion or ransomware can also be replicated if not caught early enough. - Spiraling Costs due to one-size-fits-most approach to protection
In many environments, ASR ends up being applied broadly, even to non-critical workloads that may not actually require low-RPO replication. This can greatly increase cost and operational overhead. - Dependency on full environment readiness during failover
Successful recovery still depends on network configuration, application dependencies, identity services, and orchestration—all of which must be tested and maintained separately. - Complexity: Configuring networks and replicating appliances in hybrid or large-scale environments can become complicated quickly. On top of that, there’s ongoing maintenance to consider, including keeping certificates up to date and managing permissions as environments evolve.
Disaster Recovery for Azure VMs with N2W
ASR is a powerful solution when low-RPO, region-level failover is truly required, but it is not designed to be the universal protection model across an entire Azure estate.
This is where N2W complements ASR by providing a broader, more cost-aligned recovery strategy for the rest of the environment. By combining replication for Tier 0 and Tier 1 workloads with N2W’s policy-driven backup, long-term retention, immutable storage, and point-in-time recovery, customers achieve a more complete and resilient disaster recovery posture.
In practice, ASR ensures rapid failover where it matters most, while N2W ensures everything else is protected, recoverable, and optimized for cost, compliance, and cyber resilience.
N2W provides robust disaster recovery solutions for Azure virtual machines (VMs) and disks with a comprehensive, centralized console for managing backup and recovery operations across both Azure and AWS environments.
N2W provides the following key capabilities for Azure users:
- Quick setup and central monitoring: Deployment of N2W is straightforward, allowing users to set up from the Azure Marketplace within minutes. This ease of deployment is complemented by a centralized monitoring system for overseeing backup operations across different cloud environments.
- True Point-in-time backup: along with full metadata protection and immutability. This directly addresses the gaps left by replication-based DR solutions like ASR. While ASR maintains a continuously updated replica, it can also replicate corruption, ransomware, or accidental deletion across environments. N2W complements this by enabling recovery to clean, application-consistent restore points taken at frequent intervals, along with the associated metadata required to fully rebuild the environment. With immutable backup storage, these recovery points cannot be altered or deleted by malicious actors, ensuring a trusted fallback even in advanced ransomware scenarios.
- Customizable backup policies and rapid recovery: N2W allows for the automation of backups with customizable policies and retention schedules. This flexibility enables users to set backup intervals as frequently as every five minutes, ensuring that data is consistently protected. In case of a disaster, N2W facilitates near-instant, one-click recovery, significantly reducing recovery time objectives (RTO).
- Real-time alerts and comprehensive reporting: N2W includes real-time alert features that notify users about the status of their Azure backups. Additionally, the platform offers detailed, digestible reports that can be shared with executives and other stakeholders.
- File-level recovery and cross-cloud restore: N2W supports file-level recovery, allowing users to browse through multiple backup generations and restore individual files or folders as needed. The platform also offers cross-cloud restore capabilities, enabling data to be copied from AWS into Azure. This feature ensures a comprehensive disaster recovery plan that can protect data across different cloud environments.
- Multi-cloud flexibility and efficiency: Version 4.0 of N2W enhanced multi-cloud flexibility, allowing users to manage Azure and AWS resources seamlessly. This centralization reduces the complexity associated with using multiple tools for different clouds, streamlining backup management and improving overall efficiency.
- Recovery Scenarios: With N2W, you can run disaster recovery drills and send reports to team leaders automatically. You can also orchestrate a complete failover, restoring any number of resources in the order you’ve specified, in just a few clicks.