
What Is Azure Site Recovery?
Azure Site Recovery (ASR) is a service provided by Microsoft Azure to ensure business continuity by keeping applications and workloads running during outages. ASR replicates workloads running on physical and virtual machines (VMs) from a primary site to a secondary location. This enables rapid recovery in the event of a site outage at the primary location by switching over to the replicated site.
The service offers flexibility in replication and does not restrict users to the Azure cloud; it supports replication to another on-premises location, or from one Azure region to another. This allows organizations to implement disaster recovery strategies that align with their requirements for recovery time objectives (RTO) and recovery point objectives (RPO).
Editor’s note: Updated the article to reflect new features, user experience, and limitations of Azure Site Recovery as of 2026.
This is part of a series of articles about Azure disaster recovery.
In this article:
- What Is Azure Site Recovery?
- How Azure Site Recovery Works
- 12 Key Features of Azure Site Recovery
- Azure Site Recovery Pricing
- Azure Site Recovery vs Azure Backup: What Is the Difference?
- Tutorial: Setup Azure-to-Azure Disaster Recovery with ASR
How Azure Site Recovery Works
Azure Site Recovery helps organizations ensure business continuity by replicating workloads from a primary site to a secondary location, enabling rapid failover and recovery in the event of a disaster. Here’s an in-depth look at how ASR operates:
- Initial setup and configuration: To begin, organizations must set up a Recovery Services vault in Azure. This vault acts as a central repository for replication policies, storage, and the management of replicated data. Users need appropriate permissions, such as the Virtual Machine Contributor and Site Recovery Contributor roles, to configure and manage replication.
- Replication process: ASR starts by installing a replication agent on the source machines, which can be either on-premises or Azure VMs. The initial replication involves copying the entire dataset of the source machines to the target site, which could be another Azure region or an on-premises location. This process is followed by continuous replication of changes, ensuring data is consistently updated.
- Data transmission and storage: During replication, data is compressed and encrypted for secure transmission over the network. ASR uses Azure Storage for storing the replicated data, leveraging its resilience and durability features to ensure data integrity. For on-premises to Azure replication, a configuration server and process server handle data traffic, caching, and encryption.
- Failover and failback mechanisms: ASR supports various failover types, including planned failovers for maintenance and unplanned failovers during actual disasters. A planned failover ensures no data loss by synchronizing all changes before the switchover. Unplanned failovers minimize data loss by using the latest available recovery points. After resolving the primary site issues, ASR facilitates failback, replicating data back to the primary location to restore normal operations.
- Testing and monitoring: To ensure disaster recovery plans work as expected, ASR allows organizations to perform non-disruptive tests. These tests simulate failovers in an isolated environment, validating the recovery process without affecting live services. The Azure portal provides real-time monitoring and status updates, highlighting the health and any issues in the replication process.
Related content: Learn how to create an Azure disaster recovery plan
12 Key Features of Azure Site Recovery
ASR equips organizations with a set of features that help ensure business continuity and disaster recovery across various environments. Here’s a breakdown of what ASR provides:
- Azure VM replication: Enables disaster recovery of Azure VMs across primary and secondary regions or between Azure Public Multi-Access Edge Compute (MEC) zones.
- VMware VM replication: Supports replication of VMware VMs to Azure through an enhanced replication appliance, improving security and resilience.
- On-premises VM replication: Supports replication of on-premises VMs and physical servers to Azure, eliminating the need for a secondary datacenter while ensuring cost efficiency.
- Workload replication: Allows for the replication of any workload running on supported Azure VMs, on-premises Hyper-V and VMware VMs, as well as Windows/Linux physical servers.
- Data resilience: Orchestrates replication without intercepting application data. In case of failover, Azure creates VMs based on replicated data stored in resilient Azure storage. This applies to both MEC-to-Azure region scenarios and within MEC zones (currently in preview).
- RTO and RPO targets: Aims to meet organizational limits for recovery time objectives and recovery point objectives, offering continuous replication for VMware and Azure VMs with low latency.
- Consistency over failover: Supports application-consistent snapshots that capture all disk data, in-memory data, and ongoing transactions for reliable recovery.
- Testing without disruption: Enables DR drills without impacting ongoing replication efforts, ensuring preparedness without downtime.
- Flexible failovers: Supports planned failovers for anticipated outages with no data loss or unplanned failovers with minimal data loss depending on the scenario. Enables easy failback once the primary site is restored.
- Customized recovery plans: Offers tailored recovery plans that sequence multi-tier applications’ failover/recovery processes running on multiple VMs. Includes options for adding scripts/manual actions integrated with Azure Automation runbooks.
- BCDR integration and automation integration: Integrates with other BCDR technologies like SQL Server Always On for backend protection. Also offers a library of Azure Automation scripts tailored to specific applications.
- Network integration and shared disk feature (preview): Ensures efficient network management through integration with Azure services like IP address reservation, load-balancers configuration, alongside support for shared disks enabling WSFC workloads continuity during disasters.
What’s New In Azure Site Recovery? New Features and Updates
Here are some recent improvements and innovations to the Azure Site Recovery solution:
- Support for Premium SSD v2 disks. This enables replication of VMs using newer disk types while maintaining cost efficiency and low-impact failover. It extends ASR’s ability to handle modern, high-performance workloads across Azure regions and from on-premises environments.
- Shared disk support for Azure VMs. This feature allows protection of workloads running on Windows Server Failover Clusters (WSFC). It supports up to four nodes per cluster and multiple shared disks, making it suitable for applications like SQL Failover Cluster Instances, SAP ASCS, and scale-out file servers. It also supports high churn workloads and PowerShell-based management.
- Expanded support for Trusted Launch virtual machines. Support for Windows-based Trusted Launch VMs is available, while Linux support is currently in preview. These VMs use security features like Secure Boot and virtual TPM to strengthen protection at the compute level.
- Integration with Azure Monitor. ASR now provides built-in alerts for issues such as replication health problems, failover failures, and agent expiration. These alerts can be routed through multiple channels like email, SMS, webhooks, or ITSM systems, and managed centrally alongside other Azure services.
- Replication for newly added VMware VM disks. This allows you to extend protection to additional disks without reconfiguring the entire VM replication setup, which simplifies ongoing management.

Azure Site Recovery Pricing
Azure Site Recovery service charges are based on the number of instances protected:
- In the first 31 days, all instances receive free protection.
- After the initial free period:
- ASR to customer-owned sites costs $16 per month for each instance protected.
- For ASR to Azure, the rate is $25 per month per instance protected.
- Replication: The same pricing structure applies to replication between Azure regions.
To illustrate, if an organization protects 10 instances for half a month and then reduces this number to 5 instances for the remaining half, the average daily protected instances count would be 7.5 for that month. If the organization protects these instances using ASR to Azure after the free period, the cost would be approximately $187.50 monthly (7.5 instances at $25 each).
Azure Site Recovery vs Azure Backup: What Is the Difference?
Azure Site Recovery is intended for maintaining business continuity, enabling organizations to replicate and failover virtual machines and workloads to a secondary location, ensuring minimal downtime in case of site outages. It focuses on ensuring operational availability through continuous replication and automated failover processes.
Azure Backup provides a secure, cloud-based solution for protecting data against loss and corruption. It supports a range of backup scenarios including files, folders, VMs, and applications with configurable retention policies for long-term data preservation.
While ASR ensures that operations can swiftly resume after an incident, Azure Backup protects data integrity by allowing recovery from specific points in time.
Tutorial: Setup Azure-to-Azure Disaster Recovery with ASR
This tutorial shows how to perform Azure-to-Azure disaster recovery. It is adapted from the official Azure Site Recovery documentation.
Prerequisites
Before starting the setup for disaster recovery using Azure Site Recovery (ASR), ensure the following prerequisites are met:
- Supported regions: Verify that the regions involved in the disaster recovery plan are supported by ASR.
- Azure VMs: Ensure you have one or more Azure VMs, and check that both Windows and Linux VMs are supported for replication.
- Compute, storage, and networking requirements: Review and confirm the VM compute, storage, and networking specifications.
- VM encryption: This tutorial assumes VMs are not encrypted. For encrypted VMs, refer to specific guidelines provided in Azure documentation.
Ensure the Right Azure Settings
Check the permissions and settings in the target region where the VMs will be replicated:
- Ensure your Azure account has the necessary permissions to create a Recovery Services vault and VMs in the target region.
- If you are the account admin, no additional actions are needed. Otherwise, coordinate with the admin to obtain the required permissions.
- Specific roles needed include Application Owner and Application Developer for enabling replication, and Site Recovery Contributor for managing operations.
- Confirm that your subscription has sufficient resources in the target region to create VMs that match the sizes of the source region VMs.
Prepare VMs
To ensure the VMs are properly prepared for the replication process:
- VMs should have outbound network connectivity to communicate with Azure services and write data to the cache storage account.
- Set the network configuration to allow access to necessary URLs if using a URL-based firewall proxy.
- Create service-tag based NSG rules to allow HTTPS outbound traffic on port 443 for essential service tags like Storage, Microsoft Entra ID, EventsHub, AzureSiteRecovery, and GuestAndHybridManagement.
- Ensure the VM can communicate with the Azure Instance Metadata Service (IMDS) for security purposes, bypassing IP 169.254.169.254 if using proxies.
- Provide the necessary root certificates:
- For Windows VMs: Install the latest Windows updates to ensure all trusted root certificates are present.
- For Linux VMs: Follow your Linux distributor’s guidance to update trusted root certificates and the certificate revocation list (CRL).
Create an Azure Recovery Services Vault
To set up a vault in ASR:
- Access the Azure portal and search for Recovery Services vaults.
- Click on Add to start the process of creating a vault.
- Select the subscription, resource group, and provide a name for the vault.
- Choose the region for the vault, ensuring it is different from the source region.
- Select appropriate Redundancy (Geo-redundant or Local-redundant)
- Select appropriate Encryption (use Microsoft managed or Customer managed key)
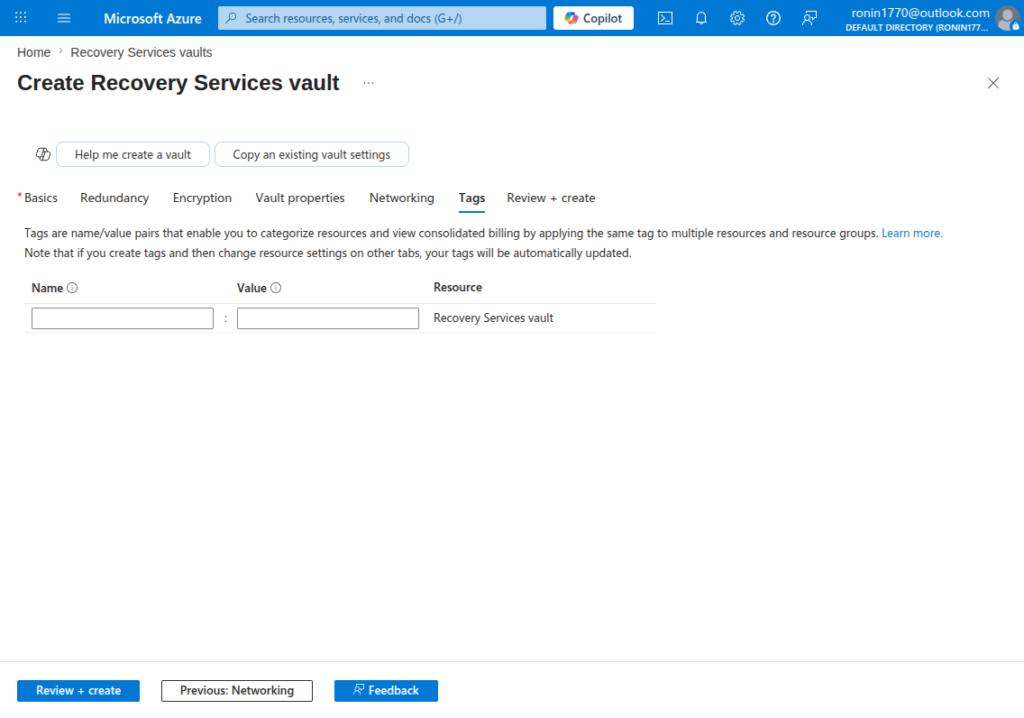
- Select vault property: ‘Enable Immutability’
- Confirm the network access or connectivity method: Allow public access from all network or Deny public access and allow private access
- Add appropriate Tags as needed.
- Review and create the vault, then pin it to the dashboard for easy access.
- Once the vault is created, navigate to the vault settings and enable Site Recovery.
Source: Azure
Enable VM Replication
To configure the replication settings for the VMs:
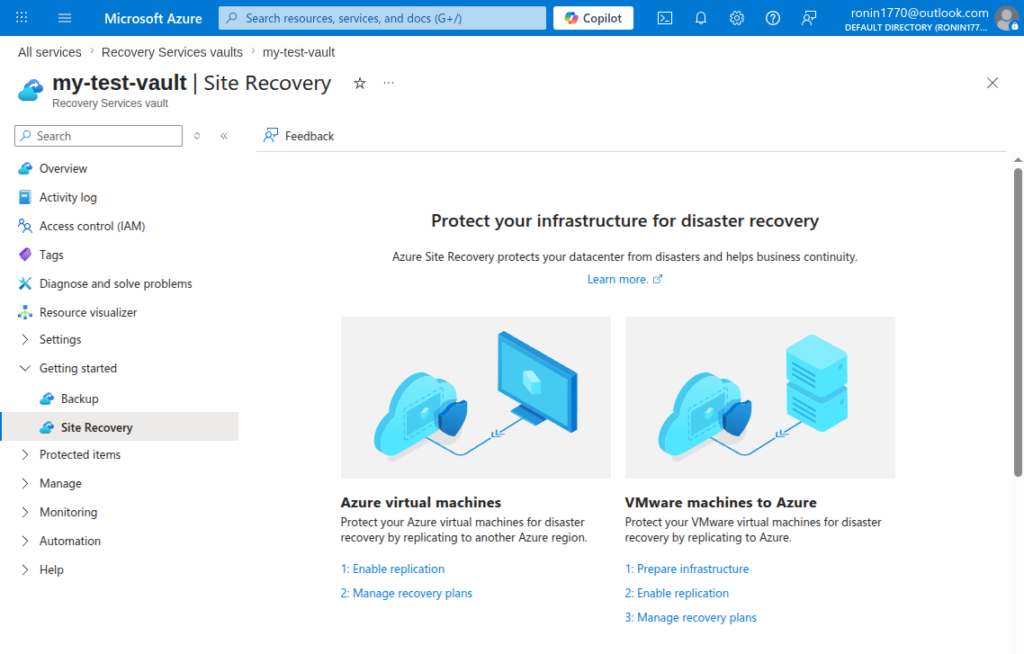
- On the Recovery Services vaults, select the vault you have just created.
- From the left hand side menu, expand ‘Getting Started’ menu item and you will see ‘Site Recovery’. Upon selection, the main window content will be updated and you will see a link for ‘Enable Replication’. Please click on it and you will redirect to the subsequent page.
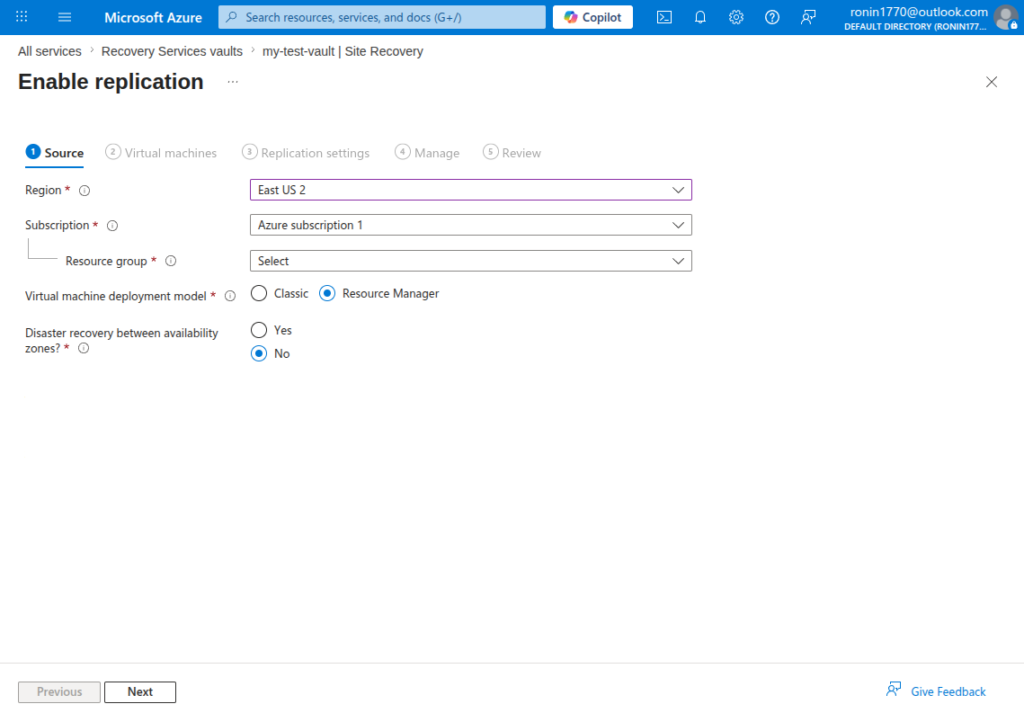
- Specify the source region, subscription, and resource group containing the VMs to be replicated.
- Keep the default Resource Manager setting for the VM deployment model.
- Choose the VMs you wish to replicate, up to a maximum of 10 VMs.
- Review the replication settings. Default settings are typically sufficient for most scenarios.
- Optionally, choose the High Churn setting for VMs with high data change rates, which uses Premium Block Blob storage.
- To manage settings, define the replication policy, including recovery point retention and snapshot frequency.
- Create a replication group if needed for multi-VM consistency.
- Review the settings and enable replication. The selected VMs will appear in the Replicated items page of the vault.
Azure Site Recovery Limitations and Pitfalls to Watch Out For
While Azure Site Recovery (ASR) is a powerful disaster recovery platform, it is important to understand that it is primarily a replication and failover solution rather than a complete backup and recovery platform. It comes with several limitations that organizations should understand before implementation. These constraints can impact architecture decisions, cost, and overall feasibility of certain workloads.
Key limitations include:
- No in-region disaster recovery: ASR does not support failover within the same Azure region—replication must occur between different regions.
- Limited resource mobility during replication: Moving VMs, storage, or networking resources (e.g., across resource groups) is not supported while replication is enabled. Replication must be disabled and reconfigured after such changes.
- Not a full backup or point-in-time recovery solution: ASR focuses on replication and failover, not long-term retention or granular point-in-time recovery like Azure Backup. Because the service is designed around continuous replication, corruption, accidental deletions, malware, or ransomware can be replicated to the recovery site along with production data. This means you are potentially left without an older, clean backup to failover to.
- Cost management: Organizations replicate every virtual machine rather than limiting protection to mission-critical workloads. Since ASR pricing includes protected instance charges, replicated storage, storage transactions, network usage, and disaster recovery testing costs, over-replication can significantly increase expenses without delivering proportional business value. In many environments, only Tier 0 and Tier 1 applications truly require low-RPO replication, while lower-priority workloads may be better served by backup-based recovery strategies.
- Low Recovery Point Objectives (RPOs) do not automatically translate into low Recovery Time Objectives (RTOs). During a failover event, organizations must still account for application dependencies, network configuration, DNS updates, identity services, validation testing, and recovery orchestration. As a result, achieving rapid business recovery often requires substantial planning beyond simply enabling replication.
- Performance constraints based on data churn: Replication performance depends on data change rates (churn). High-churn workloads may exceed supported limits unless premium storage is used.
- Bandwidth and infrastructure dependencies: Initial replication and ongoing synchronization can require significant network bandwidth, especially for large environments.
- Unsupported or restricted scenarios: Certain configurations/resources are not supported, such as:
- Some VM types (e.g., Azure Dedicated Host)
- Specific disk or workload configurations depending on the support matrix
- Disk and storage limitations: There are limits on disk sizes and configurations depending on the replication scenario (e.g., constraints on managed disk sizes or number of disks per VM).
- Operational complexity: Setting up ASR can be complex, requiring:
- Network configuration
- Replication appliances (for on-prem scenarios)
- Certificates, permissions, and ongoing maintenance
- Dependency on supported OS and versions: Only specific operating systems, hypervisors, and versions are supported, requiring alignment with Microsoft’s support matrix.
- Failover networking considerations: Network reconfiguration may be required during failover (e.g., IP changes or subnet failover), which can impact application behavior.
Disaster Recovery for Azure VMs with N2W
In the context of Azure Site Recovery, N2W is often used to address the gaps that appear when replication is treated as a complete disaster recovery strategy as it provides point-in-time recovery, ransomware rollback, and cost-optimized protection for lower-tier and both short and long-term workloads. N2W ensures your replication procedures aren’t treated as a complete disaster recovery strategy and simplifies any-tier protection with a comprehensive, centralized console for managing backup and recovery operations across both Azure and AWS environments.
N2W provides the following key capabilities for Azure users:
- Quick setup and central monitoring: Deployment of N2W is straightforward, allowing users to set up from the Azure Marketplace within minutes. This ease of deployment is complemented by a centralized monitoring system for overseeing backup operations across different cloud environments.
- Complete ransomware protection with immutable backups, flexible point-in-time recovery to any restore point, and long-term retention for compliance and flexible RPO requirements.
- Customizable backup policies and rapid recovery: N2W allows for the automation of backups with customizable policies and retention schedules. This flexibility enables users to set backup intervals as frequently as every 60 seconds, ensuring that data is consistently protected. In case of a disaster, N2W facilitates near-instant, one-click recovery, significantly reducing recovery time objectives (RTO).
- Real-time alerts and comprehensive reporting: N2W includes real-time alert features that notify users about the status of their Azure backups. Additionally, the platform offers detailed, digestible reports that can be shared with executives and other stakeholders.
- File-level recovery and cross-cloud restore: N2W supports file-level recovery, allowing users to browse through multiple backup generations and restore individual files or folders as needed. The platform also offers cross-cloud restore capabilities, enabling data to be copied from AWS into Azure. This feature ensures a comprehensive disaster recovery plan that can protect data across different cloud environments.
- Multi-cloud flexibility and efficiency: N2W enhanced multi-cloud flexibility, allowing users to manage Azure and AWS resources seamlessly. This centralization reduces the complexity associated with using multiple tools for different clouds, streamlining backup management and improving overall efficiency.
- Recovery Scenarios: With N2W, you can run disaster recovery drills and send reports to team leaders automatically. You can also orchestrate a complete failover, restoring any number of resources in the order you’ve specified, in just a few clicks.