One of the many reasons why an organization would migrate to using AWS is to reduce the hardware overhead of managing an on-premises data center. What we all discovered when we moved to the cloud, however, was that we spend an inordinate amount of time managing the virtual hardware of EC2 instances, management servers, VPC’s, clusters, and many of the other Amazon services.

It’s not that we had removed the need for this kind of management, we simply displaced it to the cloud. To call ourselves true cloud natives, we need to abandon the idea of server-based infrastructure and embrace the concept of containerization and serverless application deployments in the cloud. This will allow us to focus on our applications and functional code, rather than fretting over whether or not our environment’s underlying hardware can scale. This is where AWS Fargate comes in. AWS Fargate is a new Amazon service which is stacked on top of their Elastic Container Service (ECS) and Elastic Kubernetes Service (EKS). The advantage of using AWS Fargate is that you don’t have to worry about provisioning and scaling because the logic is already built in by the Amazon service. Using AWS Fargate, you can avoid setting up management servers and EC2 clusters, vastly reducing the amount of operational overhead required. In addition, you’ll save a pretty penny on your monthly bill because the only processing power and memory you’ll be using is application specific – as opposed to having to run underlying operating systems, bulky security software, and more. I’ll show you how to deploy your container without having to provision any other AWS server or management resources, all from the AWS Management Console.
AWS Fargate Object Hierarchy
One of the key concepts to understand when working with AWS Fargate is the hierarchy of ECS objects. The top-level object is an ECS cluster. Although clustering is optional while using AWS Fargate (because Amazon is kind enough to provide you with a “default” cluster), the ECS cluster can be created with the “Fargate” launch type, which will allow it to work with AWS Fargate containers and remove the requirement to have management infrastructure. One level down from the Cluster is the ECS Service. This level manages the number of tasks running. It can also be configured for application load balancing as well as auto-scaling, removing the need for any additional container management services. The next layer is the AWS ECS Task definition. This layer defines what containers are used for what purpose, as well as networking, startup settings, and more. Finally, the last level is the Container. This is the smallest building block of our Fargate service we create, and in the container is where we specify individual container settings, resources, and lifecycle. In Fargate’s “first run wizard”, we get started building the AWS Fargate deployment from the ground up, starting with containers and working our way up to the Cluster level. Setting up AWS Fargate with the first run wizard is doubly beneficial because it will walk us through creation of any additional AWS components our environment currently does not have.
Prerequisites
In order to get started, you’ll need to have completed the following steps.
- Have an AWS Account
- Set your AWS Region to one where Fargate is available (currently only Northern Virginia, Ohio, Oregon, and Ireland)
Setting up ECS from the AWS Management Console
The first step for setting up AWS Fargate is to make sure that we have a properly configured ECS environment. In this step, we want to make sure of the following:
- You have created an IAM user
- You have created a Security Group with the appropriate ECS permissions
ECS First Run Wizard
The next step to getting started with AWS Fargate is to run the ECS First Run Wizard provided by Amazon. This is the fastest way to get up and running with the appropriate containers, roles, and user permissions. If you want to follow along, sign into your AWS account and run the AWS ECS First Run Wizard. This link is for the “us-east-2” (Ohio) region, so if you need to change regions to where you have any additional infrastructure set up, do so before proceeding.
Container Definition
The first task in the ECS First Run Wizard is to create our container. Since this is a fresh environment, and because image creation is out of scope for this document, we’ll select the “nginx” pre-built image.
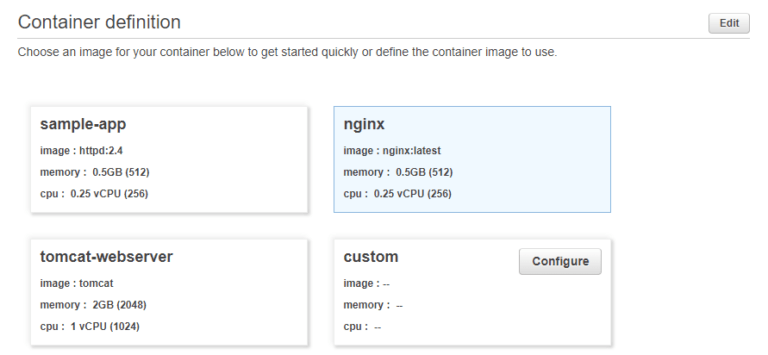
If you’re looking to create a container based on your own image, however, you can specify the custom image by clicking “edit” and specifying the image settings and any additional custom configuration you’d like, such as environment variables, port mappings, logging, and more.
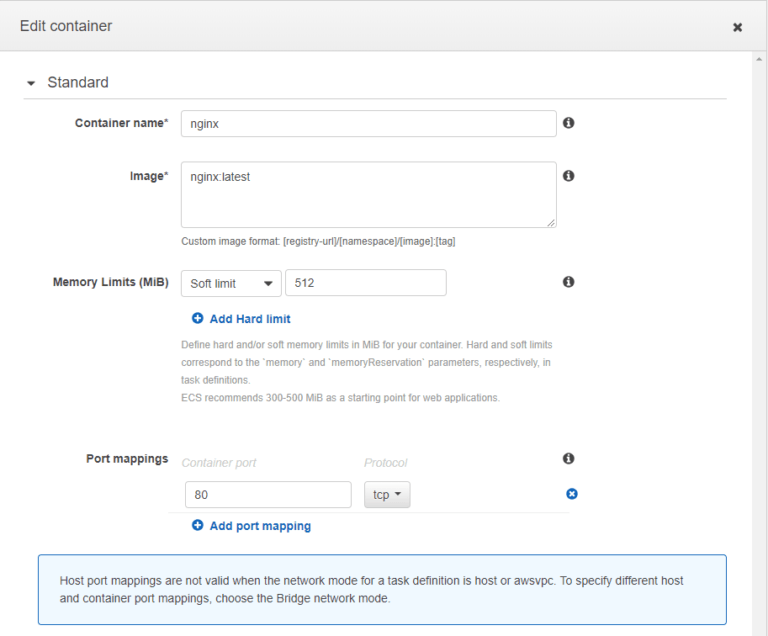
container setting specification
Task Definition
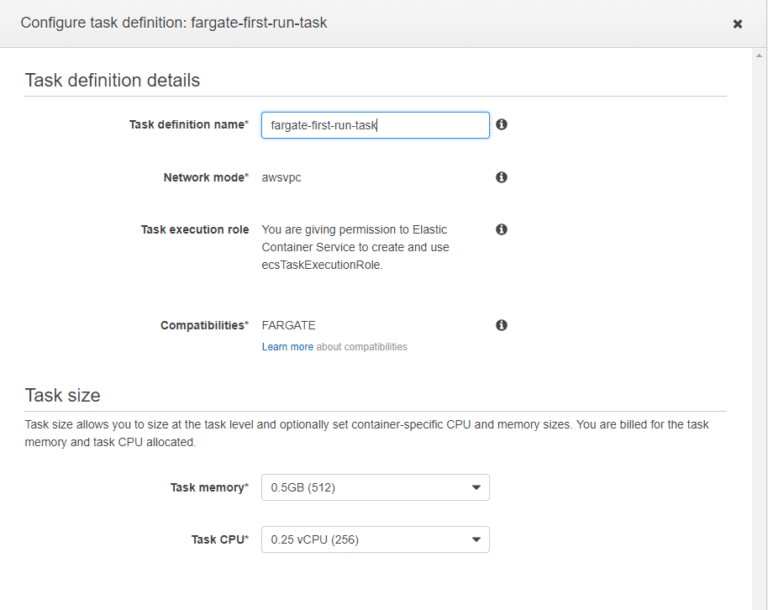
For the task definition, we specify what happens to the containers when called. We’ll call our task the “fargate-first-run-task” and we can also specify the task’s memory and processor settings. Click “edit” next to the Task Definition subheading to specify the Task settings
Configure Service
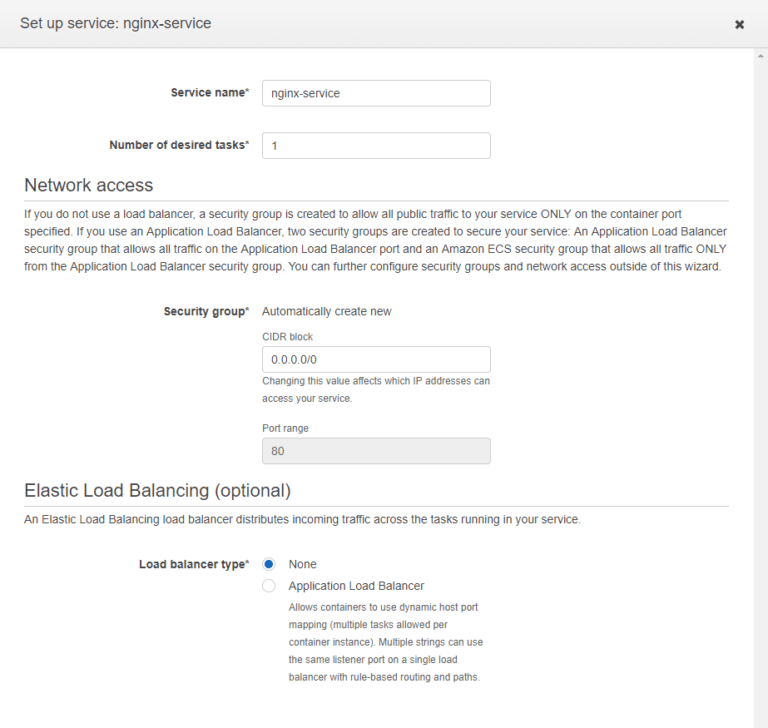
As we get to the higher level services, the settings we specify will handle the orchestration of our containers. In this step, you can specify your target number of tasks to run at the same time, the security group and IP range, as well as whether or not you’ll use an application load balancer. Once you have determined what you need for your service, click “Save” to create your Service.
Configure Cluster
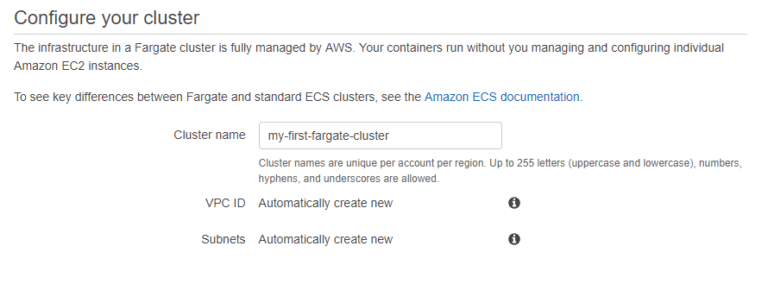
Lastly, we’ll configure our highest level service, our AWS Fargate cluster. It will automatically create any necessary VPC’s and Subnets for you. If you’d like, since every AWS account comes with a “default” cluster, you can leave the cluster name as is. I’m going to rename my cluster, since I’d like to keep the cluster created in this walkthrough separate from other clusters. Once named, we can click “Next” to reach the last step of our first run before clicking “Create”.
task configuration options After we click “Create” we can watch our services spin up.
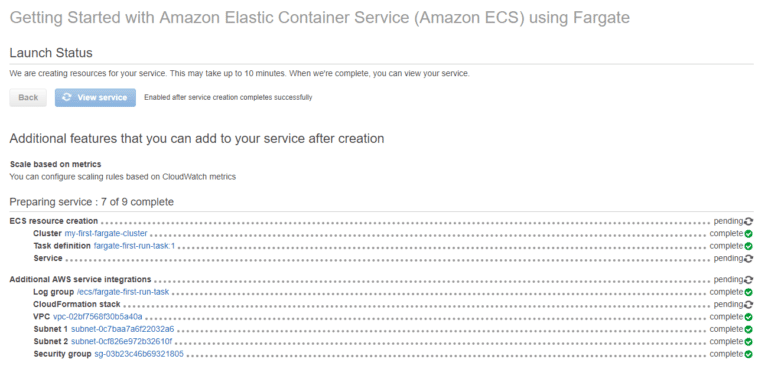
You’ll notice that there are a lot of references to ECS while the services are spinning up, but because we selected the “Fargate” launch type, these services are indeed running on Fargate. There you have it! You’ve configured and ran your very first Fargate container. To monitor the number of running services, you can enter the AWS Elastic Container Service in the Management Console, and view each cluster individually.
Viewing your Fargate deployment
In the AWS Mangement console, under the Elastic Container Service menu, you can select the “Task Defintions” sub-menu in order to view the task that you just created.

Task Definition Menu By selecting your task, you can review all the information about the task that you created. You can see the task size, any required attributes, and you can even view the JSON configuration for the task, if you wanted to copy it and use it for additional configurations via the command line later on. Lastly, in this view, we can see any actions that we can take with our newly created task.
Running a task
In order to run a task, there are several different methods we can use, but for our purpose, we will click “Actions” in the ECS Task Definition submenu, then click “Run Task”.
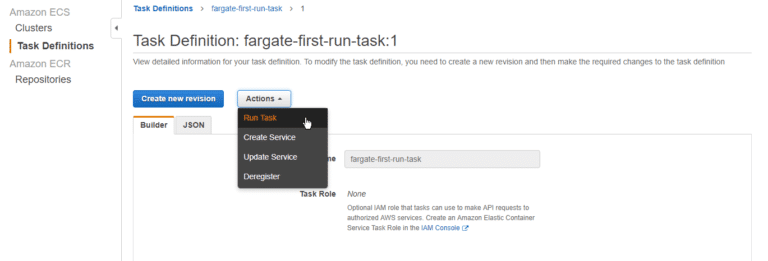
Running a task From here, we will configure the launch options for our task. For “Launch Type” we will select “FARGATE”. Our task definition will be prepopulated by the defaults from AWS. We will go on to select the platform version, number of tasks, an optional “Task Group”, and the VPC settings.
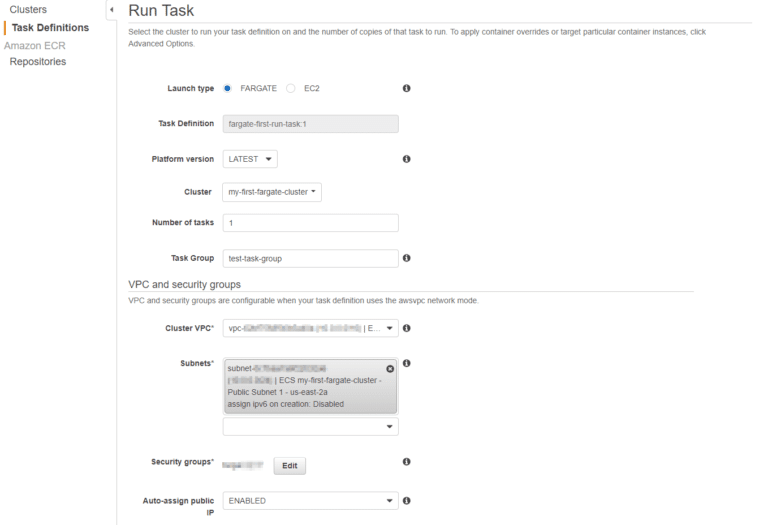
task configuration options Additionally, under the advanced options in this section, you can choose to override the IAM and task execution roles, in case you needed to have different role permissions running the specified task. Once you click “Run Task” you’ll be taken back to the ECS Cluster menu, where you will now be able to view your running task. In order to manually stop your task, you can click the task in the tasks menu, and select the “Stop” button. It’s as easy as that!
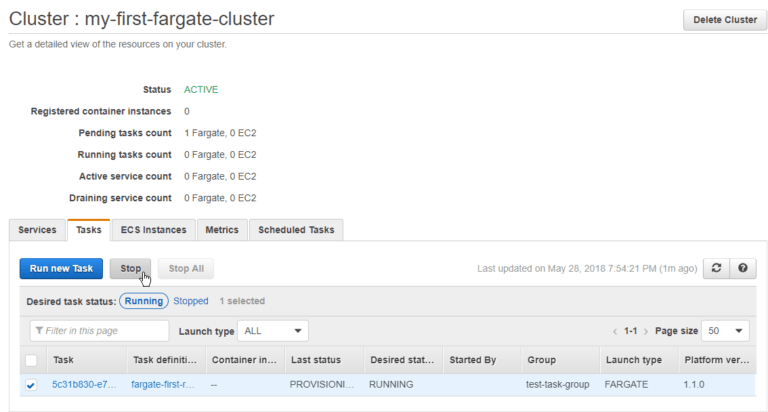
stopping a running task manually
Additional Methods for Launching Tasks
Once we have our Fargate tasks up and running, and we know how to launch them manually, the next step is to figure out how to launch them automatically, and remove manual operations from the process. There are a couple of options for launching your task with automations.
- Scheduled task. You can set this up via the ECS Clusters menu, by creating the schedule and selecting your Fargate task as the target. There are a few steps to setting this up, like setting a fixed interval or using a cron expression for the scheduling, and then specifying the task settings. Overall it’s a fairly simple way to run your task if you have predictable inputs and outputs.
- Lambda calls. Additionally, you can create specific lambda functions to launch your Fargate tasks. You can create these to work with your applications by taking the input data, spinning up a container to process it on the fly, then spinning it down – all seamlessly and without blinking at scale.
As Fargate becomes more widely adopted, it has been Amazon’s habit to add additional options for creating, configuring, and automating the service. Imagine what you could do with the ability to launch Fargate tasks based on an event rule from CloudWatch logs. When we consider the “cattle not pets” mentality of DevOps, the possibilities become endless as more launch options become available to us.
Simplify using Fargate, the future of containerization
By using AWS Fargate to launch your containers, you can save the operational overhead of complicated EC2 infrastructure. I’d implore you to analyze your AWS bill once you have adopted Fargate to view the savings to your bottom line, as well. AWS Fargate is the future of serverless containerization in the cloud. The simplicity of launching tasks for specific purposes unleash an organizations ability to automate their infrastructure in the cloud with ease. This has just been an introduction to the AWS Fargate service. If you wanted to take this one step further, by using the AWS CLI or a PowerShell script, we could easily create additional AWS Fargate clusters for many more purposes. The closer your environment gets to being a truly cloud-native, serverless, container-based infrastructure, the more valuable you will find Fargate to be.

Declan is a Channel & Alliance rep for N2WS. When he's not helping customers optimize their cloud environments and writing easy-to-understand technical content, you can find him spending time on the golf course, improving his game.