
In our previous article, we demonstrated how to back up your highly-available WordPress site using the backup feature of N2WS Backup & Recovery. In this article, we discuss how to back up a highly-available WordPress site using N2WS’ cross-account functionality. Cross-account and cross-region functionality help schedule automated backups across accounts and regions using a combination of AWS tags and N2WS’ DR module, which includes backup and recovery options.
Security-wise, this feature reduces risks like deletion of resources in a production account due to compromised AWS credentials. It also allows you to recover resources—including Amazon EC2 instances, Amazon EBS volumes, and Amazon RDS databases—to a different AWS account. In addition, you can back up encrypted Amazon EBS and Amazon RDS volumes and snapshots from your account to different accounts or regions using the same functionality.
Let’s continue with the scenario from the previous article: a WordPress blog in need of a backup. In this case, we will set up and use cross-account backup in order to complete an automated backup of the WordPress site. If there are security concerns, it will take less time to shift the site to another account because there is no downtime.
Start backing up your Wordpress site with these steps:
- Set up WordPress on an Amazon EC2 instance using AWS CloudFormation.
- Add your AWS account to N2WS using an access key and secret key or an IAM role.
- Subscribe to our Advanced Edition or Enterprise Edition.
- Make sure you have two (2) AWS accounts associated with N2WS.
Now you are ready to set up cross-account and cross-region backup and recovery. To do this, follow the instructions below.
Step 1: Create a Schedule
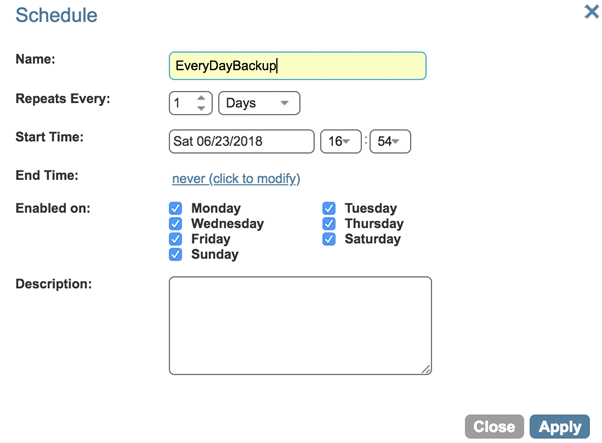
Using the schedule lets you define when a backup policy should be executed. To create a schedule, first log in to N2WS Backup & Recovery. Then navigate to the Schedule tab and click “New Schedule.” Now create a schedule.
Step 2: Create a Backup Policy
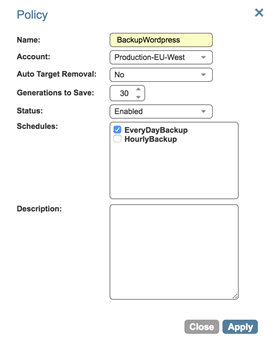
Your backup policy is important because it is where you define the rules for when, where, and how you want to conduct backups. To create a new policy, navigate to the Policies tab and click “New Policy.” Then create a simple backup policy.
Step 3: Create or Add Tags to AWS Resources
Before you can back up your highly available WordPress site via N2WS, tag your AWS resources so that the backup policy will be associated with those resources. This can be done using AWS tags. Here we will add tags to WordPress stack resources:
- Add tag key as : “cpm backup”
- Add tag value as : “BackupWordpress”
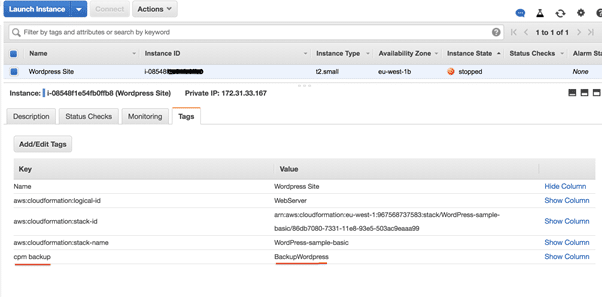
Note: The value should be the name of the backup policy you want to associate with this EC2 instance. The backup policy name should not have any spaces.
Step 4: Select Resources to Perform DR
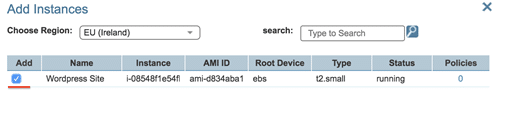
Choose the resources you want to include in DR. In this case, we will select the WordPress instance as the backup target for this backup policy. Go to the Policies section and select “Backup Targets” in the BackupWordpress policy. Select the WordPress instance as the backup target. Select the instance you want to associate with the backup policy. Select the volume you want to back up. Choose the volume and click “apply.” Once you have added the instance to the backup policy, you can proceed to configure DR for the same instance. Note: You can add many AWS resources, including Amazon EBS volumes, Amazon RDS databases, Amazon Aurora DB clusters, Amazon Redshift clusters, and Amazon DynamoDB—using a single policy.
Step 5: Configure DR
The N2WS Enterprise Edition provides automated ways to back up your instances and volumes to a different AWS account or to another region in the same account.
Cross-Account Backup
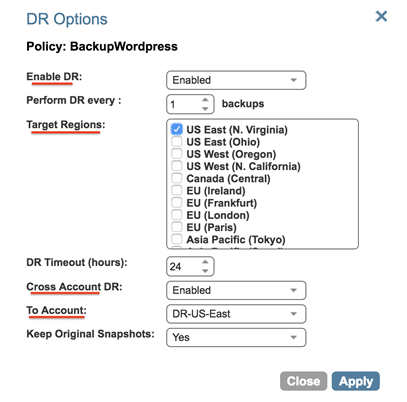
To configure cross-account backup, navigate to “BackupWordpress” under the Policies tab. Next, configure DR. You can select the account and region where you want to store the backup.
Cross-Region Backup
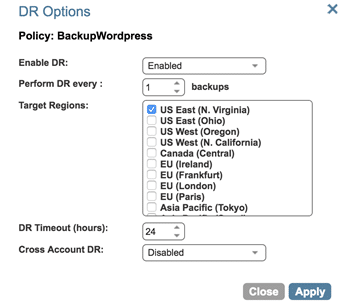
The cross-region backup follows the same basic configuration as above, but here you don’t need to provide the “To Account” name. After you apply all the configurations, the cross-account and cross-region backup policies will begin to execute according to the schedule.
Step 6: Verify Backups of your WordPress website
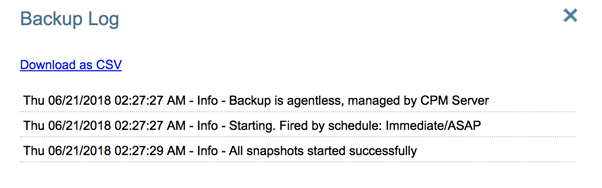
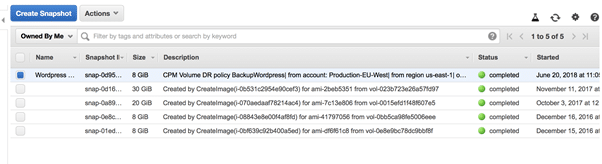
To verify the configurations, you can manually trigger the backup. To safely do this, first navigate to the Policies tab and click “run ASAP.” Now navigate to the Home tab to monitor progress. The Status field should display “Backup Successful.” Once the backup is successful, you can confirm the results by checking your AWS account under “EC2 > snapshots.” If the backup fails, you can use logs to determine the problem.
Step 7: Performing Cross-Account and Cross-Region Recovery
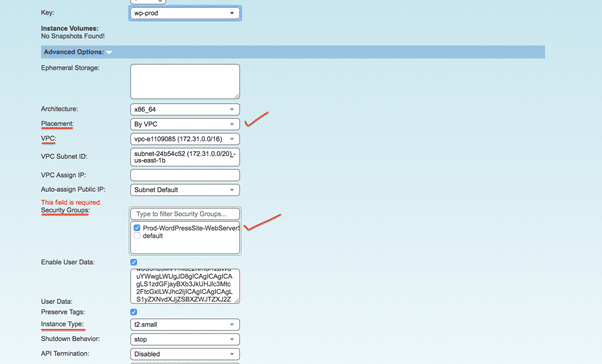
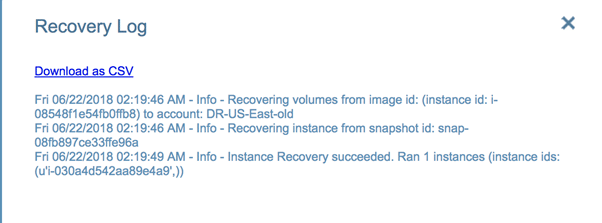
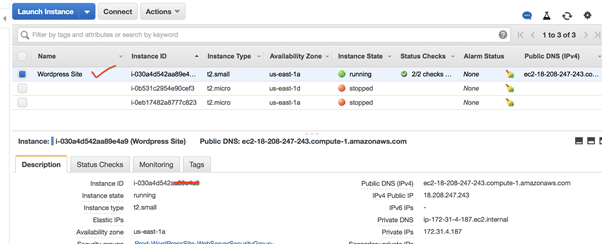
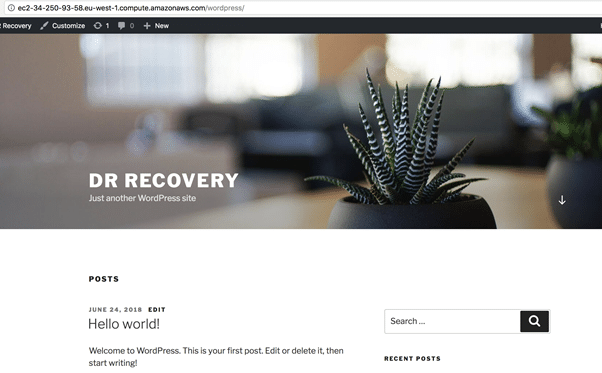
Now that your backup policy is complete, let’s review how N2WS allows you to recover a successfully executed backup to any other account or region. First, click on “Recover” to initiate backup recovery. Then select the recovery destination. For cross-account recovery, select “different account” from the dropdown menu. Make sure to also select the region you want to import the backup from. For cross-region recovery, choose the same account and region to copy the backup. Now recover your instance. On the Instance Recovery screen, verify the details and extend the “Advanced Options” dropdown menu. Under “Advanced Options,” it is required to fill in “Placement,” “VPC,” and “Security Groups” details. Once you do this, select “recover instance.” Monitor the progress from your dashboard and check your AWS account. Notice that N2W has copied a snapshot to the other AWS account and launched an instance automatically. You can now confirm that your site is backed up by referring to the URL.
Conclusion
N2WS Backup & Recovery helps effectively manage storage of AWS resources and backups. Cross-account functionality supports a configuration that uses a separate account to store snapshot data, so you don’t have to compromise security. In addition, you’re able to limit the effects of risks—like accidental deletion of resources and compromised AWS accounts or credentials—to a specific region or account. It’s worth noting that copying snapshots to other accounts will copy the entire volume every time, resulting in minor additional costs. Backups should be configured according to business needs. With N2WS, you can also back up resources that are encrypted, such as Amazon RDS databases, Amazon Aurora DB clusters, and Amazon EBS volumes. Using N2WS, these resources can be automatically backed up to another AWS account when the encryption key is shared between accounts. These features add business value, helping users simplify the way they manage storage options and backups among multiple AWS accounts.