
Running a company’s technical infrastructure often necessitates making changes in response to the shifting requirements of the industry. Thankfully, with the introduction of cloud computing, adapting your infrastructure has never been easier. These days, you can quickly add or remove resources as conditions dictate.
Historically, businesses’ storage capacity needs have fluctuated, and responding to these ever-changing needs has required regular attention. In the past, altering storage capacity typically meant expanding it—a tedious and time-consuming process. Recently, however, the use of EBS Volumes and its Elastic Volumes feature has made increasing capacity much easier.
This article will first examine AWS EBS volumes in general before looking at the processes involved with how to resize EBS volumes them for both Linux and Windows use cases.

AWS EBS Volumes: The Backbone of EC2
Amazon Elastic Block Store (EBS) provides a block storage solution designed for the EC2 instance. EBS is built for high durability as well as high availability (HA), which is ensured by the replication of data in various Availability Zones (AZs). EBS offers multiple volume types in order to fulfill various workload needs, from log processing to high-performance applications.
EBS can be easily backed up using Snapshots, which can later be used to restore data if needed. With encryption protecting your data in transit and at rest, EBS is a secure storage option for your cloud environment.
Resizing EBS: How to Grow a Volume
In the past, growing EBS volumes was a complex task that required multiple steps within Amazon, such as creating snapshots of your volumes and recreating new, larger volumes based on them. Alternatively, you could provision new volumes, along with creating partitions and file systems and copying data to them. This process was not a true volume resizing so much as a workaround that offloaded your data to larger capacity volumes. Thankfully, this process was replaced by a much more efficient one with the introduction of Elastic Volumes on AWS.
AWS EBS Elastic Volumes
EBS’ Elastic Volumes feature allows you to increase volume size while the volume is still in use, making the resizing process a lot easier and faster. Elastic Volumes also provides the option to completely change the volume type and adjust its performance—also without downtime.
Now, instead of provisioning new volumes to respond to a spike in demand or to adjust to a new workload need, you can simply modify the existing AWS EBS volume from the web console or the API. This means that you can go from general purpose (gp2) volumes to iops optimized (io1) volumes or throughput optimized (st1) volumes with just a few clicks, making storage management issues a thing of the past.
Before expanding the size of your EBS volume, it is a good idea to back up your data with an EBS snapshot. This way, if anything goes wrong, you can always restore the volume.
Resize EBS Volumes with Linux EC2 Instances
Say your company is running a production environment on an EC2 instance—perhaps a small application that doesn’t require many resources.

Since this application uses little storage, a small, 20GB general purpose AWS EBS volume has been employed.

As your business needs grow, you will likely need to add more AWS resources, making it necessary to grow your EBS volume to support more data. Needless to say, you would prefer to do this without any downtime. Let’s take a look at the steps you need to take to do this.
First, go to your volume and choose “Modify Volume” under “Actions.”
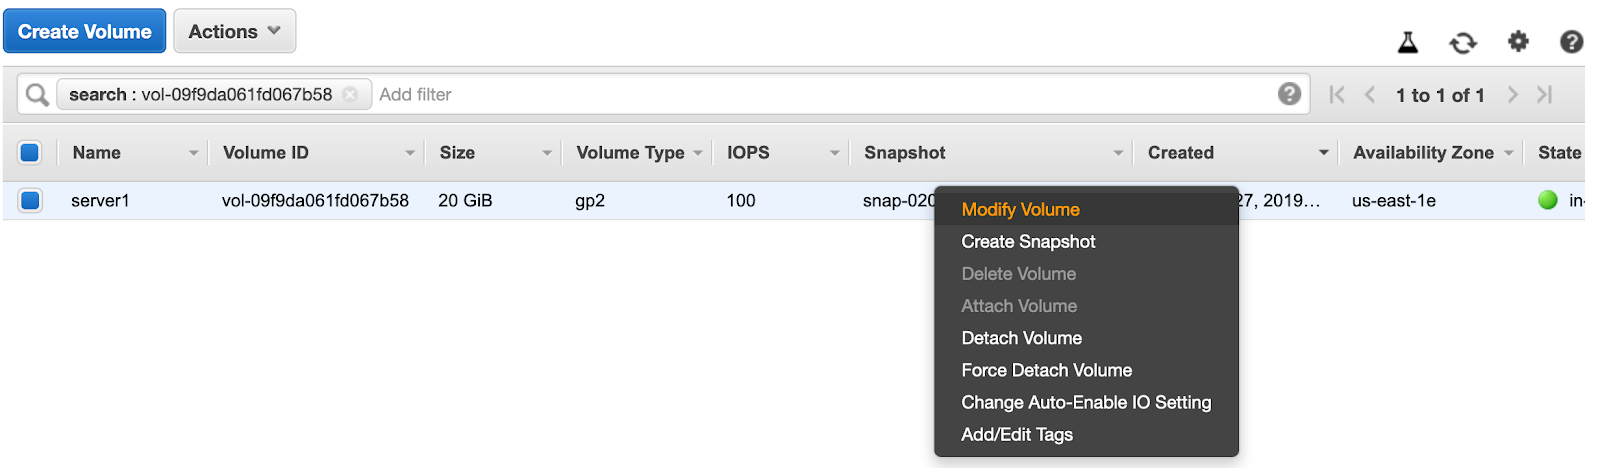
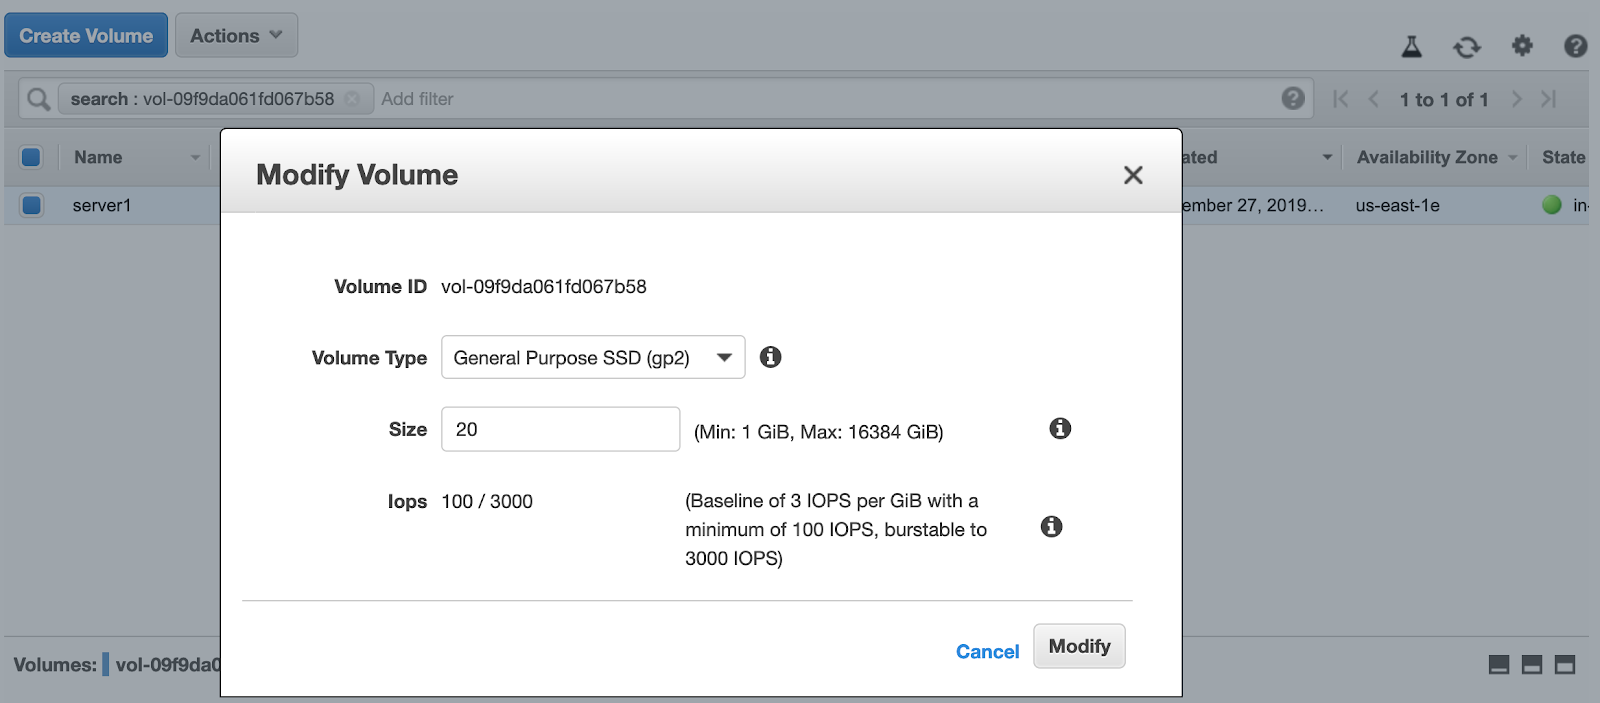
You are then given the option to change both the disk size and the volume type.
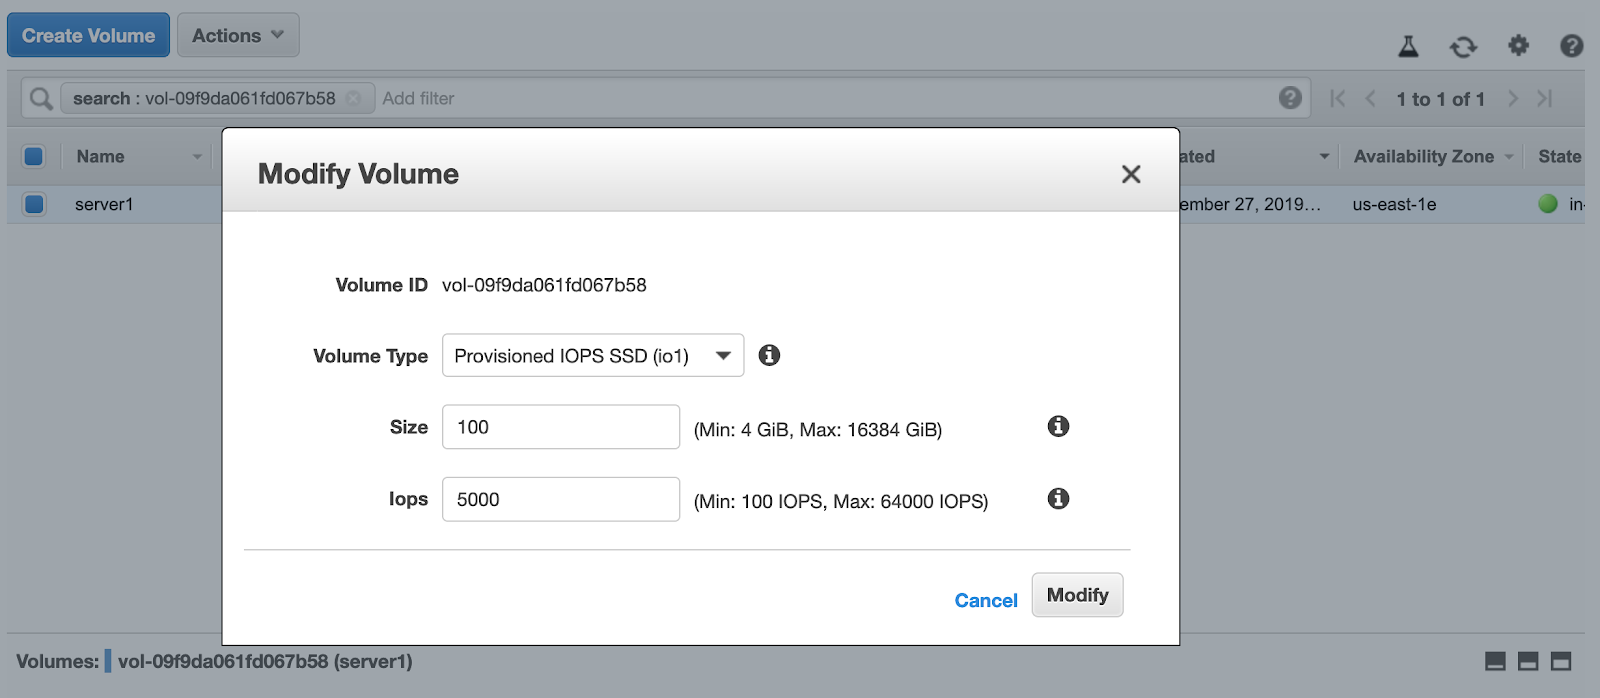
You can also switch to Provisioned IOPS SSD (io1), increase the size to 100GB, and have the IOPS set to 5000 if your requirements necessitate this step.
Remember that if you are resizing your root volume, you won’t be offered the option to change to Throughput Optimized HDD (st1) or Cold HDD (sc1).
Starting the EBS resizing process
In this example, we’ll extend the volume to 30GB and retain the volume type. To do this, adjust the values and start the resizing process by clicking on “Modify.” The volume will now begin the optimization process, which you can follow on the console.

The time it takes to optimize the volume depends on the volume’s size. In this case, the process took 7-8 minutes. After it was over, the volume state color turned green again, showing that the resizing was finalized.

After the volume has been extended, the EC2 instance and the system both need to be adjusted to adapt to the new size. Note that you can do this adjustment either as a root or a user with sudo privileges.
The first step in this process is checking the partition size with the code:
lsblk
The screenshot above shows that the volume has been extended; however, the primary partition is still at the volume’s original size. To expand the partition, use the command shown below. After you do so, you will see that the partition has grown to match the volume size.
growpart /dev/xvda 1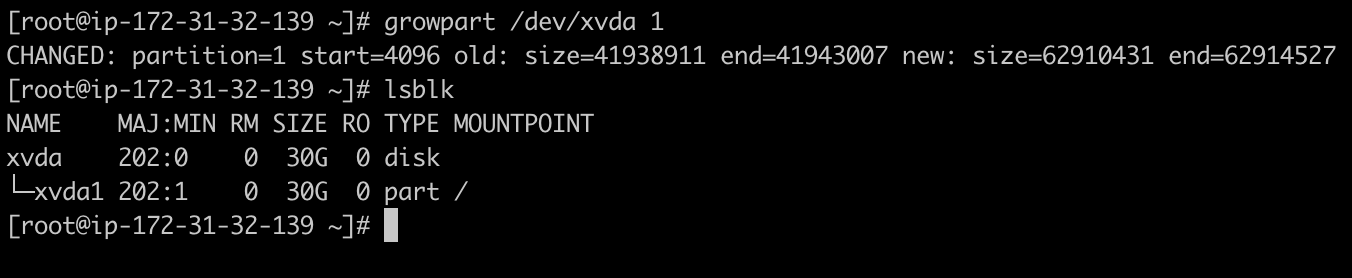
Note that, in the example screenshot above, there is a space between “/dev/xvda” and “1.” “1” refers to the partition number.
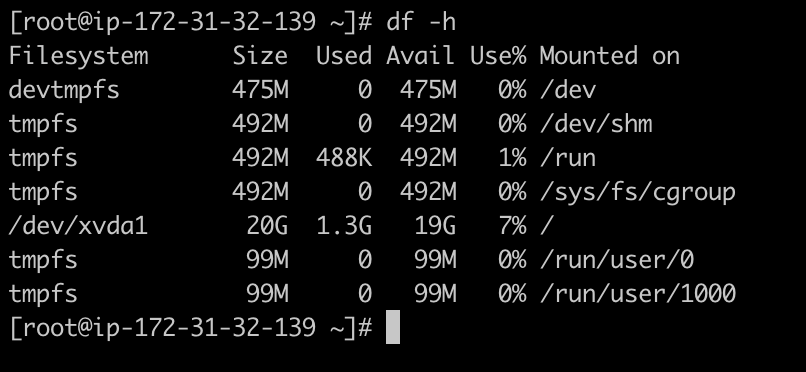
Checking the file system size
Use the code below to check the file system size.
df -hIn the screenshot below, you will notice that it is still only registering 20GB, even though both the volume and partition have been resized.
Before you start this process, make sure you know which file system you are working with. If you don’t already know, you can find out using the following command:
file -s /dev/xvd*
If you were using an ext4 (or even older ext2 or ext3) file system, you could extend it using the command.
resize2fs /dev/xvda1In our case, since the file system is XFS, we have to rely on the “xfs_growfs” tool, which should already be in the system. If not, you can install it yourself as part of the “xfsprogs” package.
Using this, we can proceed to extend the file system to match the volume and the partition size of 30GB. We will target the “/”, since that is where “/dev/xvda1” has been mounted.
xfs_growf -d /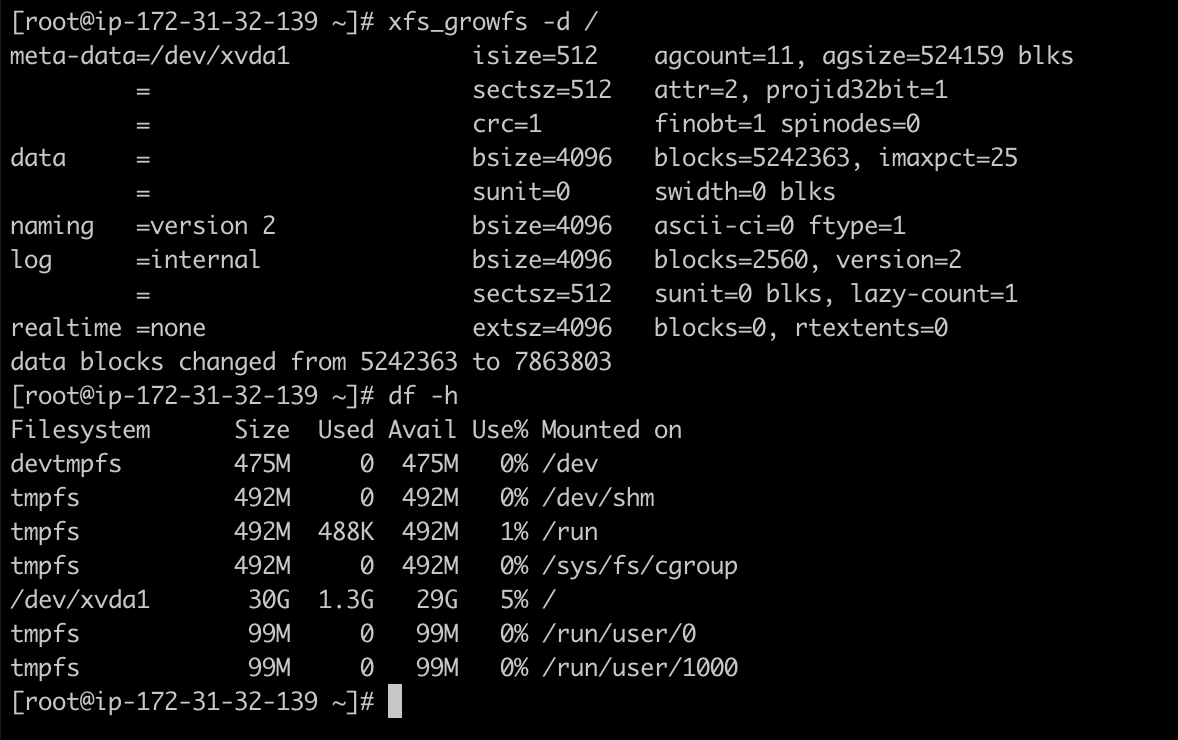
The volume is now fully resized and ready to be used. No downtime resulted from this process.
You can also extend the partition and file system size after you have already grown the volume on the AWS side by simply rebooting your instance. When the operating system comes back up, it will modify everything itself.
This will, of course, cause a small amount of downtime, but for smaller companies who don’t have dedicated DevOps engineers (or other people with Linux experience) on hand, this might be a good option.
EBS volume sizes and configurations still have some constraints (for example, their maximum volume size is 16TiB), due to the physics and arithmetic of block data storage. Additionally, AWS imposes their own limits. Make sure you visit the AWS documentation page for full details.

Resize EBS Volumes with Windows EC2 Instances
To increase the size of volumes for Windows instances, start by modifying the volumes’ sizes and allowing the optimization process to occur, just as you would for Linux instances. After the optimization process, the volume will have increased from 30GB to 40GB, so additional steps are required.
First, log into your Windows instance, and open Disk Management. You can do this by typing in:
diskmgmt
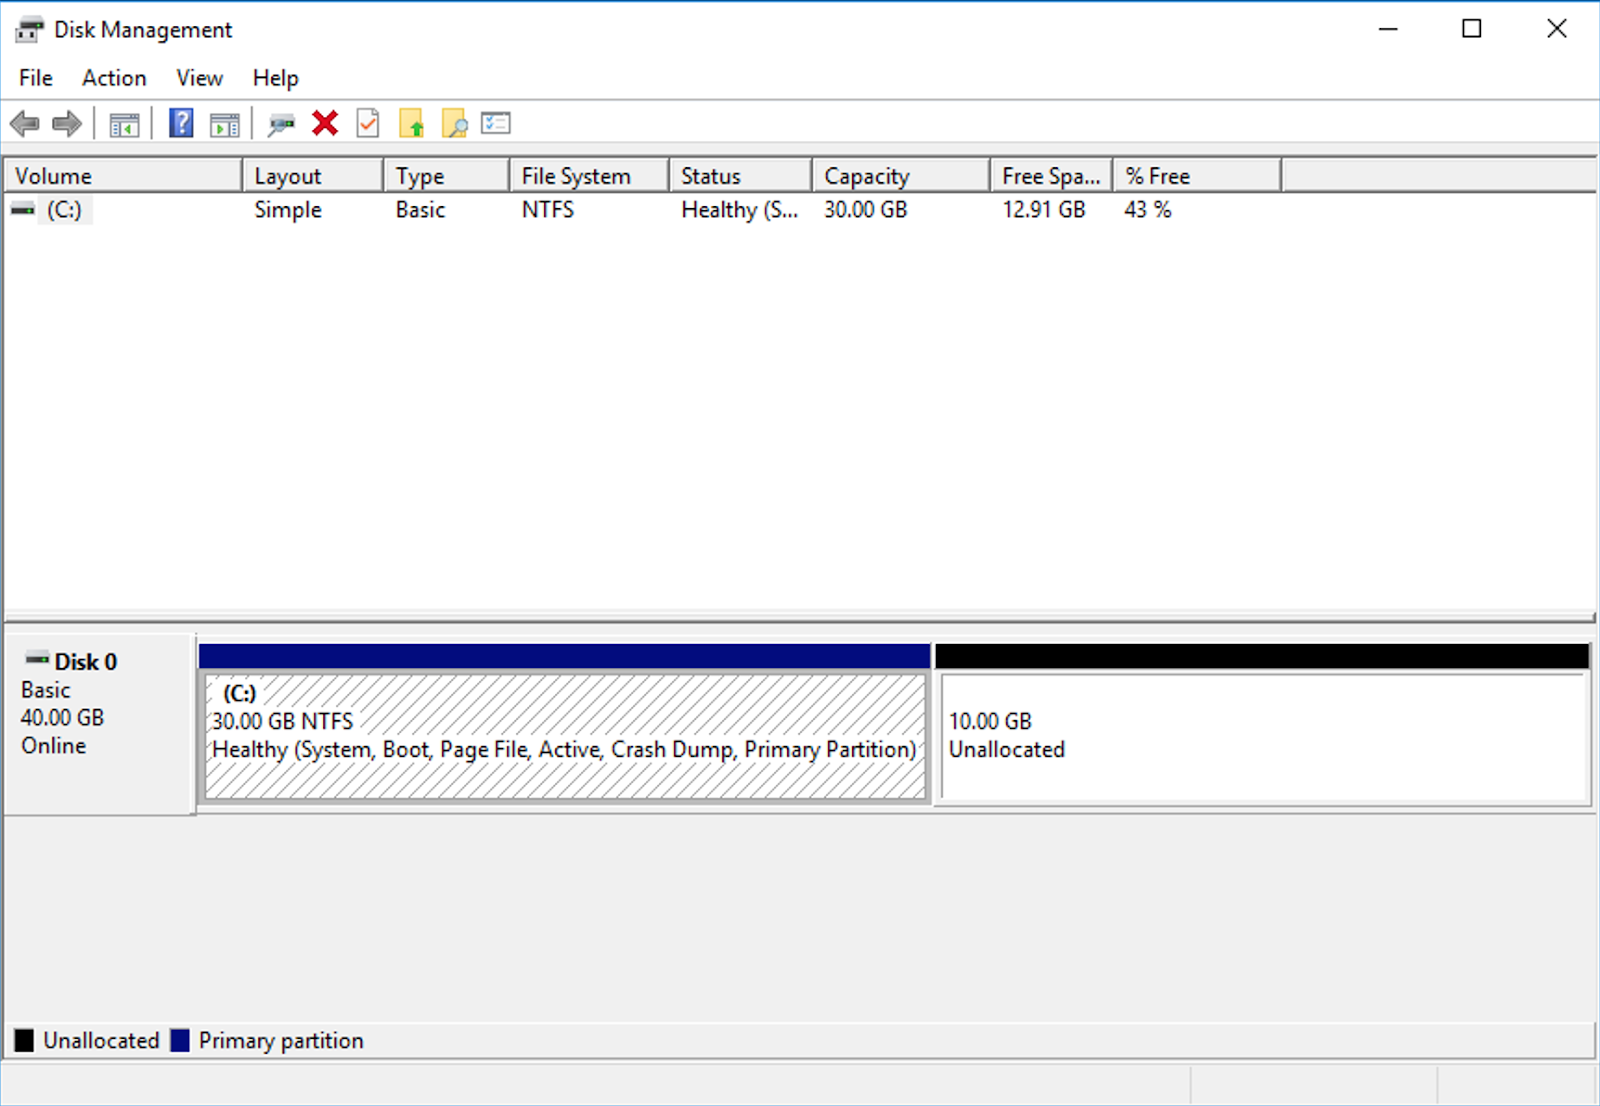
When Disk Management opens, you will notice the volume is sized at 30GB, as it was originally.

If you open “Action,” and then “Rescan Disks,” you will see an additional 10GB of unallocated space which was just added by expanding the EBS Volume.
To use the newly added space, right click on the existing volume and choose the “Extend Volume” option.
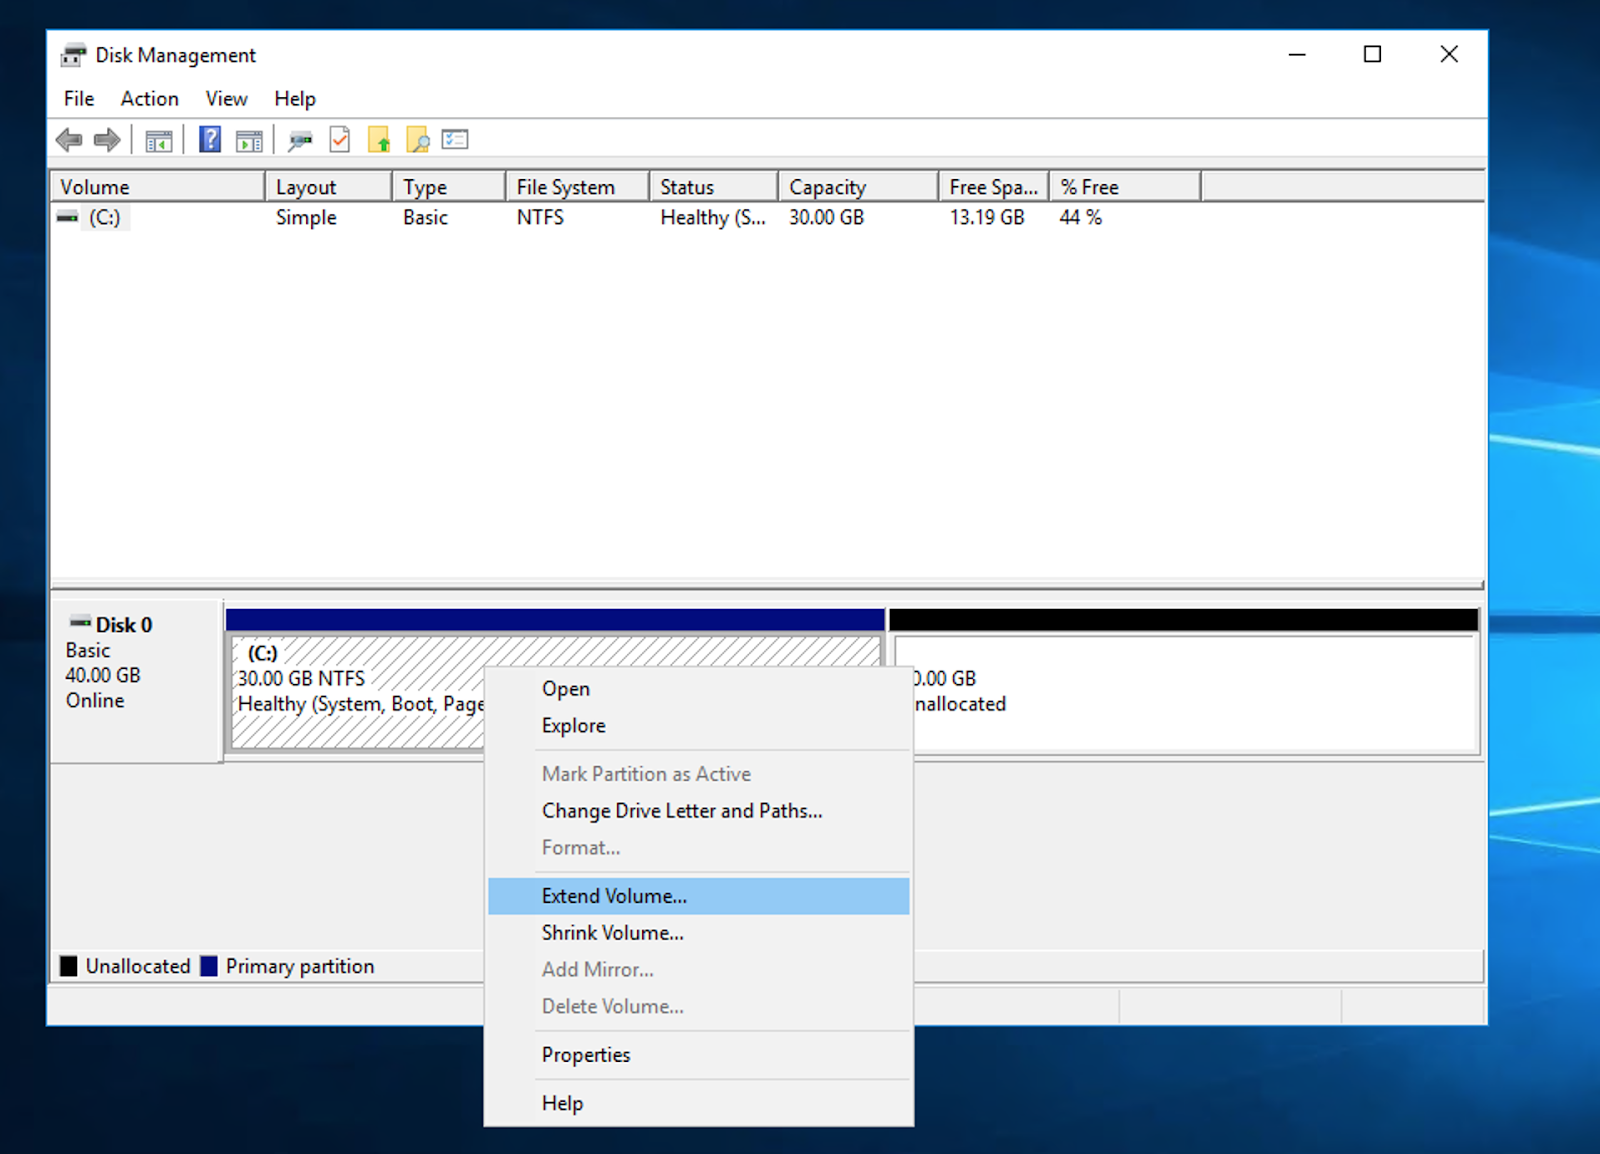
This will bring up the Wizard which will help you make changes quickly.
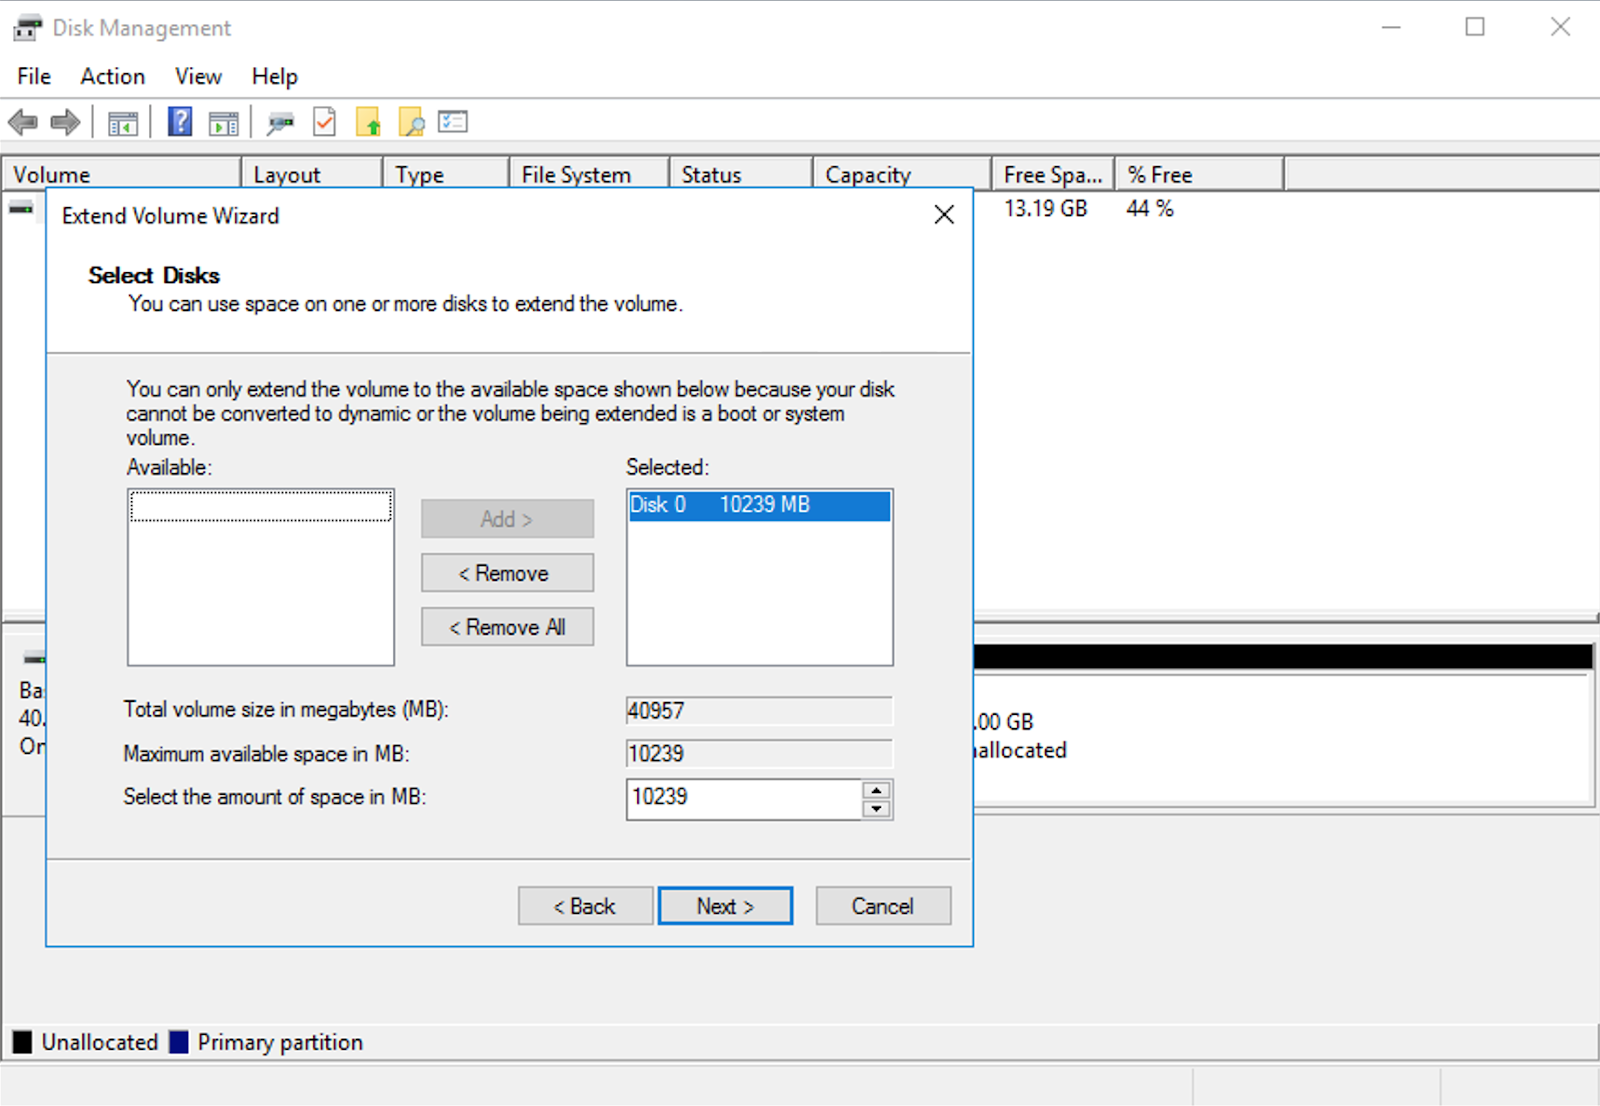
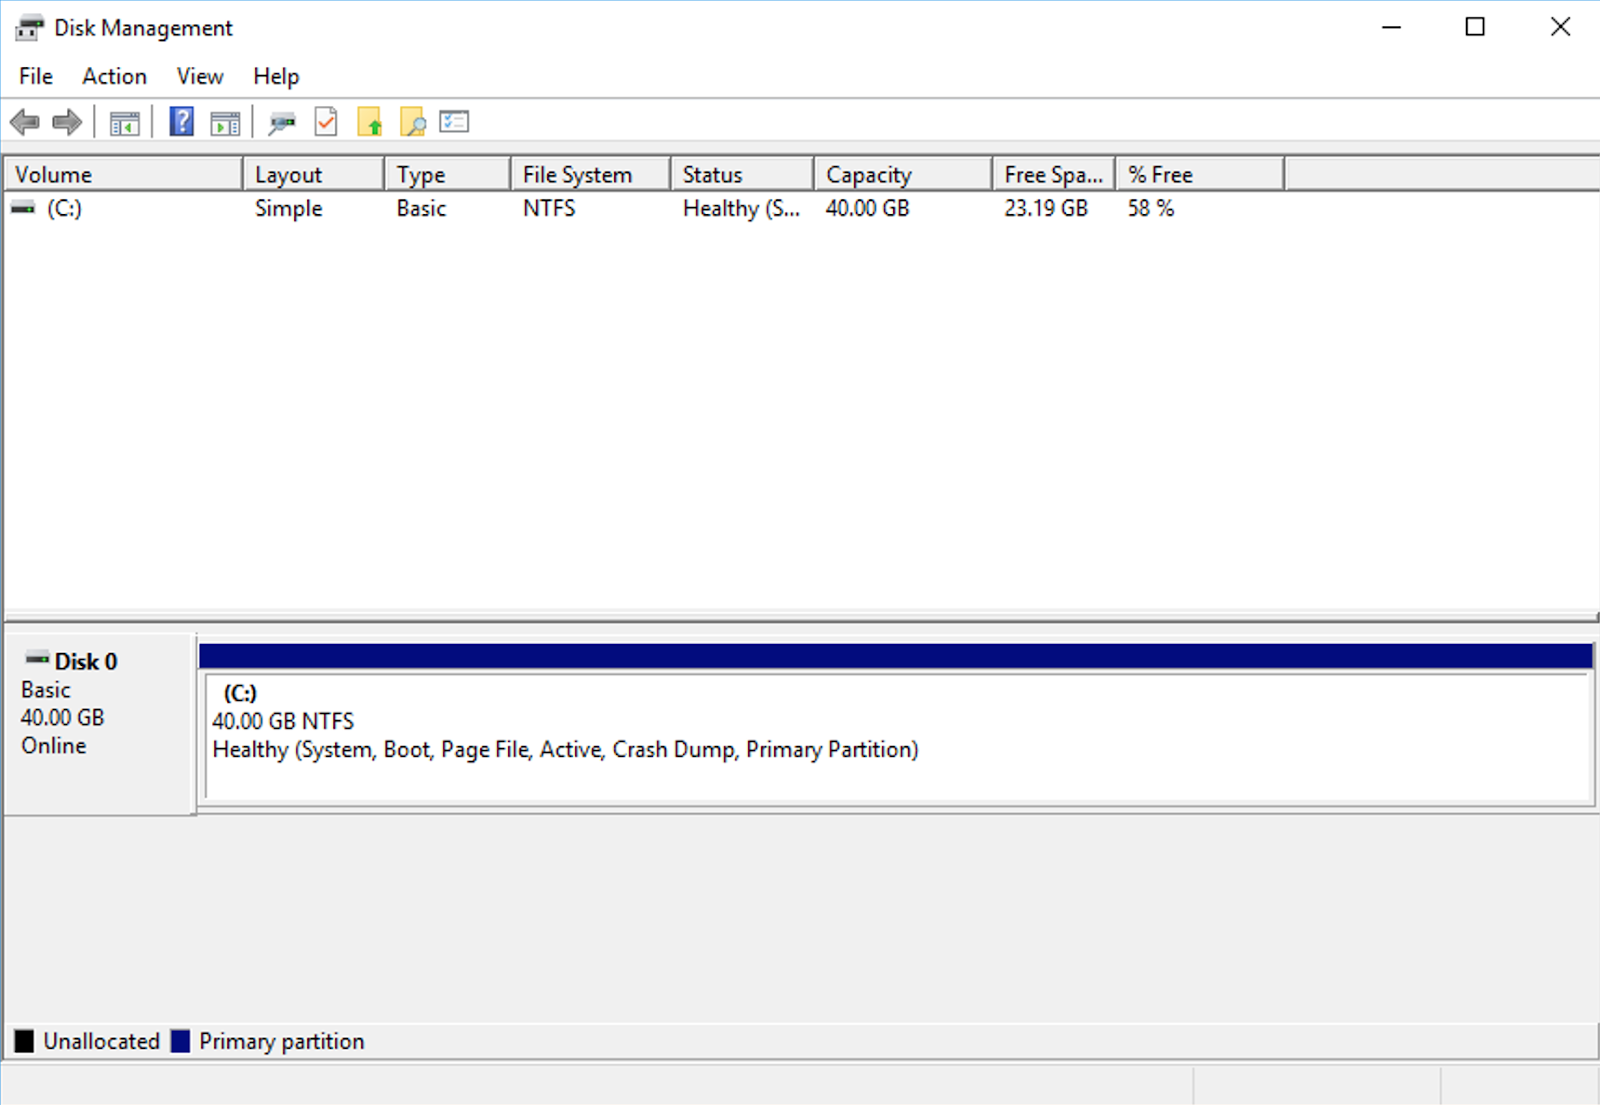
Select the desired amount of space to be added (you most likely want to add all of it, as was done here), and finish the process. When you look at the usable size now, you will see that you have successfully expanded it to 40GB.
Resizing Your EBS: How to Shrink a Volume
Unfortunately, EBS Elastic Volumes does not support volume size reduction. Shrinking a volume within Amazon will require creating a new volume, attaching it to the running instance, and copying all the data to it—tedious work. You can find a detailed description of the entire process in this article.
Resize your EBS volumes easily and quickly
EBS volumes are the AWS block storage offering you can’t live without. While working with them is simple, until recently, resizing them resulted in unnecessarily complex tasks. The introduction of Elastic Volumes has changed this completely—at least when you need to grow your volumes.
Shrinking volumes in AWS is tedious and time-consuming. Luckily, you can use N2WS to easily recover a snapshot of the volume and, in the process, change the size or even move to storage with a better throughput, for example from go2 to go3.
N2WS Backup & Disaster Recovery is an enterprise-class backup/recovery and disaster recovery solution for EC2, EBS, DynamoDB, EFS, Aurora, Redshift and RDS. It is launched as an AMI on the AWS Marketplace and uses EBS volumes and RDS databases to automatically take snapshots at regular intervals.
You can set up policies and schedule backups for various targets. Try N2WS Backup & Recovery for free for 30 days (which automatically converts to our Forever Free edition).
Click here to read the original post →
You might also like