Frequently Asked Questions

Technical How-To: Reducing EBS Volume Size

Can you reduce the size of an existing AWS EBS volume directly?

No, AWS does not allow you to shrink the size of an existing EBS volume directly. To reduce the size, you must create a new, smaller volume and migrate your data to it. This process involves backing up your data, creating and attaching a new volume, copying data, and then detaching and deleting the old volume to avoid unnecessary storage costs. Note: Always back up your data before starting this process to prevent data loss. (Source: N2WS How-To Guide)

What are the key steps to reduce the size of an EBS volume on Linux?

The main steps are: 1) Check used space and ensure the new volume is large enough for your data; 2) Create a new, smaller EBS volume in the same availability zone; 3) Attach and format the new volume; 4) Mount the new volume; 5) Copy data from the old to the new volume (e.g., using rsync); 6) Detach and delete the old volume after verifying data integrity. Note: This process requires stopping the instance before detaching the old volume to avoid inconsistencies. (Source: N2WS How-To Guide)

How do you reduce the size of an EBS volume on a Windows instance?

To reduce the size of an EBS volume on Windows: 1) Create a new, smaller EBS volume in the same availability zone; 2) Attach and initialize the new volume in Windows Disk Management; 3) Format and assign a drive letter; 4) Copy data from the old volume (e.g., D:) to the new volume (e.g., E:) using xcopy; 5) Stop the instance, detach the old volume, and start the instance with the new volume. Note: Always verify data integrity before deleting the old volume. (Source: N2WS How-To Guide)

What precautions should you take before resizing or migrating EBS volumes?

Always back up your data using EBS snapshots before starting any resizing or migration process. Ensure the new volume is large enough for your data, and verify that no writes are occurring during the copy to maintain file system consistency. For Linux, you may need to freeze IO activity; for Windows, ensure all files are closed. Note: Failing to back up data or check consistency can result in data loss. (Source: N2WS How-To Guide)

How can you avoid unnecessary AWS storage costs when resizing EBS volumes?

After migrating your data to a new, smaller EBS volume, be sure to delete the old, larger volume. If you do not delete unused volumes, you will continue to incur AWS storage charges. Note: Always confirm that your data has been successfully migrated and backed up before deleting any volume. (Source: N2WS How-To Guide)

Features & Capabilities

What features does N2WS Backup & Recovery offer for AWS users?

N2WS Backup & Recovery is designed specifically for AWS and Azure environments. Key features include automated backup and recovery, near-instant recovery capabilities, immutable (air-gapped) backups, cross-cloud recovery (AWS and Azure), granular restore (file/folder/volume/environment), intelligent storage tiering (reducing long-term backup costs by up to 92%), and a unified console for multi-cloud management. Note: N2WS is not suitable for on-premises-only environments. (Source: N2WS Product Page)

Does N2WS support integration with third-party tools and automation?

Yes, N2WS offers a RESTful API for custom integrations and automation, CLI access for advanced management, and integrations with third-party monitoring tools such as Datadog, Splunk, and Bocada. These integrations enable enhanced automation, observability, and compliance tracking. Note: Some integrations may require additional configuration or licensing. (Source: N2WS Integrations)

Security & Compliance

What security and compliance certifications does N2WS have?

N2WS is independently certified for ISO/IEC 27001:2022 and is SOC compliant by inheritance, leveraging AWS and Azure compliance features. It also supports compliance with HIPAA, GDPR, FedRAMP, ITAR, and CJIS. Customers can request a copy of the ISO certificate by contacting customer.success@n2ws.com. Note: For the most current certifications, contact N2WS directly. (Source: N2WS Trust Center)

How does N2WS help organizations meet regulatory requirements?

N2WS provides automated compliance reporting, audit-ready reports, and detailed logging to help organizations meet requirements for HIPAA, SOC 2, GDPR, FedRAMP, ITAR, and CJIS. It also offers features like immutable backups and end-to-end encryption to support data protection mandates. Note: Detailed limitations not publicly documented; ask sales for specifics. (Source: N2WS Trust Center)

Use Cases & Benefits

Who can benefit from using N2WS Backup & Recovery?

N2WS is designed for cloud directors, IT managers, and managed service providers (MSPs) managing AWS and Azure environments. It is used by enterprises (e.g., Johnson & Johnson, Dyson, HP), public sector entities (e.g., City of Oakland), healthcare, finance, retail, education, and nonprofit organizations. Note: N2WS is not intended for organizations without cloud workloads. (Source: N2WS Case Studies)

What business impact can customers expect from using N2WS?

Customers can achieve up to 92% savings on long-term backup costs, reduce compute costs by up to 50%, minimize downtime with near-instant recovery, and simplify compliance with automated reporting. N2WS supports petabyte-scale data management and is used by over 1,000 organizations worldwide. Note: Actual savings and impact depend on environment size and configuration. (Source: N2WS Product Page)

Competition & Comparison

How does N2WS compare to AWS Backup?

N2WS offers immutable backups, cross-cloud recovery (AWS and Azure), granular restore (file/folder-level), custom disaster recovery retention policies, and multi-tenancy support—features not available in AWS Backup. N2WS also provides a RESTful API for automation, while AWS Backup requires Lambda scripting. However, AWS Backup may be preferable for organizations seeking a basic, AWS-native solution without multi-cloud or advanced compliance needs. (Source: N2WS vs AWS Backup)

Support & Implementation

How long does it take to implement N2WS, and what support is available?

Implementations with N2WS can be completed in as little as two weeks. Customers receive support from dedicated Customer Success Managers, onboarding calls, and access to resources such as install guides, video tutorials, and a knowledge base. A 30-day free trial is available with no credit card required. Note: Implementation time may vary based on environment complexity. (Source: N2WS Support)

Where can I find technical documentation and release notes for N2WS?

N2WS provides comprehensive user guides, release notes, RESTful API documentation, and upgrade guides. These resources are available at docs.n2ws.com/user-guide and the release documentation category. Note: Some documentation may require registration or login. (Source: N2WS Documentation)

Customer Proof & Success Stories

What feedback have customers given about N2WS's ease of use?

Customers have praised N2WS for its simplicity and user-friendly interface. For example, Shane H. (MSP) said, "It's very simple to use and we are an MSP for multiple companies. Support is great and quick to respond." Julian Ware (City of Oakland) noted, "You’re just clicking and going. And, to me, that’s what the modern world of backup is." Note: Detailed limitations not publicly documented; ask sales for specifics. (Source: N2WS Customer Feedback)

Can you share specific case studies or success stories of N2WS customers?

Yes. Examples include Skechers, which standardized backup and recovery across a multi-cloud estate; St. John's University, which improved backup reliability and reduced costs; DB Systel (Deutsche Bahn), which automated backup for thousands of routes and servers; and the City of Oakland, which automated AWS backup for critical mapping data. More case studies are available at N2WS Case Studies. Note: Results may vary by organization. (Source: N2WS Case Studies)

How to Reduce the Size of an EBS Volume

A step-by-step guide to reduce the size of an EBS volume by creating a new volume and moving over the existing data to save on unutilized volume costs.
Share post:

With the world of the cloud growing at exponential rates, the demand for persistent storage is also increasing. AWS EBS offers persistent storage for Amazon EC2. EBS is a cost effective, plug and play device that can be attached to one instance at a time. EBS also offers a backup and recovery mechanism with the help of snapshots.

With growing storage needs, users may have to think about increasing the size of their storage. Users may also shrink large EBS volumes to save on unutilized volume costs. All things considered, there is a real demand to reduce the size of an EBS volume.

However, it’s no easy task. It may require you to check certain conditions such as the total utilized storage compared to the desired size of your new EBS volume. You also need to learn your data’s growth rate and choose the size of your EBS volume accordingly. In this how-to guide, we will cover how to create a smaller sized data volume (in addition to a root device) using Linux and Windows.

A few points to keep in mind:

  • It’s impossible to reduce the size of an original volume, so you need to create a new volume and migrate the existing data.
  • Always remember to back-up your data before migrating.
  • Remove the large (old) volume so you don’t continue to pay for storage you’re not using.
AWS Backup Checklist
Fill in the gaps in your backup and DR strategy

Fortify your cloud across every critical dimension.

the disaster-proof backup & DR checklist

Step-by-Step: Create a Smaller EBS Volume (Linux)

In the steps below, we will show you how to create a smaller EBS volume using an Ubuntu Linux instance with an 8GB data volume attached in addition to the root volume. Locate the target EBS volume:
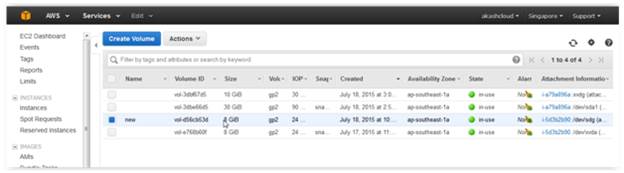
Using the AWS CLI:

aws ec2 describe -volumes

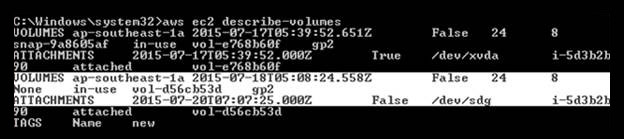
Mount the additional 8GB data volume to a directory called ‘new’.

df -h

The new directory (the data volume) is not empty, as seen below:

Since the volume is not completely full, having consumed less than 1GB of storage, you can create a smaller sized volume and copy the data from the original volume. As mentioned above, the new volume size must be bigger than the amount of space that was consumed by the original volume.

The steps below can help you create your new, smaller volume:

Create a 5GB volume in the same zone as your running instance.

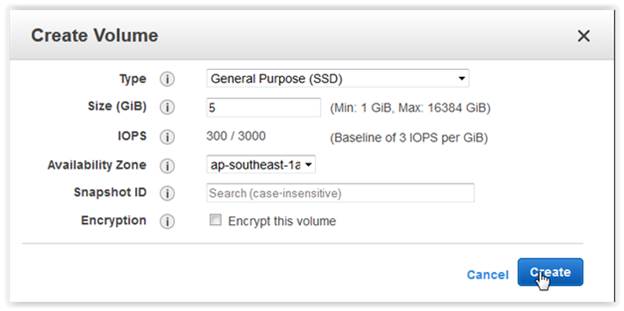
Using the AWS CLI, write the following command:

aws ec2 create-volume --size 5 --region ap-southeast-1 --availability-zone ap-southeast-1a --volume-type gp2

Now, attach the new volume as ‘/dev/sdf’ to your running instance where the old EBS external volume is mounted.

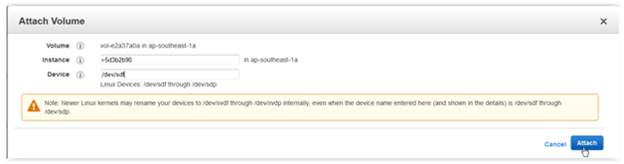
Using the AWS CLI, run the command:

aws ec2 attach-volume --volume-id vol-e2a37a0a --instance-id i-5d3b2b90 --device /dev/sdf

Mounting the volume

Since the new volume behaves like a raw unformatted block volume, you need to first format it with a file system and mount it to the instance. See the steps below to mount the volume: In this case, we used ext3 as a file system, but that’s not mandatory. You can select whichever file system you need.

mkfs -t ext3 /dev/sdf
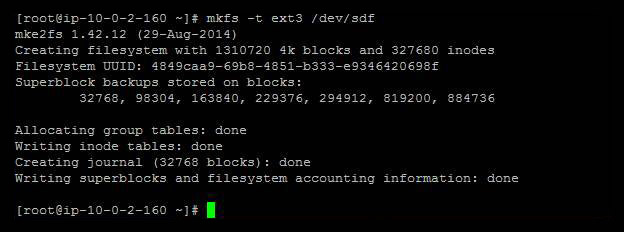
echo "/dev/sdf /newone ext3 noatime 0 0" >> /etc/fstab
mkdir /newone
mount /newone
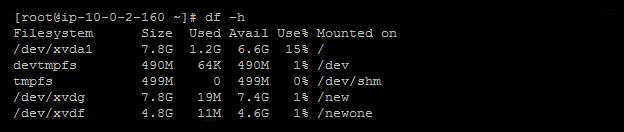
df -h 

Now you can see that the new 5GB external EBS volume is successfully mounted in the directory as ‘newone’

Copying the data

Copy the data from the 8GB volume to the 5GB volume using the following command:

sudo rsync -aHAXxSP /new /newone

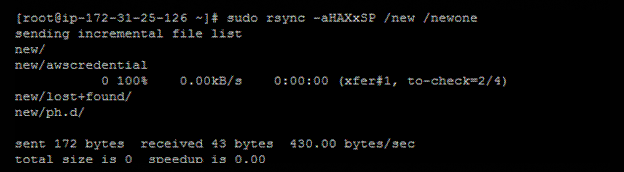
In the command with option aHAXxSP makes a full backup of system root directory. We recommend ensuring that there are no writes on the disk in order to achieve a consistent file system. You can temporarily freeze IO during copies.

Some file systems, such as XFS, allow you to freeze and unfreeze IO activity in order to successfully and consistently copy data. Learn more about consistent snapshots and freezing applications. As you can see, all of the data has been copied to the new 5GB volume mounted on the ‘newone’ directory.

You can find the difference between original volume and new volume directory with below command:

diff -r /new /newone

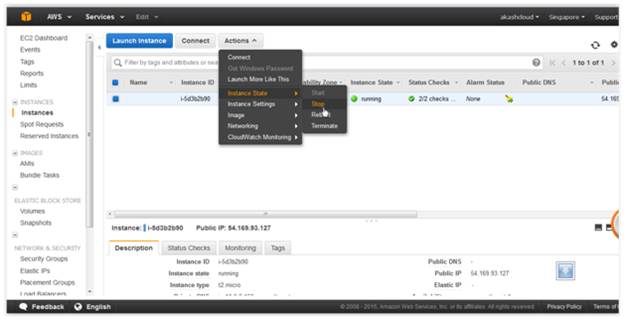
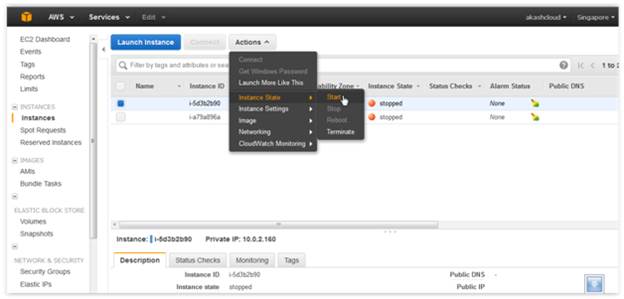
Detaching the old volume and stop the instance

You can now detach the old 8GB volume from the instance, but first stop the instance to prevent inconsistencies.

Using the AWS CLI command:

aws ec2 stop-instances --instance-ids i-5d3b2b90

Detaching the external volume

After stopping the instance, go to the ‘Volumes’ section of your AWS EC2 console and detach the external 8GB EBS volume that is mounted on the ‘new’ directory.
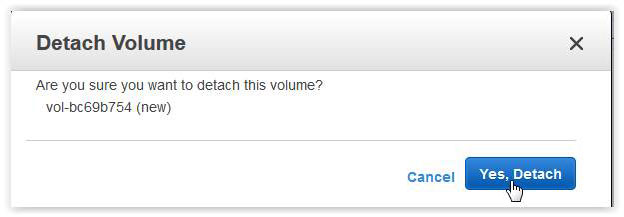
Using the AWS CLI:

aws ec2 detach-volume --volume-id vol-bc69b754

Starting the instance

Start the instance.

Using the AWS CLI:

aws ec2 start-instances --instance-ids i-5d3b2b90

Now you can see that the external 8GB EBS volume has been successfully detached and the only remaining external data volume is your new 5GB volume.

Be sure to delete the old 8GB volume, however, or else you will continue to be charged for it. Now that we’ve shown you how to create a more appropriately sized volume attached to a Linux instance, we’ll show you how to use a 10GB external EBS data volume to create a 5GB volume on a WIndows instance.

As shown below, the data volume is attached as drive ‘D’. Assuming that less than 5GB of the original 10GB volume’s total disk space is being consumed by the ‘D’ drive, it makes sense to make the new volume 5GB.

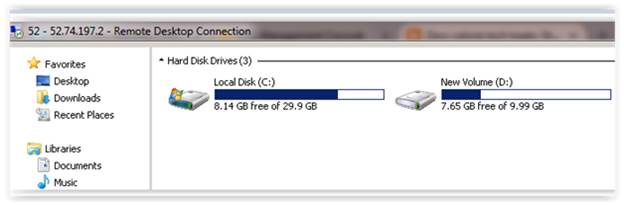
Below are the contents of volume ‘D’:

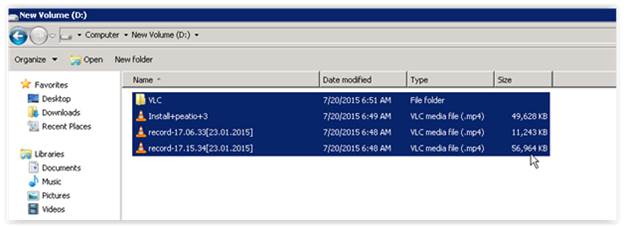
Creating the smaller volume

Now, in order to reduce the size of an EBS volume and create a smaller volume than the one shown above, follow the steps outlined below:

1. Create a 5GB volume in the same zone as the running instance.
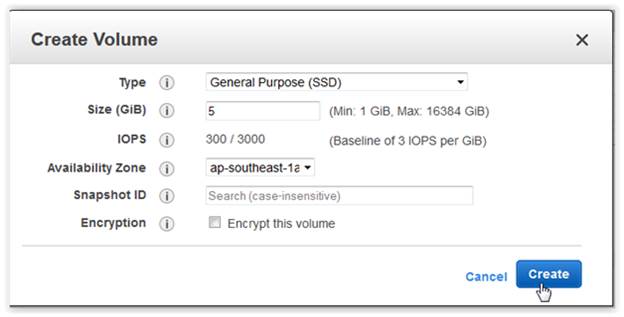
Using the AWS CLI:

aws ec2 create-volume --size 5 --region ap-southeast-1 --availability-zone ap-southeast-1a --volume-type gp2

Attaching the new volume

Attach the new volume as ‘/dev/sdf’ to the running instance where the previous EBS external volume is also mounted.
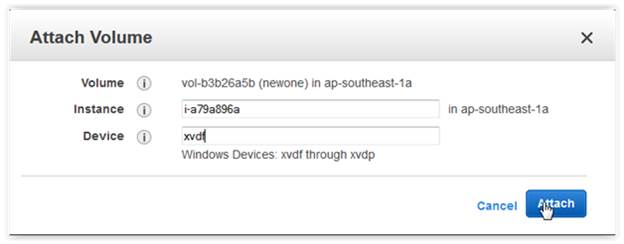
Using the AWS CLI:

aws ec2 attach-volume --volume-id vol-e2a37a0a --instance-id i-a79a896a --device /dev/sdf

Mounting the new volume on the instance

Mount the new volume on the instance:

Since the new volume is raw and unformatted, you need to first format it. Go to ‘My Computer’ and select ‘Manage’.

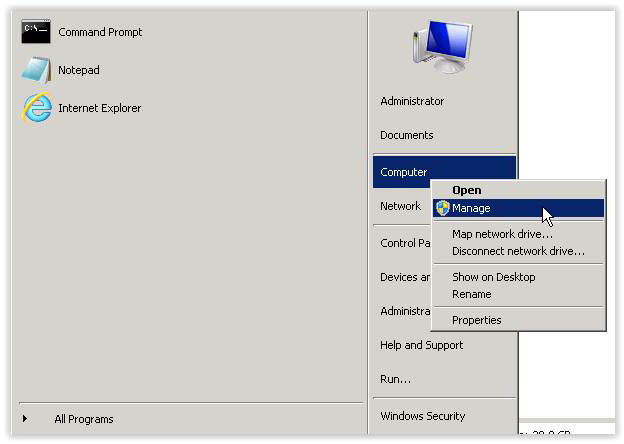
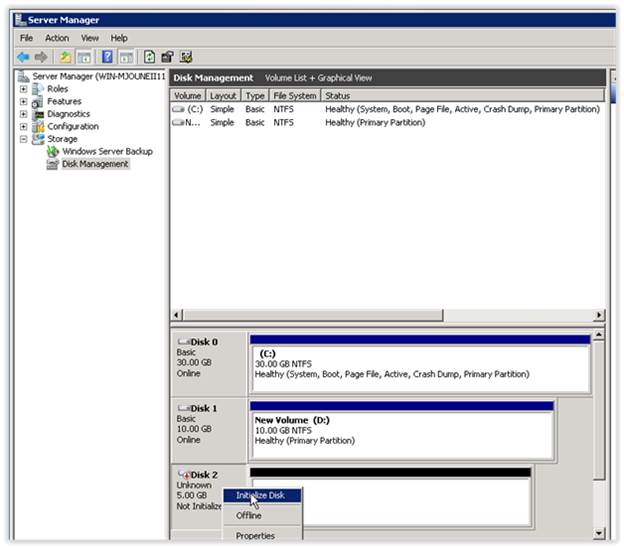
The volume might be attached as raw unformatted disk to a Windows instance, so you have to first initialize the disk. Make the new disk volume 5GB.

Create a new drive (volume) and label it ‘E’.

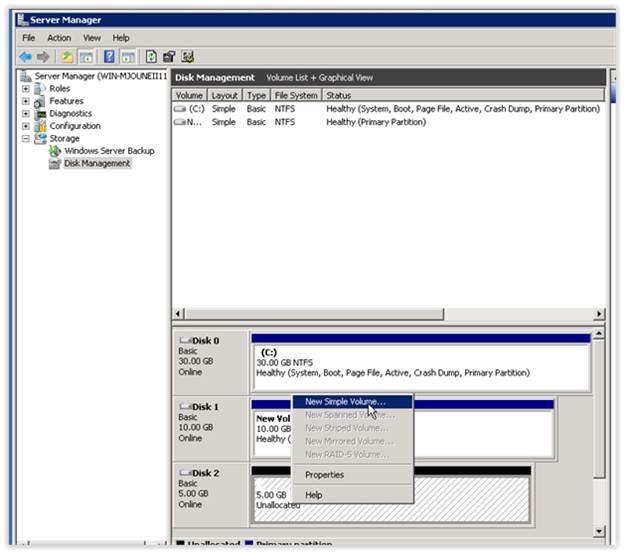
The new 5GB volume is now available as an additional drive.

Copying your data

With the following command, you can copy all of your data from the 10GB external volume is mounted on drive ‘D’ to the new 5GB external EBS volume that is now mounted onto drive ‘E’.

xcopy /s D:\*.* E:\

Once copying is complete, check the contents of drive ‘E’ to make sure that all of your data was successfully copied over.

Detaching the old volume

In order to detach the old 10GB volume from your instance, you need to first stop the instance.
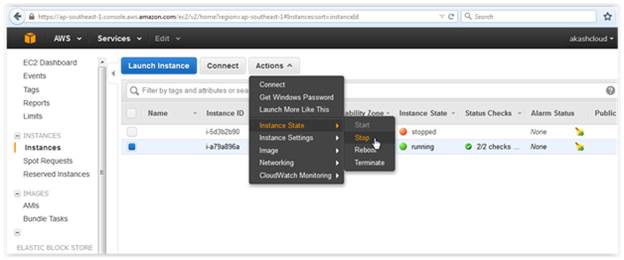
Using the AWS CLI:

aws ec2 stop-instances --instance-ids i-a79a896a

Afterwards, go to the ‘Volumes’ section of your AWS EC2 console and detach the external 10GB EBS volume that was mounted on drive ‘D’.
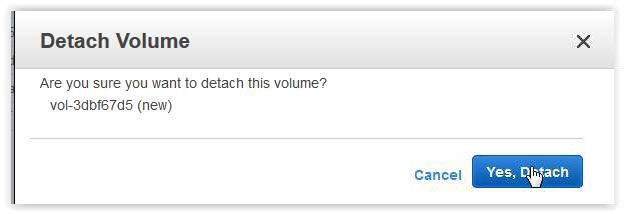
Using the AWS CLI:

aws ec2 detach-volume --volume-id vol-3dbf7d5

There you have it! We’ve shown you two ways to create a more appropriately sized EBS volume and efficiently and easily reduce the size of your EBS volume so you can save on costs. Remember to back up your data using EBS snapshots BEFORE performing any of the steps outlined above.

Top-rated tool for AWS – N2WS Backup & Recovery

N2WS gives you the abilitity to eliminated downtime and achieve truly high availiability for your critical AWS cloud workloads. Third-party products can perfectly complement existing AWS capabilities. N2WS Backup & Recovery was built specifically for AWS. By leveraging native AWS technologies to utilize block-level and incremental snapshots, it allows for very efficient backups which can be easily automated.

With N2WS Backup & Recovery for AWS, you can eliminate downtime and achieve truly high availability for your critical AWS cloud workloads.

Try N2WS Backup & Recovery free after 30-days it automatically converts to our Forever Free edition (no credit card needed).

Read Also

You might also like