EBS snapshots, which are block-level incremental snapshots, is probably the best and most efficient way to protect MongoDB in the EC2 environment. Snapshot technology allows backing up volumes in high frequency. What’s even more important is that recovery of large data volumes is almost instant. Snapshot technology provides that magic. So, like with every other application, the concern with snapshots is what happens if a snapshot was taken in the middle of some important operation or transaction. In that case there may be a data corruption when trying to recover the database from these snapshots. Snapshots taken that way are also called crash-consistent. The possibility of such a recovery operation ending up with a corruption is the same as if the machine crashed and booted up again (as a result of a malfunction or an outage).
Disclaimer: The scripts in this post are given as-is without any warranties`. Please consider them as guidelines. Please don’t use them in your production environment until thoroughly testing them and making sure the backup and recovery processes work correctly.
To Journal or not to Journal
In MongoDB there is a mechanism called “journaling” which is the answer the problem in the previous paragraph. Journaling (explained quite well in this post blog: https://blog.mongodb.org/post/33700094220/how-mongodbs-journaling-works) basically makes sure that any changes made to the data in memory is written also to a journal file, thus allowing the database to reconstruct its last consistent state, even if the machine crashed before all updates were flushed to the main data files. Whether to use journaling or not is a decision that needs to be made for every installation of MongoDB. Using journaling has implications in terms of memory consumption and performance, but in terms of data durability, it is certainly recommended to use it.
In MongoDB’s official documentation, it says that if the database resides on a single volume, and if journaling is turned on, there is no need for any additional operations: just taking snapshots is enough and the journaling mechanism will take care of any consistency problem that may arise. Since no mechanism is completely bullet-proof and since in most production environments multiple volumes will be used, the best way to ensure a backup of MongoDB is consistent, is to perform “flush and lock” on the database before taking the snapshots, and to release the lock right after all snapshots started.
Flushing and locking MongoDB with N2W
When using backup scripts to ensure consistent backups, N2W runs three backup scripts for each backup policy. One script (aka the “before” script) runs just before snapshots are taken. The second script (aka the “after” script), runs just after all snapshots started. The third one (aka the “complete”) script, runs after all snapshots are completed. With MongoDB it’s pretty straightforward. The first script needs to flush and lock the database, the second script needs to unlock the database and the third one needs to do nothing.
These scripts actually run on your N2W backup server, which is a different EC2 instance than your MongoDB server. SO these scripts need to connect to the MongoDB server to perform these operations. It can be done by installing a MongoDB client on the N2W server and connecting the database remotely. A more secure way would be to connect to the MongoDB server using SSH and running the commands on it. With this approach, there is no need installing anything on the N2W server, and it will also work on MongoDBs that don’t accept connection from outside connections. Here are the steps I used to define consistent backup for MongoDB:
- After creating a new backup policy named “mongodb” (just a suggestion), I added the MongoDB instance as a backup target to the policy (see N2W’s documentation). By default, N2W will backup all the volumes attached to that instance.
- I logged in the N2W server instance with SSH, using my own key pair and the user: “cpmuser.”
- In the folder /cpmdata/scripts, I created the “before” script in the name before_mongodb (before_<policy name>). Here is its content:#!/bin/bash ssh -i /cpmdata/scripts/mongosshkey.pem <MongoDB server ssh user>@<MongoDB server address> “mongo localhost/admin -eval ‘db.fsyncLock();'” if [ $? -gt 0 ]; then
echo “Failed locking mongodb” 1>&2
exit 1
else
echo “mongodb lock succeeded” 1>&2
fi - Explanation: the file /cpmdata/scripts/mongosshkey.pem is the private key to connect to the MongoDB server using SSH; it needs to be copied over and given minimal permissions. No need to worry to copy ssh key here since the N2W server instance is running in my own AWS account and is in my total control.
- In the folder /cpmdata/scripts, I created the “after” script in the name after_mongodb (after_<policy name>). Here is its content:#!/bin/bash
if [ $1 -eq 0 ]; then
echo “There was an issue running the first script” 1>&2
fi
ssh -i /cpmdata/scripts/mongosshkey.pem MongoDB server ssh user>@<MongoDB server address> “mongo localhost/admin -eval ‘db.fsyncUnlock();'”
if [ $? -gt 0 ]; then
echo “Failed unlocking mongodb” 1>&2
exit 1
else
echo “mongodb unlock succeeded” 1>&2
fi - Explanation: This is similar to the first script, only the operation is unlocking instead of locking. Since it will be called after all EBS snapshots have started, it’s ok the release locking. The snapshots are guaranteed to be consistent. One other addition is the condition at the first line. If the first script failed (i.e. locking did not succeed), it will just output a message and will not attempt to unlock the database.
- In the folder /cpmdata/scripts, I created the “complete” script in the name complete_mongodb (complete_<policy name>). It is just an empty script that does nothing:#!/bin/bash
- Remember that all three scripts need to have executable permissions for the “cpmuser” user.
- To test the scripts I ran them from the SSH command line, and made sure they worked. This step is also necessary to approve the ssh private key (needed only the first time).
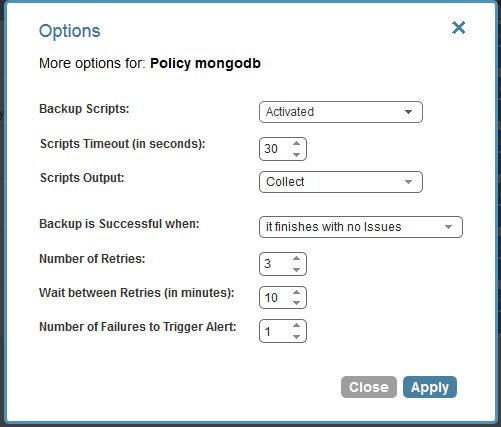
- After that I only need to configure policy “mongodb” to run scripts:
As you can see, script output was changed to “collected,” so I will be able to see messages the scripts printed out in my N2W console. After that, all I need to do is to monitor my backups through N2W’s management console. My MongoDB server will be backed up consistently according to the scheduling I configured. It is very important to have recovery drills, to make sure the MongoDB server does recover properly from backup. In a separate post we will try to deal with backing up a sharded MongoDB database, distributed across multiple EC2 instances.

