Disclaimer: The scripts in this post are given as-is without any warranties`. Please consider them as guidelines. Please don’t use them in your production environment until thoroughly testing them and making sure the backup and recovery processes work correctly.
In the first part of this post, I presented a set of python scripts that lock and unlock a complete MongoDB shard cluster. So, using N2WS, configuring backup for such a cluster takes only a few minutes. Basically, we need a backup policy that will include all the shards of the cluster. Assuming the shards are actually replications sets, it needs to back up a secondary member of each set. Furthermore, the backup policy needs to include one config server. Typically, in production environments, there will be three, but since they’re all the same, only one is needed in the backup policy. The MongoS server is needed for the locking process, but doesn’t necessarily need to be included in the backup, since it is stateless, unless you want to include it.
First stage: Define the Policy
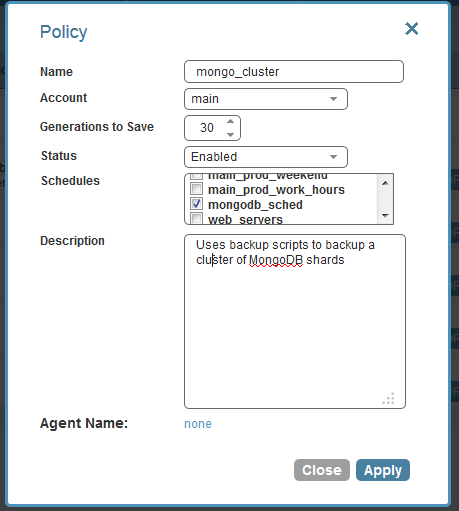
I defined a new policy named “mongodb_cluster,” and associated it with a schedule. I can configure any schedule I need.

Then, when selecting backup targets, I chose a config server and the two shard servers in the policy. Since the shard locking happens in parallel, locking a larger number of shards should take approx. the same time.
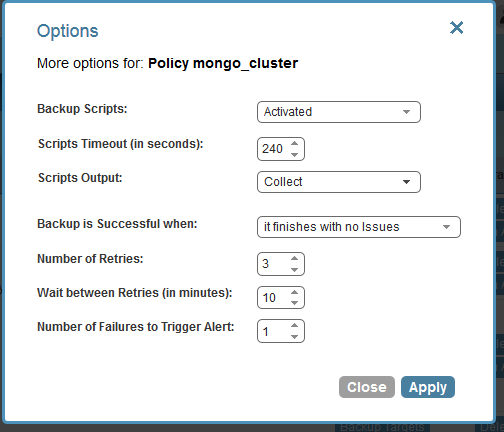
The last stage is to change the option of the policy (by clicking “More Options” :
Please note: I enabled backup scripts, increased the scripts timeout, since the locking (especially waiting for the load balancer to stop) may take some time. I chose 4 minutes; maybe even a larger value is needed. Furthermore, I chose to collect scripts output, which will give very good visibility of what the scripts are doing.
Setting the scripts
The scripts can be found here. To log in the N2WS Server, I need an SSH client with an option to copy over files. I use a Windows system, with putty and WinSCP, there are other tools available. I logged in as user “cpmuser” and copied the scripts to the folder “/cpmdata/scripts,” the names of the executables need to match “before_< policy name>,” “after_<policy name>” and the last script, which is an empty script that does nothing (but needs to be present), is called “complete_<policy name>.”
After copying the scripts (including the python module mongo_db_cluster_locker.py), I needed the SSH Python library “paramiko.” It is recommended to use it locally and to try to avoid actually installing anything on the N2WS Server, since at some stage, for an upgrade or some other reason, it will be required to terminate the instance and launch a new one. All the scripts and code that are stored in “/cpmdata/scripts” reside on the N2WS data volume, and will remain there even if the instance is terminated. So, for “paramiko” I copied the library locally to my scripts folder. I did the following:
> cd /tmp > wget https://github.com/paramiko/paramiko/archive/master.zip (If the link changes go to the “paramiko” site [[link]] and find the new one)
> sudo apt-get install unzip
(This is indeed installing, but I only need this utility for now…)
> mv paramiko-master/paramiko/ /cpmdata/scripts
Now, I wanted to make sure the executable scripts have executable permissions for the “cpmuser” user:
> chmod u+x /cpmdata/scripts/*_mongo_cluster
Then I copied over all needed SSH private keys (“.pem” files) to allow the scripts to connect to all remote machines. It is important to keep permissions minimal for those key files (read-only permission for user “cpmuser” only). The last thing needed was to edit the script configuration file (mongo_db_cluster_locker.cfg) correctly, here is an example:
[MONGOS]
address=mongos.example.com
ssh_user=ubuntu
ssh_key_file=/cpmdata/scripts/mongosshkey.pem
mongo_port = 27017
timeout_secs = 60
[CONFIGSERVER]
address=mongoconfig.example.com
ssh_user=ubuntu
ssh_key_file=/cpmdata/scripts/mongosshkey.pem
mongo_port = 27019
timeout_secs = 60
[SHARDSERVER_1]
address=mongoshard1.example.com
ssh_user=ubuntu
ssh_key_file=/cpmdata/scripts/mongosshkey.pem
mongo_port = 27018
timeout_secs = 60
[SHARDSERVER_2]
address=mongoshard1.example.com
ssh_user=ubuntu
ssh_key_file=/cpmdata/scripts/mongosshkey.pem
mongo_port = 27018
timeout_secs = 60
When editing the configuration file, please make sure all paths to key files, addresses, ports, and credentials are correct.
To test the script, just ran it from command line:
> ./before_mongo_cluster
> ./after_mongo_cluster 1

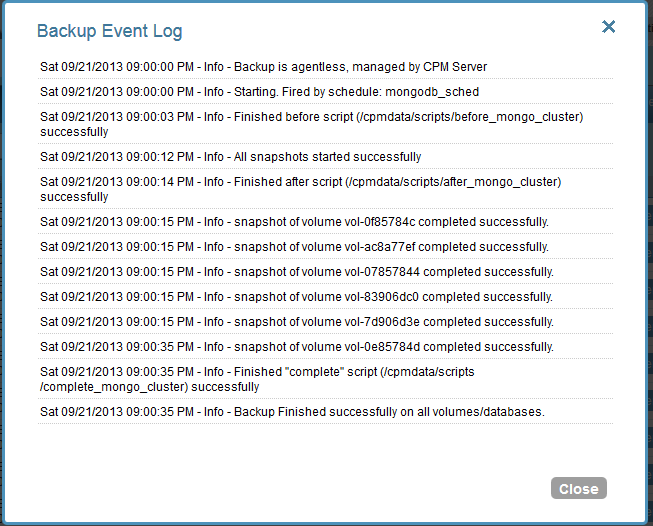
When testing, please make sure not to leave the cluster locked…
Now all is set and N2WS will take it from here. It started using the scripts and performing backup as scheduled:
Clicking on “Open” in the Log column in the backup monitor screen displays the backup process step by step:
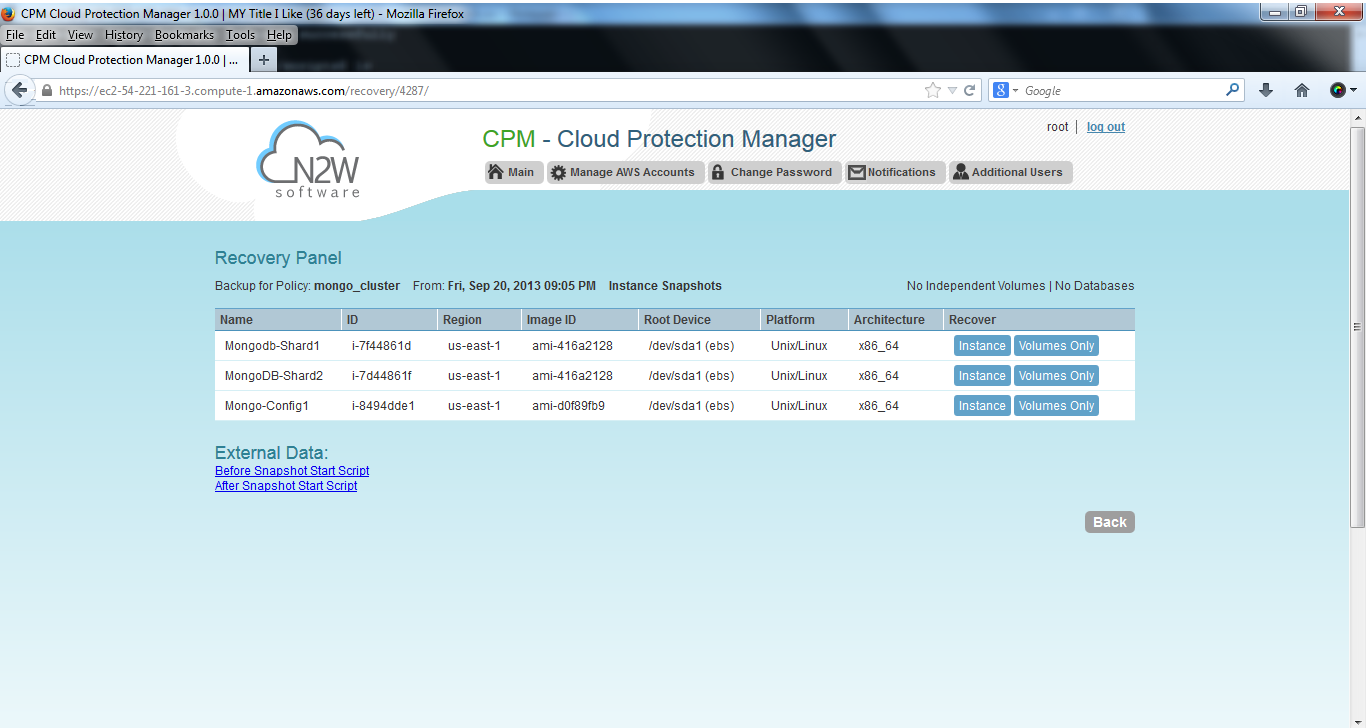
Clicking on the “Recover” button displays the recovery panel screen:
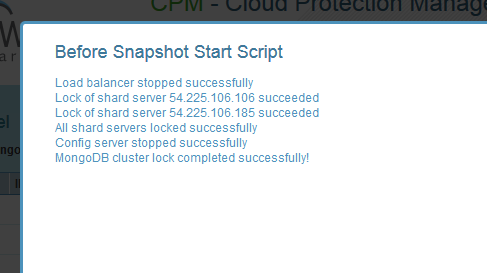
All the instances involved in the backup are shown here. It is possible to recover them, and also to view the output of the backup scripts by clicking on the “External Data” links:
All steps of the MongoDB shard cluster locking scripts are displayed here. If an error occurred, this output can give an insight as to what the issue was.
Recovery:
N2WS allows recovery of complete instances, and it is possible to recover an entire cluster in a matter of minutes. If DR was defined on the backup policy, it is even possible to perform that recovery in another AWS region.
Two things need to be taken into account:
- EBS snapshots of the shard servers are taken while the server is locked. When recovered, MongoDB detects the old lock file and refuses to start working, assuming the server crashed before. Of course, this is not a real issue in this case. It can be seen easily in the MongoDB log:> grep “old lock file” /var/log/mongodb/mongodb.log
> old lock file: /data/mongod.lock. probably means unclean shutdown,
> Sat Sep 21 20:10:52 [initandlisten] exception in initAndListen: 12596 old lock file, terminatingThis is easy to fix, but requires performing this manual operation on all shards: > sudo rm /data/mongod.lock
> sudo service mongodb start - If you the original addresses of the shard servers are preserved, the cluster will work without any changes. That can be done by using elastic IP addresses, and assigning them to the recovered shard servers (assuming the old cluster is dead). This address association is done in the AWS Management Console; N2WS will not take care of that. When using new addresses, it is required to change the configuration in the config servers for the cluster to start working again.
Conclusion:
It is a short and easy process to define consistent backup of a MongoDB shard cluster using N2WS and backup scripts.
For any comments, feedback, correction or suggestions, you can contact us at info@n2ws.com
Follow N2W Software on LinkedIn
