
What Is Azure Blob Storage Lifecycle Management?
Azure Blob Storage Lifecycle Management is a feature that automates the transition of data between different access tiers in Azure Blob Storage based on predefined rules. It helps optimize storage costs by moving data to less expensive tiers as it becomes infrequently accessed. Lifecycle management policies control the retention and deletion of data, ensuring that only necessary information is stored over time.
This system aligns data storage strategies with actual usage patterns. By automating policies, it reduces manual intervention and allows more efficient usage of storage resources. This can reduce storage costs by ensuring data is stored in a cost-effective manner throughout its lifecycle. Without lifecycle automation, IT teams risk overpaying for storage tiers and missing compliance deadlines, especially when managing millions of objects.
This is part of a series of articles about Azure backup
In this article:
- Understanding Azure Blob Storage Access Tiers
- Benefits of Blob Storage Lifecycle Management
- Tutorial: Configure a Lifecycle Management Policy
- 4 Best Practices for Azure Storage Lifecycle Management
Understanding Azure Blob Storage Access Tiers
Azure Storage provides three access tiers—Hot, Cool, and Archive—each suited to different use cases. Blob Storage Lifecycle Management is mainly focused on transitioning data between these tiers:
- Hot tier: For frequently accessed data, this tier offers the lowest latency and highest performance. However, it comes with higher storage costs, making it suitable for operational workloads or active datasets that require immediate access.
- Cool tier: This tier strikes a balance between cost and accessibility. It is suitable for infrequently accessed data, such as backups or data retained for compliance. While storage costs are lower than the Hot tier, accessing data incurs higher transaction costs.
- Archive tier: The Archive tier is the most cost-effective option for long-term storage of rarely accessed data, such as regulatory archives or historical logs. However, retrieving data from this tier takes time (ranging from hours to days) and incurs higher access costs.*
*Additionally, frequent retrievals from Cool or Archive tiers can result in high transaction costs. When configuring lifecycle policies, it’s important to strike a balance between low storage costs and the cost of access.
Related post: Learn more about storing in an Azure backup vault
Benefits of Blob Storage Lifecycle Management
Azure Storage Lifecycle Management automates data transitions and optimizes storage costs. Key benefits include:
- Cost optimization: Automatically transitions data to the most cost-effective access tiers, such as cool or archive, based on usage patterns.
- Simplified data management: Reduces the need for manual intervention by automating storage policies, ensuring data is stored, transitioned, and deleted according to predefined rules.
- Improved compliance: Ensures that data retention and deletion align with organizational or regulatory policies, minimizing risks of non-compliance.
- Scalability: Handles data of any size, making it suitable for organizations managing large-scale or rapidly growing datasets.
- Customizable policies: Supports a variety of use cases with flexible lifecycle rules that adapt to organizational needs, such as managing backups or archiving rarely used files.
✅ Pro Tip: While Azure’s native lifecycle policies provide a solid foundation for cost and operational efficiency, N2W amplifies these benefits by offering additional cost savings through a per-VM pricing model and supporting multi-cloud storage options for hybrid workloads.
Related post: Azure backup pricing
Tutorial: Configure a Lifecycle Management Policy
To configure a lifecycle management policy in Azure Storage, you can use the Azure portal, PowerShell, Azure CLI, or Azure Resource Manager (ARM) templates. This tutorial shows the process using the Azure portal. These instructions are adapted from the Azure documentation.
Enable Access Time Tracking (Optional)
Before creating a lifecycle policy, consider enabling access time tracking if your rules depend on the last access time of blobs. To enable this:
- Navigate to your storage account in the Azure portal.
- Under the Data Management section, click on Lifecycle Management.
- Check the Enable access tracking checkbox.
When enabled, this feature tracks the time a blob was last accessed. Actions based on this condition use the most recent read or write operation within the past 24 hours. Without this feature, actions referencing access time default to the policy’s activation date.
Source: Microsoft
Add a New Lifecycle Management Policy
To add a policy:
- In the Azure portal, go to your storage account.
- Under Data Management, select Lifecycle Management.
- Choose List View and click Add a Rule.
- Provide a name for your rule in the Details form.
- Specify the Rule scope. Define whether the rule applies to all blobs or filtered blobs.
- Specify the Blob type and subtype: For example, base blobs, snapshots, or versions.
Define Rule Conditions
To configure rules:
- Select Base Blobs to specify conditions. Examples include:
- Move blobs to the Cool tier if they have not been modified for 30 days.
- Delete blobs or snapshots after a specific period.
If using filters, navigate to Filter Set to narrow the rule’s scope. For example, specify blobs with names starting with a certain prefix (e.g., log).
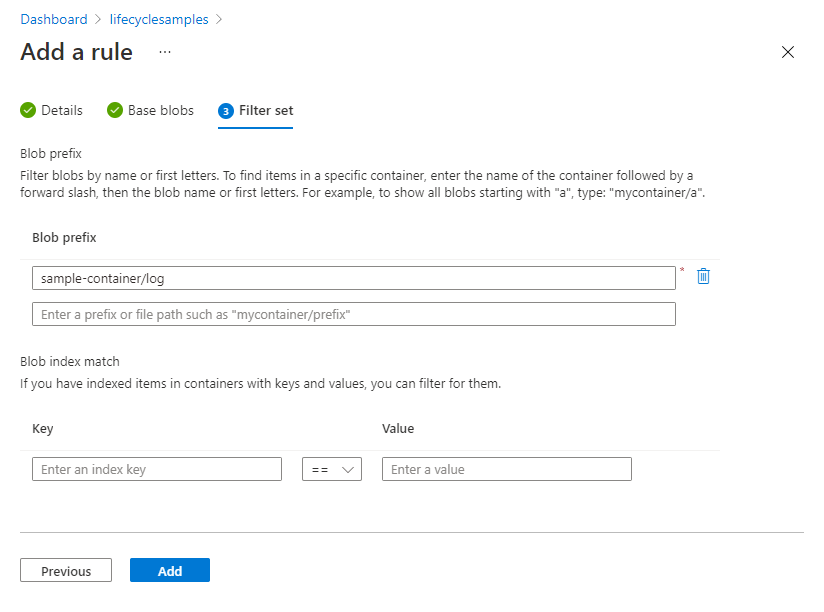
Source: Microsoft
Apply and Save the Policy
Once the rule is defined:
- Click Add to create the policy.
- Ensure that you address dependencies between blob versions and snapshots. Blobs with older versions or snapshots must have those removed before the current version is deleted.
Define Policies in JSON (Code View)
For greater flexibility, use the Code View tab in the Azure portal to define policies in JSON format. A sample policy might look like this:
{
  "rules": [
    {
      "enabled": true,
      "name": "transfer-to-cool-storage",
      "type": "Lifecycle",
      "definition": {
        "actions": {
          "baseBlob": {
            "tierToCool": {
              "daysAfterModificationGreaterThan": 20
            }
          }
        },
        "filters": {
          "blobTypes": [
            "blockBlob"
          ],
          "prefixMatch": [
            "example-container/log"
          ]
        }
      }
    }
  ]
}
This policy moves block blobs to the Cool tier if they have not been modified for more than 20 days and have names beginning with log.

4 Best Practices for Azure Storage Lifecycle Management
Optimizing Azure Storage Lifecycle Management involves adhering to best practices that maximize efficiency, cost management, and compliance. Regular policy reviews, testing, alignment with business needs, and performance optimization are essential strategies.
1. Test Policies Before Deployment
Lifecycle management policies automate critical tasks, such as transitioning data between tiers or deleting old files. However, deploying untested policies can lead to unintended consequences, including accidental deletions or moving frequently used data to inaccessible tiers.
Before rolling out policies in production, test them in a controlled environment using a subset of data. Azure provides tools such as the Azure portal or Azure Storage Explorer to help simulate policy effects. You can also create policies in JSON format and review their logic to ensure they align with business goals.
For example, if the policy moves data to the Archive tier after 60 days of inactivity, testing ensures that only the intended files are affected and verifies that retention rules are applied correctly. This step minimizes risks and prevents costly mistakes.
2. Analyze Data Access Patterns
The success of lifecycle management policies depends on accurately reflecting how data is used. Begin by analyzing historical access patterns to determine which data is frequently accessed, which becomes idle over time, and which is rarely used but needs retention for compliance or archival purposes.
Azure tools such as Storage Insights or Monitor Metrics can help identify trends in data access and modification. For example, you may find that some datasets are actively used for 30 days and then rarely accessed afterward. With this information, you can create a policy to move these files to the Cool tier after 30 days of inactivity and to the Archive tier after 180 days.
3. Use Filters to Target Specific Data
Lifecycle management policies allow you to apply broad rules or highly targeted actions. Using filters effectively helps you manage data with precision, ensuring that policies address specific organizational requirements without unintended side effects.
Filters can narrow the scope of policies to certain containers, blob prefixes, or metadata tags. For example, if a storage account contains both production and test data, you can use a prefix filter (e.g., prod- or test-) to ensure policies apply only to the relevant datasets.
Similarly, metadata filters can target files based on custom tags like project names or retention requirements. For example, a policy could be set to delete old log files with names starting with “log-” after 90 days, while keeping production data in the Hot tier for immediate access.
4. Monitor and Adjust Policies Regularly
Lifecycle management policies should evolve alongside business needs and data usage patterns. Once a policy is active, its performance should be monitored to ensure it delivers the desired results, such as cost savings and compliance with retention requirements.
Azure provides monitoring tools, such as the Activity Log and Azure Monitor, to track policy actions, including data transitions and deletions. Regularly reviewing these logs helps identify issues like data transitioning too soon, not transitioning as expected, or excessive storage costs from misaligned tiers.
Adjustments may be necessary as business priorities change. For example, a dataset initially earmarked for long-term archival might become critical for a new project, requiring faster access. Inactive data in the Hot tier may need to be moved to the Cool or Archive tiers to reduce costs. These policies should be reviewed periodically.
Streamline with Major Storage Savings: Lifecycle Management with N2W
N2W offers many advantages for storage lifecycle management compared to native Azure tools:
- Bigger cost savings: Unlike Azure’s native approach, which charges based on the size of the VM (typically tiered and not transparent), N2W offers cost savings of up to 80% by charging per VM. Customers appreciate the transparent pricing, a no-brainer for organizations managing large-scale or diverse workloads.
- Broader long-term storage options: A common challenge with Azure Storage Lifecycle Management is its focus on Azure-native storage options, which may limit flexibility for companies leveraging Multicloud strategies. N2W addresses this by supporting Azure Blob, AWS S3, and Wasabi S3, enabling lifecycle management across platforms.
- Immediate Recovery: Azure Backup can take several hours to even days to recover large VMs as data has to be copied from your vault to your target storage account. N2W guarantees near-instant Azure disaster recovery.
- Better granular control: With advanced policies, users can configure and automate backup schedules, retention policies, and tiering workflows from a single easy-to-use console.
Learn more about N2W for Azure Backup and try it out today.