In our previous post, we reviewed the Archive Snapshots to Amazon S3 for Reduced Long-Term Retention and Storage Costs feature, as well as Cross Account Incremental Backups. In this post, we will cover the other two new features: VPC Capture & Clone and Enhanced RESTful API. For years, N2WS Backup & Recovery has provided options to help quickly recover instances in the case of failure, malware, ransomware, or other incidents that can cause outages of your Amazon EC2 instances.
Now, with VPC Capture & Clone, you can bootstrap other regions with an identical infrastructure setup, as if you were creating the infrastructure with tools like AWS CloudFormation. VPC Capture & Clone is quick and easy to use and keeps your recovery environment ready for identical restore. In addition, because developers commonly perform actions or operations via RESTful calls, N2WS Backup & Recovery has enhanced its API capabilities to perform backups and recoveries directly for certain features, such as RDS databases and Redshift data warehouses. You can recover Amazon EC2 instances from the N2WS Backup & Recovery console. In this article, we outline how to set up VPC Capture & Clone and help you get started with Enhanced RESTful API.
Assumptions and Environment
Step-by-step assumptions:
- You currently have a VPC on AWS and an instance running N2WS Backup & Recovery, with the following configured:
- A login account with privileges to configure policies, schedules, agents, and recovery.
- An IAM Role set up for the N2WS Backup & Recovery instance that allows Amazon EC2 VPC operations and Amazon EC2 operations like creating and restoring snapshots.
- Environment used for this guide:
- 1 N2WS Backup & Recovery server
- 1 VPC in us-east-1 (to be recovered into eu-west-2)
- 2 AWS Regions: us-east-1 (Primary), eu-west-2 (Secondary)
- 1 AWS Account
VPC Capture & Clone
In this section, we will outline how to set up VPC Capture & Clone.
Step 1: Configure VPC Capture
You will configure N2WS Backup & Recovery to capture the VPC configuration on a schedule, just like a backup of an instance. Note that you can create identical looking VPCs in the same account, but this can lead to confusion. In this example, you will create the capture with the intention of restoring it into a DR region. The VPC Capture & Clone functionality is captured and restored utilizing AWS CloudFormation in the background. Keep this in mind with regards to what is actually being captured, as capturing VPCs does not include the data of the following entities: NAT gateways, VPC peering connections, customer gateways, VPN connections, network interfaces, elastic IP addresses, VPC endpoints, and VPC endpoints services. For additional information on VPC Capture & Clone, and important information on limitations, please refer to our official support documentation.
- In the top menu of N2W, click the General Settings button.
- Expand Capture VPC.
- Capture VPC Environments: Enabled
- Capture VPCs Interval: 24 hours
- Click Capture Now.
- To confirm capturing VPC environments, click OK when the window pops up.
- You can click the Capture Log button to gather information on what was captured.
- Click Apply.

Step 2: Clone a Captured VPC
N2WS Backup & Recovery can eliminate the need to create a VPC and deploy AWS CloudFormation templates to perform these VPC cloning actions—all through the UI. In this step, the VPC captured environment will be cloned to the eu-west-2 region.
- In the N2WS Backup & Recovery UI top menu, click Accounts.
- Under the account where the VPC was backed up, click Clone VPCs (under the “Actions” column).
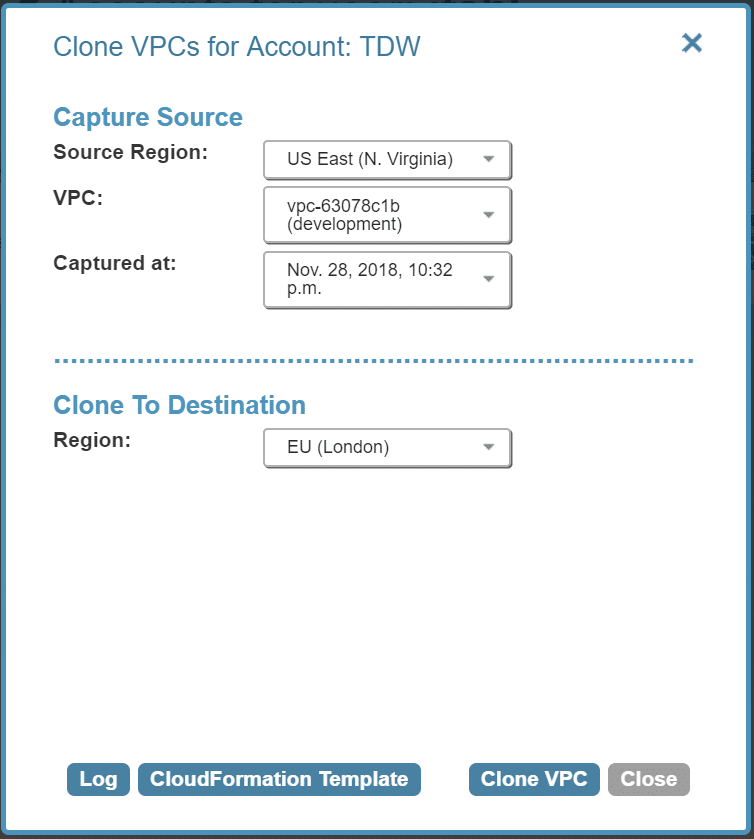
In the “Clone VPCs for Account: Your Account” window, enter:
- Capture Source: US East (N. Virginia)
- VPC: Choose a VPC you backed up
- Captured at: You will likely only have one option if you just configured the backup with this guide. As more backups occur, you can choose them like you would a recovery time.
- Region: EU (London) –
Note: If you want to make customizations, click the CloudFormation Template, which will provide the JSON. This will require you to execute your own AWS CloudFormation stack.
- Click Clone VPC.
Here is AWS CloudFormation working in the background in the London region:

Here is the restored VPC in London:

It is simple to recover VPCs for DR. This feature helps reduce the RTO of a disaster and provides a predictable infrastructure, eliminating the need to handle the orchestration yourself.
Enhanced RESTful API
If you are unfamiliar with how APIs and RESTful calls work, this guide will help you get started, but you should still refer to our documentation for more information and guidance. In this section, we will cover forming API calls, creating an API token, and making a few basic queries, such as querying snapshots, Amazon S3 backups, and schedules.
First, you will need to get an API access token. Tokens are only good for one hour, so if you are using the tokens in jobs, you’ll want to set up a process to refresh tokens automatically. You can find information about how to do this in the linked documentation above.
It is recommended to install jq to parse the JSON in a readable format.
Step 1: Create an API Token
This token will be used for API calls in this example.
Important: Obtain the DNS name or IP of your N2W server. This is required for the API calls and can be found in the address of your N2W UI. Also, ensure your N2W server allows 443 access from the host you’ll be executing API calls on in this example.
- At the bottom of the UI, click the Configure API Authentication Key link.
- In the “Configure API Access” window, enter:
- API Access: Enabled
- Click the new authentication key link.
-
Important: If you are currently relying on N2W 2.3 API calls, do not do this step or you will invalidate that API Key.
- When the window pops up confirming that you will invalidate prior keys, click Okay.
-
- Copy the key out of the “Authentication Key” field. This will be used to request tokens.
- Export two variables: HOST and TOKEN. HOST is the N2W server IP or DNS name. TOKEN is the API Key you retrieved in Step 2c.
- The next commands are in the terminal shell:
-
export API_KEY='YOURLARGEAPIKEY'
-
Export HOST='IPADDRESSorDNSNAME'
-
curl -k -X POST https://$HOST/api/token/obtain/api_key/ -H 'Accept: application/json; version=1.1.0' -H 'Authorization: Bearer $TOKEN' -H 'Content-Type: application/json' -d '{"api_key": "'"$TOKEN"'"}' - You will see two items returned: an ACCESS token and a REFRESH token. For now, copy the ACCESS Token and export it.
-
Example: {"access":"eyJhbGciOiJIUzI1NiIsInR5cCI6IkpXVCJ9.eyJ0b2tlbl90eXBlIjoiYWNjZXNzIiwidXNlcl9pZCI6IjEiLCJqdGkiOiJhOGYwY2IyMDFiMTI0MmE0OTgxNmNkNjhmM2JiNTlmOCIsImFjYyI6IkFQSSIsImV4cCI6MTU0MzQ3MDE0Mn0.KlB_Z4GZA3acJAALa3UcpX1JHpX6LUuBWTHwB-obeW8","refresh":"eyJhbGciOiJIUzI1NiIsInR5cCI6IkpXVCJ9.eyJ0b2tlbl90eXBlIjoicmVmcmVzaCIsInVzZXJfaWQiOiIxIiwianRpIjoiMjQ2NDk3MDJlYTQwNGExOWIyNDg2ZGRiZmVmMDY3M2UiLCJhY2MiOiJBUEkiLCJleHAiOjE1NDM1NTI5NDJ9.Sy_Vbb25C5uyjPhaWYYRqJkFDlxrPMRv87vrNQRYulk"} -
Export ACCESS_TOKEN='HUGESTRING'
-
Step 2: Perform Sample API Queries
This is a simple query to pull the backups N2W is managing.
-
curl -k -X GET https://$HOST/api/backups/ -H 'Accept: application/json; version=1.1.0' -H "Authorization: Bearer ${ACCESSKEY}" | jq . - You will get a potentially lengthy response, but you can find the information on your backups organized by jq.
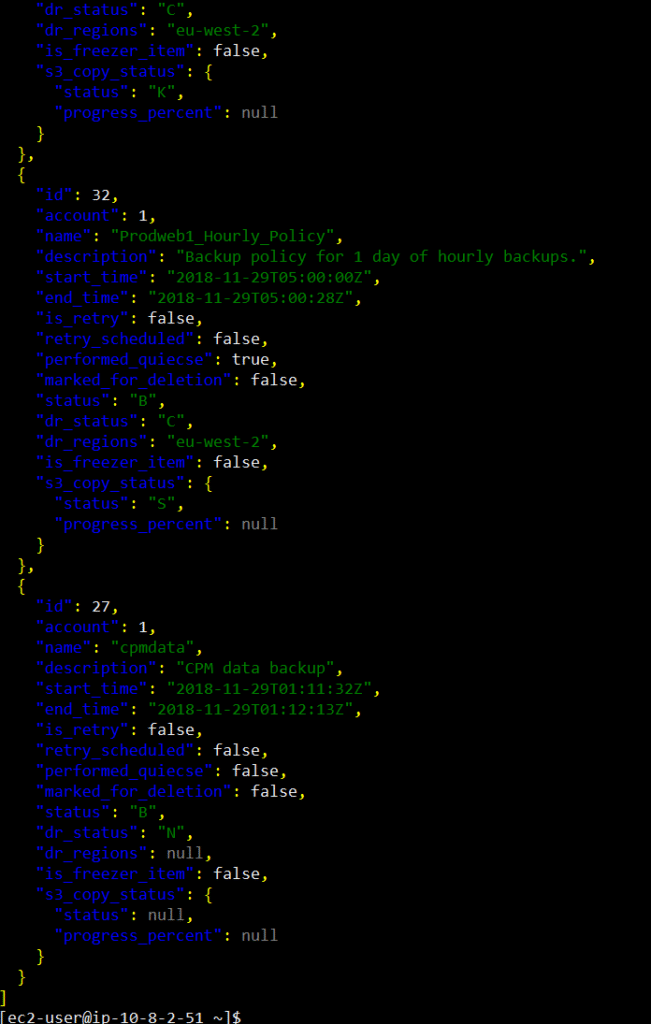
Get Copy to Amazon S3 Backups from Snapshots
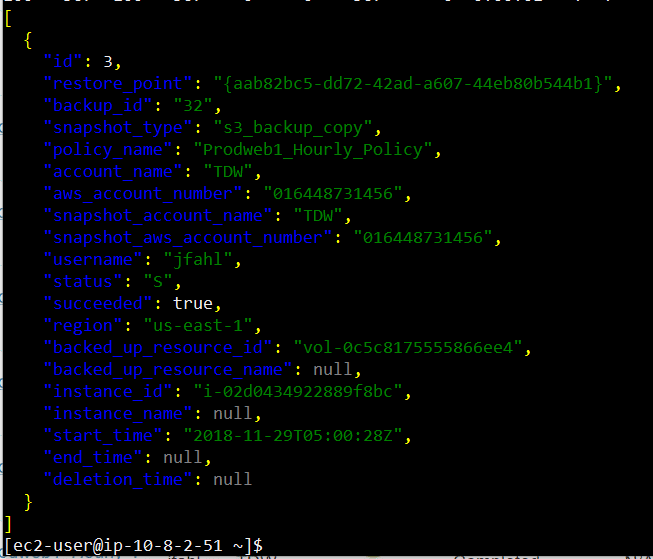
Next is a simple query to pull the Amazon S3 backup information from the previous message. As you can see from the image above, backup id: “32” is an hourly snapshot. In this query, the respective Amazon S3 snapshot for that backup will be returned.
-
curl -k -X GET https://$HOST/api/backups/{32}/snapshots/copy_to_s3/ -H 'Accept: application /json; version=1.1.0' -H "Authorization: Bearer ${ACCESS_TOKEN}" | jq . - Here is the JSON response:
Get S3 Repositories
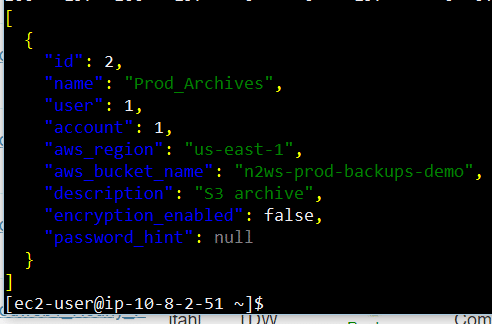
Let’s verify the S3 repositories that are currently configured in the account.
-
curl -k -X GET https://$HOST/api/s3_repositories/ -H 'Accept: application/json; version=1.1.0' -H "Authorization: Bearer ${ACCESS_TOKEN}" | jq . - Here is the JSON response:
Update the S3 Repository To Be Encrypted (Client-Side)
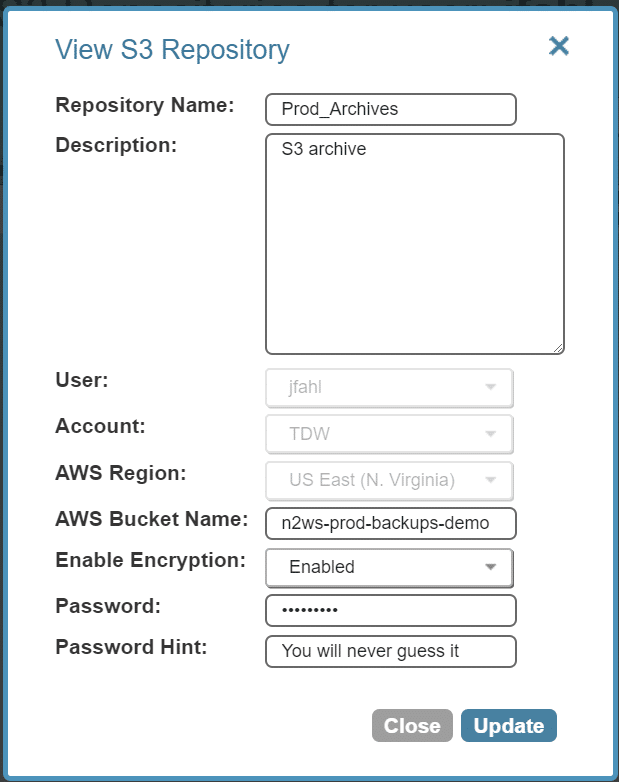
Using the S3 repositories queried in the last example, let’s enable and set the password for encryption.
-
curl -k -X PUT https://$HOST/api/s3_repositories/{2}/ -H 'Accept: application/json; version=1.1.0' -H "Authorization: Bearer ${ACCESS_TOKEN}" -H 'Content-Type: application/json' -d '{"encryption_enabled": "True", "password": "Str0ng0n3", "password_hint": "You will never guess it" }' - As you can see, the S3 repository is now configured in N2W as enabled with the password.
Video Tutorial
N2WS’ VPC Capture + Clone feature is demonstrated in this ~3 minute video:
Summary
In this article, we dove into two exciting new features of N2WS Backup & Recovery: VPC Capture & Clone and Enhanced RESTful API. These two features focus on speed of recovery and the flexibility of using the utility through scripts. The extended capabilities of the API allow for scripted queries and reports through tools, rather than querying N2W directly from the UI.
The four new features of N2WS Backup & Recovery, as explored in this two-part series, will help reduce your spending in AWS and decrease your time to recovery. Stay tuned for additional features.