
Why create a Logical Volume Manager (LVM)?
Picture the following scenario: an organization uses EC2 instances for its database where data is stored in EBS volumes. As the company grows, the size of its database also grows at a rate of 10GB per day.
In terms of storage, the organization has a 1TB EBS volume, which they can increase to 16TB. But, every time they increase it, a maintenance window has to be scheduled where the database server is shut down, an EBS snapshot of the data volume is created, and a newer, bigger volume is created and attached to the instance.
The Performance Problem
However, this causes a problem for the organization because shutting down the database server results in lost business. On top of that, there are network performance bottlenecks between EC2 instances and the EBS volume that impact system performance on the whole.
The Solution: Leveraging LVM
To fix these issues, the organization decides to leverage a Logical Volume Manager (LVM), which provide the option to easily increase the size of their volume by adding more EBS volumes. With multiple EBS volumes, network performance is increased between EC2 instances and EBS volumes.
In this post, we’ll take a deeper look at dynamic disk arrays (i.e., LVM). LVMs create an abstraction layer on top of underlying disk layouts and allows sysadmins to create virtual partitions over physical volumes. You can have multiple virtual partitions on a physical volume or a single virtual partition over multiple physical volumes. LVMs provide the ability to dynamically expand and shrink virtual partitions and make additions to physical volumes on the fly for existing LVMs.

How to Configure an LVM Volume
Launch an EC2 instance
Attach EBS volumes to your EC2 instanceIn this case, we are attaching three 10GB SSD EBS volumes. The EBS volumes are given the following device names: ‘/dev/sdf’, ‘/dev/sdg’ and ‘/dev/sdh’.
Initialize devices to use with the LVMIn order to do this, we need to use the pvcreate command. pvcreate is used to initialize disk or partitions that will be used by LVM. It can either initialize a complete physical disk or a partition on physical disks. Syntax:
sudo pvcreate <device-1> <device-2> <device-3> 
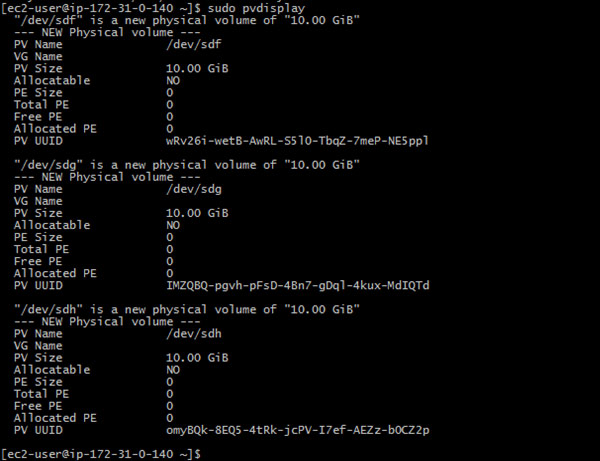
Next, you’ll want to display the device attributes. For this, we need to use the pvdisplay command to display information about physical disks. Command :
# pvdisplay 
Creating the LVM volume group
Once the devices are initialized, you can create the LVM volume group. A group of physical volumes or disks are combined together into a single storage file which is referred to as the LVM volume group.
For this, we used the vgcreate command to create a volume group by providing the name of the volume group and the path of actual physical volumes. Syntax:
# sudo vgcreate <volume-name> <device-1> <device-2> <device-3> 
Once the LVM volume group is created, you can use the vgdisplay command to show its attributes.
There are also commands like “vgscan“, which scan all disks for LVM volume groups.

Create Logical Volumes
Once the LVM volume group is created, it’s time to create logical volumes. Syntax:
sudo lvcreate --name <logical-volume-name> --size <size-of-volume> <lvm-volume-name>In this case, we’re creating two logical volumes (data and backup). For the data logical volume:

For the backup logical volume:
sudo lvcreate --name backup --size 15GB n2ws
Once the logical volumes are created, we can view their status using the “lvdisplay” command.
sudo lvdisplay
Format your logical volumes
Once the logical volumes are created, we can format them using any filesystem like ext4, XFS, and more. If you are using the ext4 filesystem:
#mkfs.ext4 <logical-volume-path>In our case, it's:# mkfs.ext4 /dev/n2ws/data 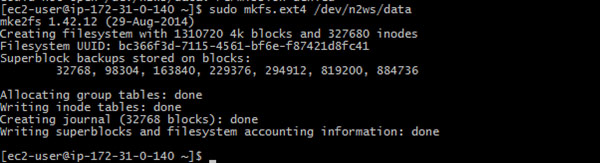
# mkfs.ext4 /dev/n2ws/backup 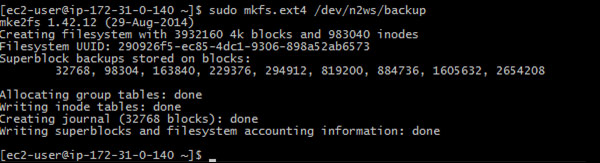
Mount the logical volumes
Once the logical volumes are formatted, you can mount them on your mount directories. Please make sure your mount directories already exist. If not, please create them.
sudo mkdir /data
Use the mount command to mount:
# mount <logical-volume> <mount-point> 
If you want you mount points to be available after reboot, you can add mount point entries in ‘/etc/fstab’.

To view the status of the mount, use the mount command.
sudo mount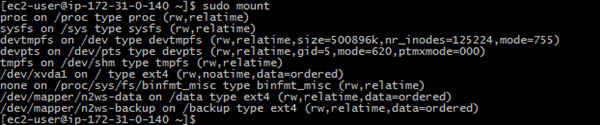
Once the logical volumes are created and mounted, you can use them as your normal volumes.
The benefits of Logical Volume Manager (LVM) include:
- Better performance – If your data is spread across multiple EBS volumes using LVM, you can leverage dedicated network throughput between EC2 instances wand EBS volumes. This provides you better network throughput over a single network channel between EC2 and EBS volumes.
- The ability to grow – You can expand your volume at any time according to your requirement. More EBS volumes can be mounted to your LVM volume rather than creating a snapshot of an EBS volume and expanding it.
- EBS volume snapshots – You need to ensure that there are no operations happening in your EBS volume during snapshots. You can suspend operations on your LVM volume by using the dmsetup command.
Here’s the syntax for the suspend command:
# dmsetup suspend <lvm-volume-name> And the syntax for the resume command:
# dmsetup resume <lvm-volume-name> As mentioned above, LVM volume backup can be done using the EBS snapshot procedure, ensuring that LVM volume operations are suspended for that duration of time.
N2WS offers a solution that enables you to further simplify the process of using snapshots. N2WS Backup & Recovery is an enterprise-class backup-recovery and disaster recovery solution for the EC2 compute cloud. N2WS is available as a service model that allows users to manage multiple AWS accounts and configure policies and schedules to take automated snapshot backups.
It also has a Windows agent to consistently back up Windows applications. N2WS allows you to recover a volume from a snapshot, increase its size and switch it with an existing attached volume, in a single step. To see the different editions with pricing and details, refer to N2Ws’ pricing page on our website.