Defining infrastructure or configuration as code is a great way to easily provision many different infrastructure components in one job typically known as a deployment. In AWS land, the configuration as code concept is represented via their CloudFormation service. CloudFormation is an AWS service that allows administrators to define many different AWS resources as one deployable “package”. That “package” can then be sent up to AWS at one time and AWS will then happily consume those instructions and create and configure all of the resources you have defined.
CloudFormation is handy for those times when you need to deploy entire stacks of infrastructure like a web server, load balancer, database, etc. CloudFormation allows you to define each resource in a hierarchical fashion via a single JSON or YAML file. If the JSON or YAML file matches the expected schema that CloudFormation understands, AWS will read that file and figure out the best way to get everything in that file provisioned.
In this article, we’re going to cover creating you first stack with AWS Cloudformation by covering each step necessary to get started.
Prerequisites
Before we get too far, if you do plan on following along with a tutorial, you’re going to need a few prerequisites first. You’ll need:
- an AWS account
- signed up for CloudFormation
- have a key pair set up in the same region you’ll be creating the stack
- somewhat familiar with JSON
If you’ve met these few prereqs, let’s dig in and see what it takes to get our first CloudFormation template defined and sent up to AWS.
AWS Cloudformation Templates
At the heart of CloudFormation is the template. The template is the JSON or YAML file that will instruct AWS to provision our resources. The template is what makes everything work. A template contains all of the configuration information necessary to build the AWS resources you’re looking for.
A template is defined according to a specific schema that CloudFormation can read and understand. Any ol’ JSON/YAML file won’t work with CloudFormation. It must adhere to the CloudFormation schema!
A template can either be built from scratch or you can use a sample template that AWS provides. For this tutorial, we’re going to be using an existing template so we can get started faster. More specifically, we’ll be using the Wordpress sample template. Feel free to download it and take a look but since CloudFormation provides a way to define a template via a URL, we’ll just put our CloudFormation deployment to it directly.
Using our example Wordpress template as an example, you can see the template starts out with the schema version or AWSTemplateFormatVersion. This is a date when the schema was updated.
{
  "AWSTemplateFormatVersion" : "2010-09-09",
  <SNIP>

You’ll then see a Parameters section. The Parameters section allows you to pass in various values at run-time which will pass to various resources inside of your template.

<SNIP>
  "Parameters" : {

    "KeyName": {
      "Description" : "Name of an existing EC2 KeyPair to enable SSH access to the instances",
      "Type": "AWS::EC2::KeyPair::KeyName",
      "ConstraintDescription" : "must be the name of an existing EC2 KeyPair."
    },

    "InstanceType" : {
      "Description" : "WebServer EC2 instance type",
      "Type" : "String",
      "Default" : "t2.small",
      "AllowedValues" : [ "t1.micro", "t2.nano", "t2.micro", "t2.small", "t2.medium", "t2.large", "m1.small", "m1.medium", "m1.large", "m1.xlarge", "m2.xlarge", "m2.2xlarge", "m2.4xlarge", "m3.medium", "m3.large", "m3.xlarge", "m3.2xlarge", "m4.large", "m4.xlarge", "m4.2xlarge", "m4.4xlarge", "m4.10xlarge", "c1.medium", "c1.xlarge", "c3.large", "c3.xlarge", "c3.2xlarge", "c3.4xlarge", "c3.8xlarge", "c4.large", "c4.xlarge", "c4.2xlarge", "c4.4xlarge", "c4.8xlarge", "g2.2xlarge", "g2.8xlarge", "r3.large", "r3.xlarge", "r3.2xlarge", "r3.4xlarge", "r3.8xlarge", "i2.xlarge", "i2.2xlarge", "i2.4xlarge", "i2.8xlarge", "d2.xlarge", "d2.2xlarge", "d2.4xlarge", "d2.8xlarge", "hi1.4xlarge", "hs1.8xlarge", "cr1.8xlarge", "cc2.8xlarge", "cg1.4xlarge"]
,
      "ConstraintDescription" : "must be a valid EC2 instance type."
    }
    <SNIP>
Next, let’s touch on the Resources section. This is the only section that’s required. This is the section where all of the resources you’d like to create are defined.
<SNIP>
  "Resources" : {
    "WebServerSecurityGroup" : {
      "Type" : "AWS::EC2::SecurityGroup",
      "Properties" : {
        "GroupDescription" : "Enable HTTP access via port 80 locked down to the load balancer + SSH access",
        "SecurityGroupIngress" : [
          {"IpProtocol" : "tcp", "FromPort" : "80", "ToPort" : "80", "CidrIp" : "0.0.0.0/0"},
          {"IpProtocol" : "tcp", "FromPort" : "22", "ToPort" : "22", "CidrIp" : { "Ref" : "SSHLocation"}}
        ]
      }
    },

    "WebServer": {
      "Type" : "AWS::EC2::Instance",
      <SNIP>
Finally, in our example template, we have the Output section. This is the section that defines what CloudFormation will return when the deployment is finished. In this case, CloudFormation will return the URL of the Wordpress site we’ll be provisioning.
<SNIP>
  "Outputs" : {
    "WebsiteURL" : {
      "Value" : { "Fn::Join" : ["", ["https://", { "Fn::GetAtt" : [ "WebServer", "PublicDnsName" ]}, "/wordpress" ]]},
      "Description" : "WordPress Website"
    }
  }
}
Stacks with AWS Cloudformation
When deployed to AWS, a template creates a stack. A stack is AWS’ terminology defining all of the resulting infrastructure that’s provisioned and configured during a CloudFormation deployment. The stack represents the result of what instructions the template provides to CloudFormation.
Getting Started
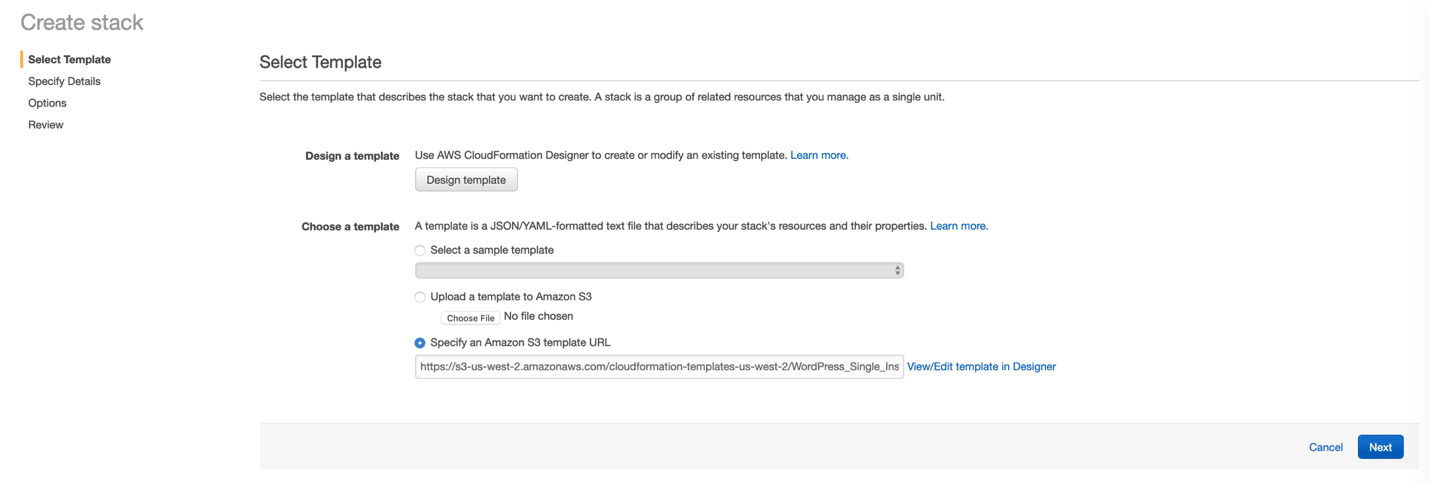
Let’s now get started actually deploying our first stack! To do this, head over to CloudFormation in the AWS Management Console. Once here, click on Create Stack. This will bring you to a screen where you can define your own template or choose an existing one. For this article, we’re going to specify a URL that points to the Wordpress sample template as shown below and click Next.
PHOTO1

Once we do this, you’ll be able to define a name for the stack and to provide a value to any of the parameters defined in the template. Fill out the parameter values with any of your choosing ensuring the KeyName field is defined as well. Be sure to select a key pair you’ve created earlier.
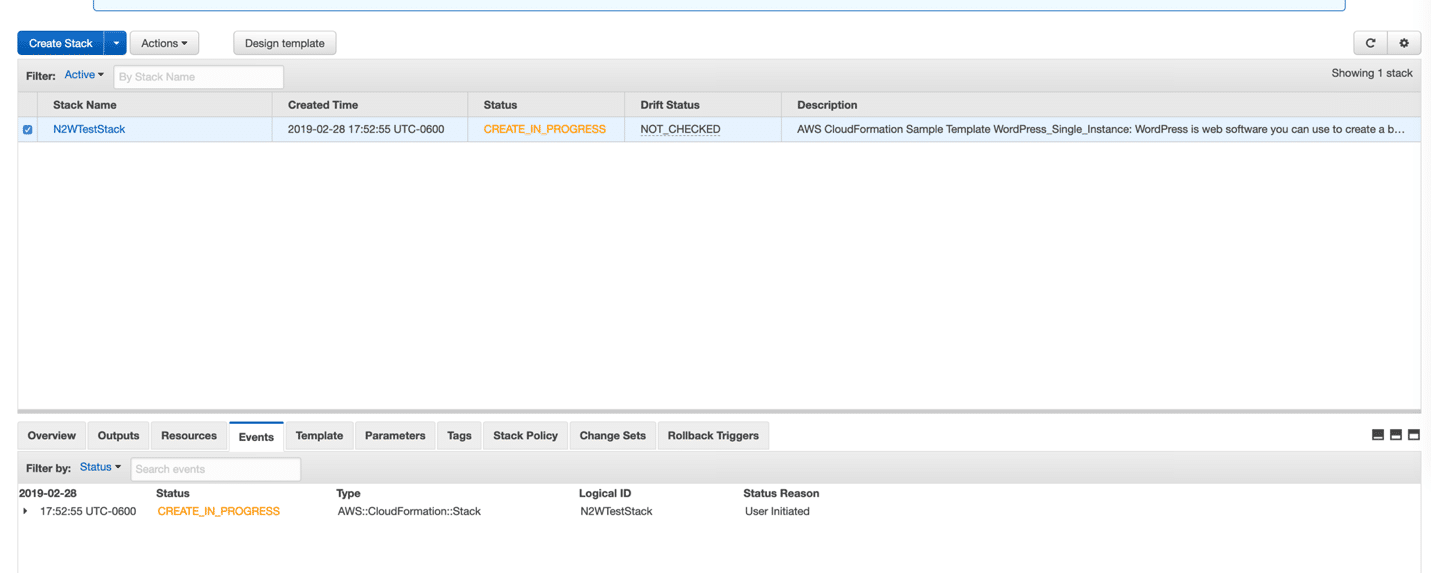
Next, you can provide some tags and other advanced configuration information but we won’t be doing that so click Next again until you get to the Create button. Click that and you should then see the stack beginning to be provisioned.

Monitoring Stack Creation
At this point, your deployment is in process. Eventually, you will see a green CREATE_COMPLETE message if all goes well. You can track the progress of your stack by inspecting the Events tab. This is where all of the activity for the stack will be displayed.

Detecting Drift
Once the stack is created, it’s under the control of CloudFormation. However, any changes can still be made to the stack outside of the control of CloudFormation. Luckily, CloudFormation has a feature called Drift Detection.
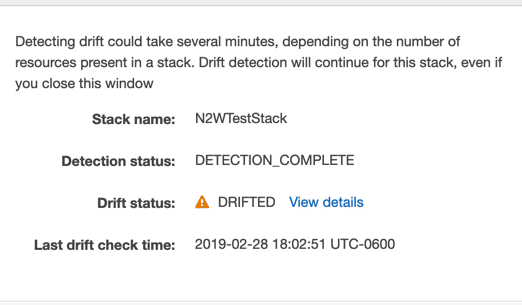
Let’s say someone comes along and changes my EC2 instance type that I configured with CloudFormation. To find this out, I can go up to Actions and click on Detect Drift and CloudFormation will begin scanning the resources to ensure they adhere to the template we created earlier.
If it detects drift, you will see this like below:

Clicking on View Details will provide you with another screen of granular configuration information about what resource changed and how.
Removing a Stack
Just as easily as the stack was created, it can be removed as well. Rather than removing each resource individually, CloudFormation allows you to remove the entire stack at once taking all of the resources that were created with it. To do so, simply click on the stack to remove, click on Actions and then on Delete stack. This will begin the deletion process where you will be directed to the events tab again to monitor the progress.
Summary
You can see that CloudFormation allows you to provision, manage and remove entire groups of resources as if they were one. By following the CloudFormation JSON/YAML template schema, you’re able to bring up, detect changes and bring down entire data centers’ worth of resources with a single deployment!
If you have lots of infrastructures to deploy and manage, CloudFormation is a great way to keep all of that infrastructure defined in a single text file and deployable at a moment’s notice.

Declan is a Channel & Alliance rep for N2WS. When he's not helping customers optimize their cloud environments and writing easy-to-understand technical content, you can find him spending time on the golf course, improving his game.
About N2WS
N2WS was founded in 2012 with the mission of providing enterprise-class data protection for production environments deployed in the public cloud. N2WS Backup & Recovery was designed and built from the ground up to meet all backup and DR requirements and is now the leading enterprise-class backup, recovery, and disaster recovery solution specifically optimized for Amazon’s AWS EC2 infrastructure. Enterprises can recover complete servers/instances, specific volumes, or individual files in seconds to other AWS regions or even another AWS account, and be back up to production in only seconds.
Try N2WS
You can try N2WS today. The 30-day free trial (no credit card needed) includes all features of our Enterprise edition so you will be able to see first hand how to efficiently and cost-effectively protect your EC2 instances, RDS, DynamoDB, Aurora databases, as well as Redshift clusters, utilize both cross region and cross-account DR.