
FIPS compliance ensures your operating system uses certified cryptographic libraries, meeting strict NIST security standards. It’s important to note that FIPS is not about general system hardening—the libraries themselves function the same as before, but they now carry the certification auditors require. For many organizations, this is a non-negotiable compliance requirement.
Previously, Ubuntu 18.04 provided FIPS compliance out-of-the-box. When it reached end-of-life (EOL), it’s possible that some auditors would not allow critical workloads, like N2W, to run on unsupported versions. Ubuntu Pro solves this problem. With ongoing updates and certified cryptographic libraries, Oracle can maintain FIPS compliance without disruption.
For customers currently on Ubuntu 18.04—or any version seeking FIPS compliance—the path is clear: upgrade to Ubuntu 22.04 Pro. Doing so ensures your environment meets compliance standards while benefiting from ongoing support.
Upgrading to Ubuntu Pro is simple, safe, and has no impact on N2W operations. It’s just a few steps to apply minor updates and extend your support coverage. Here’s how to do it:
Steps for Upgrading to Ubuntu Pro
Step 1: Shut down your instance
- Check no backups are currently running by viewing the backup monitor screen
on your N2WS console. - Take a snapshot of your cpmdata volume either by running the cpmdata policy
on your N2WS console or by manually creating a snapshot of the volume on the
AWS console. - Then, go to the EC2 dashboard and shut down your N2WS instance.
Step 2: Upgrade to Ubuntu Pro
- Go to the AWS License Manager and select License type conversion on the left
side menu. - Click the Create license type conversion button.
- Select Ubuntu LTS from the dropdown menu and choose the instances you want
to upgrade. - Click Next and select Ubuntu Pro as the License type destination.
- Review the information and click Convert.
- The Conversion will show as successful once its complete (this can take a few
minutes)
Enabling FIPS
Step 1: Connecting to your N2WS instance CLI
- Start your N2WS instance
- Connect to your N2WS instance using SSH
- Install the pro tool (if not already installed):
sudo apt update
sudo apt install ubuntu-advantage-tools
4. Enable FIPS updates or FIPS mode:
sudo pro enable fips-updates
sudo pro enable fips
5. Reboot Instance using CLI command below or stop and start instance on AWS
console
Sudo RebootVerify FIPS mode or FIPS updates are enabled
sudo pro status 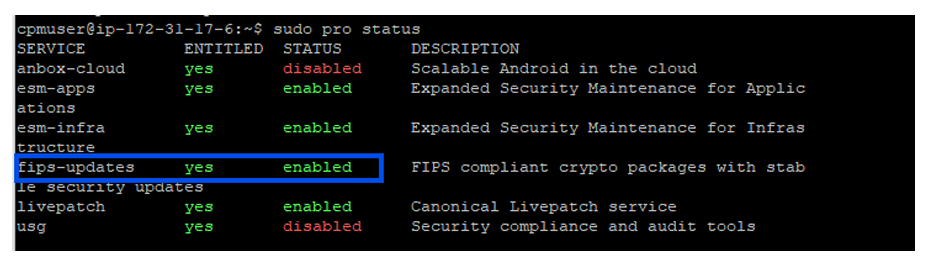
Any questions? Looking for additional security and compliance tips?
Don’t hesitate to book a (free!) short healthcheck.