
You’ve probably already implemented the basic cost-saving tips for your Azure backups – creating a budget alert, choosing the right storage tier, and deleting old backups. But if you’re looking at your monthly Azure bill and still getting sticker shock, it’s time to go deeper.
Storage Tier Optimization
Azure has storage tiers that dictate how data is stored and accessed:
- Hot for frequent access
- Cool for 30+ day storage
- Cold for 90+ day storage
- Archive for 180+ day offline storage.
While each tier offers progressively lower storage costs, they come with higher retrieval costs. This trade-off creates opportunities for optimization.
By automating the movement between these tiers based on intelligent analysis of your backup patterns, you can significantly reduce costs. Here’s an example of a JSON file that sets up a smart tiering strategy using Azure Blob Storage lifecycle management rules:
{
  "rules": [
    {
      "name": "backup-lifecycle-rule",
      "enabled": true,
      "type": "Lifecycle",
      "definition": {
        "filters": {
          "blobTypes": ["blockBlob"],
          "prefixMatch": ["vm-backups/"]
        },
        "actions": {
          "baseBlob": {
            "tierToCool": {"daysAfterModificationGreaterThan": 30},
            "tierToArchive": {"daysAfterModificationGreaterThan": 90},
            "delete": {"daysAfterModificationGreaterThan": 2555}
          },
          "snapshot": {
            // For snapshots, use creation date rather than modification date
            "delete": {"daysAfterCreationGreaterThan": 90}
          }
        }
      }
    }
  ]
}
This policy automatically moves VM backups to the Cool tier after 30 days and to Archive after 90 days.
Remember that Archive tier is only supported for LRS, GRS, and RA-GRS redundancy configurations – an important detail that can trip you up if missed.
The real sophistication comes with implementing granular policies across your environment. Azure allows up to 100 rules per storage account, giving you significant flexibility. You can target policies based on:
- Specific containers
- Blob prefixes (up to 10 per rule)
- Blob types
- Blob index tags
For maximum cost efficiency, consider enabling access time tracking to better inform your tiering decisions.
# Enable access time tracking via Azure PowerShell
Enable-AzStorageBlobLastAccessTimeTracking
N2WS Advantage: While Azure offers policy deployment through PowerShell, CLI, ARM templates and REST API, N2WS provides ready-to-use intelligent tiering policies with built-in best practices that optimize your backup storage costs across your entire environment without requiring custom script development or management.
Incremental Snapshots vs. Azure Backup: Selecting the right approach
Azure’s incremental snapshot technology can be useful for specific backup scenarios, but there are important distinctions to understand. By default, all Azure managed disk snapshots are incremental, with the first snapshot being a full copy of the disk and subsequent snapshots storing only the delta changes.
While manual snapshots might seem like a cost-effective solution, Microsoft generally recommends Azure Backup for production workloads because it provides application-consistent backups and comprehensive management capabilities that raw snapshots lack.
If you’re implementing a snapshot-based approach for specific use cases (like test/dev environments or as part of a custom workflow), here’s an example of how to do it with PowerShell:
# Create an incremental snapshot with proper error handling and tagging
try {
    $disk = Get-AzDisk -ResourceGroupName "YourResourceGroup" -DiskName "YourDiskName"
    $snapshotConfig = New-AzSnapshotConfig `
        -Location $disk.Location `
        -SourceUri $disk.Id `
        -CreateOption Copy `
        -Incremental `
        -Tag @{CreatedBy="Backup";RetentionPolicy="30Days"}

    New-AzSnapshot `
        -ResourceGroupName "YourResourceGroup" `
        -SnapshotName "YourSnapshotName-$(Get-Date -Format 'yyyyMMdd')" `
        -Snapshot $snapshotConfig
} catch {
    Write-Error "Failed to create snapshot: $_"
    throw
}

# Clean up old snapshots based on retention policy with error handling
try {
    $date = (Get-Date).AddDays(-30)
    $snapshots = Get-AzSnapshot -ResourceGroupName "YourResourceGroup" |
                 Where-Object { $_.Tags.RetentionPolicy -eq "30Days" }

    foreach ($snapshot in $snapshots) {
        if ($snapshot.TimeCreated -lt $date) {
            Remove-AzSnapshot -ResourceGroupName "YourResourceGroup" -SnapshotName $snapshot.Name -Force
            Write-Output "Removed snapshot: $($snapshot.Name)"
        }
    }
} catch {
    Write-Error "Failed to clean up snapshots: $_"
}
However, this approach still lacks several important features that Azure Backup provides natively.
Best Practice: Azure Backup for Production Workloads
For most production environments, Azure Backup is the recommended approach as it provides:
- Built-in application consistency (not available with raw snapshots)
- Automatic management of recovery points
- Native support for GFS (Grandfather-Father-Son) retention schemes
- Integration with Azure Security Center
- Cross-region recovery capabilities
Here’s how to implement a proper backup solution using Azure Backup:
# Create Azure Recovery Services vault
New-AzRecoveryServicesVault `
 -Name "BackupVault" `
 -ResourceGroupName "YourResourceGroup" `
 -Location "EastUS"

# Configure backup policy with GFS retention
$schPol = Get-AzRecoveryServicesBackupSchedulePolicyObject -WorkloadType "AzureVM"
$retPol = Get-AzRecoveryServicesBackupRetentionPolicyObject -WorkloadType "AzureVM"

# Customize retention for GFS scheme
$retPol.DailySchedule.DurationCountInDays = 30
$retPol.WeeklySchedule.DurationCountInWeeks = 12
$retPol.MonthlySchedule.DurationCountInMonths = 12
$retPol.YearlySchedule.DurationCountInYears = 7

# Create the policy
$policy = New-AzRecoveryServicesBackupProtectionPolicy `
 -Name "GFSPolicy" `
 -WorkloadType "AzureVM" `
 -SchedulePolicy $schPol `
 -RetentionPolicy $retPol

# Enable backup for a VM
$vm = Get-AzVM -ResourceGroupName "YourResourceGroup" -Name "YourVMName"
Enable-AzRecoveryServicesBackupProtection `
 -ResourceGroupName "YourResourceGroup" `
 -Name "BackupVault" `
 -Policy $policy `
 -VirtualMachine $vm
Key Insight: While incremental snapshots appear cheaper at first glance, Azure Backup often provides better long-term cost optimization through built-in lifecycle management, deduplication, and compression capabilities that raw snapshot management doesn’t offer.
Smart Retention Policies: Right-Sizing Your Backup History
Let’s talk about retention – the art of deciding how long to keep your backups. The default approach is often too simplistic: keep everything for X days. For optimal cost efficiency, you need to understand the specific retention capabilities of different Azure backup services and implement appropriate tiered strategies.
Understanding Azure SQL Database Retention Structure
Azure SQL Database provides a sophisticated built-in retention model:
- Short-term retention (STR): 7-35 days by default, with point-in-time restore capability
- Long-term retention (LTR): Up to 10 years in Azure Blob Storage
The backup schedule itself follows a fixed pattern:
- Full backups: Weekly
- Differential backups: Every 12 or 24 hours
- Transaction log backups: Every 5-10 minutes
This means you don’t need to configure hourly backups – Azure handles this automatically for databases. However, you do need to configure the retention periods appropriately.
Implementing Resource Segmentation for Cost-Effective Retention
Microsoft recommends separating your backup vaults for more efficient retention management:
- Different business units (Finance, HR, Operations)
- Production vs. non-production environments
- Different workload types (VMs, SQL, File Shares)
Here’s how to implement this segmentation using Azure CLI:
# Create separate vaults for production and non-production
az backup vault create \\
    --name "ProdBackupVault" \\
    --resource-group "ResourceGroup" \\
    --location "EastUS"

az backup vault create \\
    --name "DevBackupVault" \\
    --resource-group "ResourceGroup" \\
    --location "EastUS"

# Configure production retention policy
az backup policy create \\
    --name "ProdRetentionPolicy" \\
    --vault-name "ProdBackupVault" \\
    --resource-group "ResourceGroup" \\
    --backup-management-type AzureIaasVM \\
    --workload-type VM \\
    --policy-type V2

# Configure development retention policy (shorter retention)
az backup policy create \\
    --name "DevRetentionPolicy" \\
    --vault-name "DevBackupVault" \\
    --resource-group "ResourceGroup" \\
    --backup-management-type AzureIaasVM \\
    --workload-type VM \\
    --policy-type V2
Key Insight: Use Azure’s built-in capabilities like Policy and Backup Center for scale management before resorting to custom scripting. This reduces operational overhead while still providing granular control.
Monitoring and Automation: Leveraging Azure’s Built-in Cost Tools
While implementing these optimization strategies is crucial, their success depends on effective monitoring and automated adjustments. Azure provides several built-in tools that streamline backup cost monitoring and optimization, eliminating the need for complex manual tracking.
One particularly useful tool is Azure Logic Apps, a cloud-based platform for creating and running automated workflows with minimal coding. Its visual designer and pre-built connectors make it easy to orchestrate business processes, integrate applications, and automate monitoring tasks.
Implementing Cost Alerts with Azure Monitor
Rather than building custom Logic Apps from scratch, if you know PowerShell, Azure provides built-in capabilities for cost monitoring and alerting. Here’s an approach using Azure Monitor and Action Groups:
# Create an Action Group for cost alerts
$actionGroup = New-AzActionGroup `
    -ResourceGroupName "ResourceGroup" `
    -Name "BackupCostAlerts" `
    -ShortName "BkpCost" `
    -Receiver @(
        @{
            Name = "EmailAlert"
            ReceiverType = "Email"
            EmailAddress = "admin@yourdomain.com"
        }
    )

# Create a budget alert
$budget = New-AzConsumptionBudget `
    -Name "BackupBudget" `
    -Amount 1000 `
    -Category "Cost" `
    -StartDate (Get-Date) `
    -EndDate (Get-Date).AddYears(1) `
    -TimeGrain "Monthly" `
    -ContactEmail "admin@yourdomain.com" `
    -NotificationKey "Actual" `
    -NotificationThreshold @(50, 75, 90, 100) `
    -NotificationEnabled $true `
    -ResourceGroupName "ResourceGroup" `
    -ResourceId "/subscriptions/$subscriptionId/resourceGroups/ResourceGroup" `
    -ActionGroup $actionGroup.Id
This approach leverages Azure’s built-in budget alerts and action groups.
Leveraging Azure Advisor for Backup Cost Optimization
Azure Advisor helps optimize your Azure spend by analyzing backup configurations and identifying cost-saving opportunities. The recommendations it provides for backup optimization include:
- Using differential or incremental backup approaches for database workloads
- Optimizing retention policies through appropriate archive tier usage
- Identifying backup protection options for resources:
- Stop protection and retain backup data
- Stop protection and delete backup data
- Recommending archive tier usage specifically for long-term retention (LTR) points
While Azure Advisor provides these valuable insights, implementing them manually can be time-consuming. This is where Azure Automation comes in – it allows you to automatically act on these recommendations through runbooks:
Below is an example of creating an Azure Automation runbook with PowerShell that programatically gets recommendations from Azure Advisor and gives you the opportunity to implement remediations if necessary.
# Create automation runbook to process recommendations
$runbookName = "ProcessBackupRecommendations"
$automationAccount = "YourAutomationAccount"
$resourceGroup = "YourResourceGroup"

# Define the runbook content
$runbookContent = @'
workflow ProcessBackupRecommendations {
    param (
        [Parameter(Mandatory=$true)]
        [string] $SubscriptionId
    )

    # Connect to Azure
    $connection = Connect-AzAccount -Identity

    # Select subscription
    Select-AzSubscription -SubscriptionId $SubscriptionId

    # Get recommendations
    $recommendations = Get-AzAdvisorRecommendation | Where-Object {
        ($_.Category -eq "Cost") -and
        ($_.ImpactedResource -like "*Microsoft.RecoveryServices/vaults*")
    }

    foreach ($rec in $recommendations) {
        if ($rec.ShortDescription.Problem -like "*differential backup*") {
            # Logic to implement differential backup recommendation
            Write-Output "Processing recommendation: $($rec.ShortDescription.Problem)"
            # Additional implementation code here
        }
    }
}
'@

# Create the runbook
New-AzAutomationRunbook -Name $runbookName -Type Workflow -ResourceGroupName $resourceGroup -AutomationAccountName $automationAccount
Set-AzAutomationRunbookContent -Name $runbookName -Type Workflow -Content $runbookContent -ResourceGroupName $resourceGroup -AutomationAccountName $automationAccount
Publish-AzAutomationRunbook -Name $runbookName -ResourceGroupName $resourceGroup -AutomationAccountName $automationAccount
Key Insight: Azure Advisor recommendations are dynamic and evolve as Microsoft refines its cost optimization algorithms. Always verify the latest recommendations before implementing automated solutions, as the specific advice may change over time
Cross-Region and Cross-Cloud Optimization
One often-overlooked aspect of backup cost optimization is leveraging different regions or even different cloud providers for long-term retention. Azure storage costs vary significantly by region – sometimes by as much as 30-40%. By strategically positioning your long-term backups in lower-cost regions, you can achieve substantial savings.
Consider this approach:
- Keep short-term backups local for fast recovery
- Replicate medium-term backups to a lower-cost Azure region
- Archive long-term backups to the most cost-effective storage option
Implementing this in Azure requires custom development using Azure Storage and replication services. You’ll need to build automation to:
- Identify backups eligible for cross-region archiving
- Copy the backup data to the target region
- Verify data integrity after transfer
- Delete the source data once safely archived
This approach delivers impressive cost savings but increases operational complexity substantially.
N2WS Advantage: N2WS provides built-in support for cross-region and cross-cloud backup archiving. You can automatically tier data from expensive storage to more cost-effective options, including across Azure regions or even to AWS S3 storage, without building custom automation.
Building a Comprehensive Cost Optimization Strategy
Truly optimizing your Azure backup costs requires a multi-faceted approach. It’s not just about picking the right storage tier or adjusting retention periods – it’s about building an intelligent, automated system that continuously optimizes your backup storage and operations.
The challenge with Azure’s native tools is that implementing these advanced optimization techniques requires significant custom development and ongoing maintenance. You’ll need to build and maintain PowerShell scripts, Logic Apps, and custom monitoring solutions – all of which add operational overhead and complexity.
Streamlining Backup to Azure Cold Storage with N2W: A Smart Strategy for Long-Term Savings
This is where purpose-built backup management tools like N2W can provide substantial value. By automating these complex cost optimization strategies and providing built-in support for advanced features like cross-region archiving, intelligent tiering, and comprehensive monitoring, N2W eliminates the need for custom development while delivering superior cost optimization.
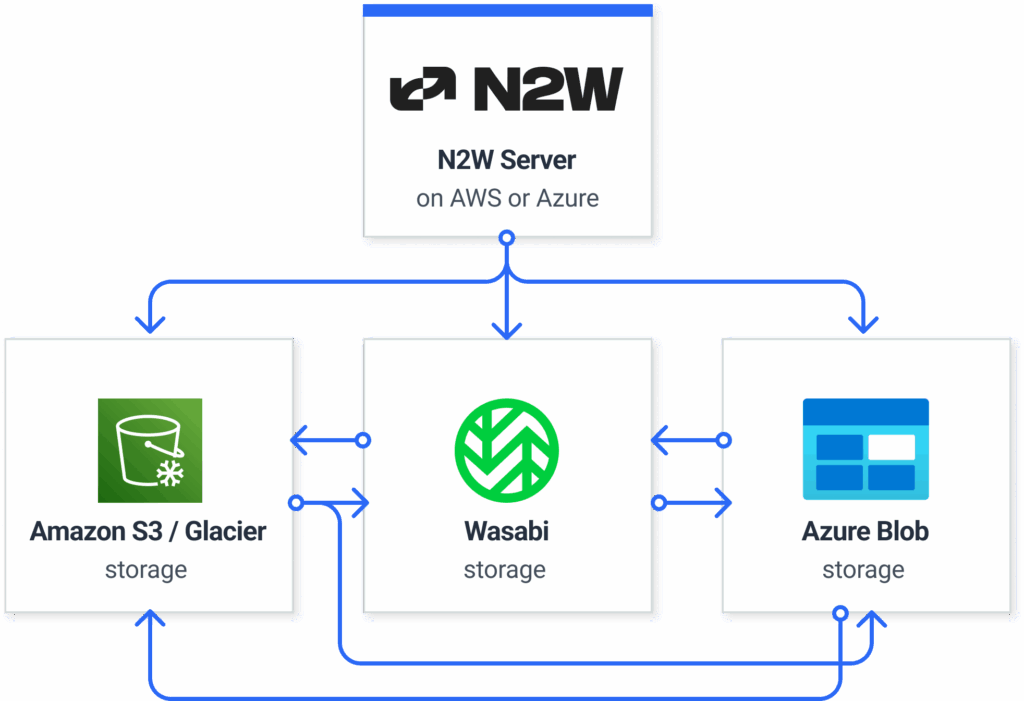
N2W offers a robust solution that not only simplifies backup management across AWS, Azure, and Wasabi but also delivers significant cost savings by streamlining the process of moving backups to cold storage.
N2W’s cost saving standout feature is its seamless integration with Azure Blob, AWS S3, and Wasabi, facilitating automated and cost-effective data archiving. This cross-cloud capability not only isolates backup data from production environments but also mitigates risks associated with vendor lock-in. With direct API integrations and enhanced immutability features, N2W ensures rapid recovery and compliance with regulatory requirements, all managed through a unified console. This approach allows for substantial reductions in storage and licensing expenses, with some customers experiencing up to 92% savings.
Incorporating N2W into your backup strategy is more than a technical decision—it’s a proactive step towards a more efficient, automated, and resilient Multicloud infrastructure. By streamlining data archiving and optimizing storage costs, N2WS empowers organizations to focus on innovation and growth, knowing their data protection needs are in capable hands.
Click. Restore. And relax! Try N2W today.