Our aim at N2WS is to simplify your backup and recovery processes through advanced automation.
One of our standout features is Tag Management. This powerful tool automates your backup workflow by managing resources through tags—whether it’s adding, excluding, or removing them from a policy as required.
In this blog post, we’ll dive into how Tag Management functions and demonstrate how you can leverage it to enhance and streamline your N2WS backup management right away.
How Tag Management Works
By tagging a resource (such as an EC2 instance, EBS volume, EFS, DynamoDB, RDS instance, Aurora Cluster, Redshift cluster), N2WS is automatically notified. This allows N2WS to manage the resource appropriately without logging into the N2WS console.
Once Tag Management is enabled, the N2WS server will scan the target AWS accounts on a preset schedule and search for the supported tags. Based on the tag value assigned, it will set up the backup policy accordingly.
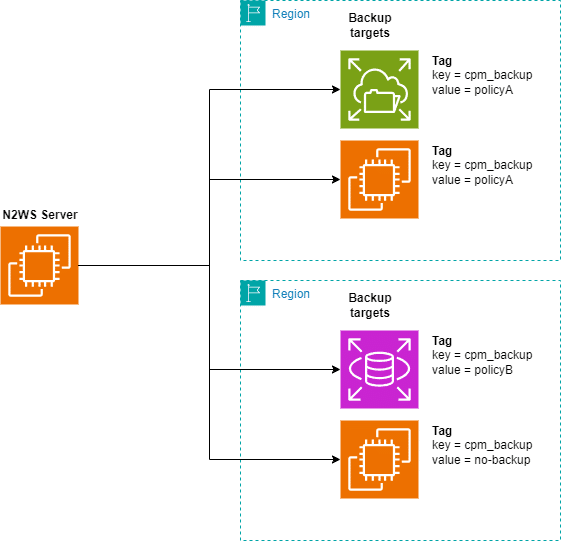
For example, in the diagram below, the N2WS server is configured to scan for resources in two regions.
In the first region, it found an EFS & EC2 resource with tag cpm_backup=policyA, so it would add both resources automatically to that existing policy.
In the second region, it found an RDS database with tag cpm_backup=policyB and and an EC2 instance with cpm_backup=no-backup. Therefore, the RDS would be added automatically to PolicyB and the EC2 will be removed from all policies as it’s tagged to not be backed up.
Let’s Start Using Tag Management
To start using Tag Management, select which resources and region to scan on each account. Then, tag the relevant resource and enable periodic tag scan in the system.
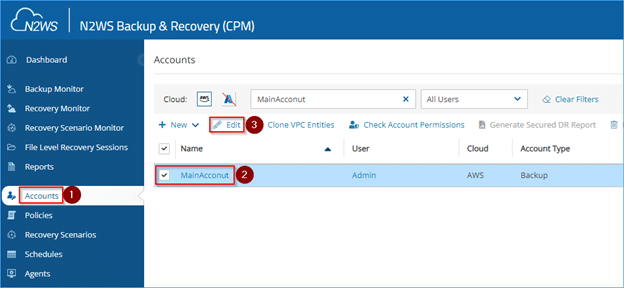
Step 1: Enabling tags on account
- (1) Go to Account Monitor
- (2) Select the relevant account.
- (3) Click on Edit
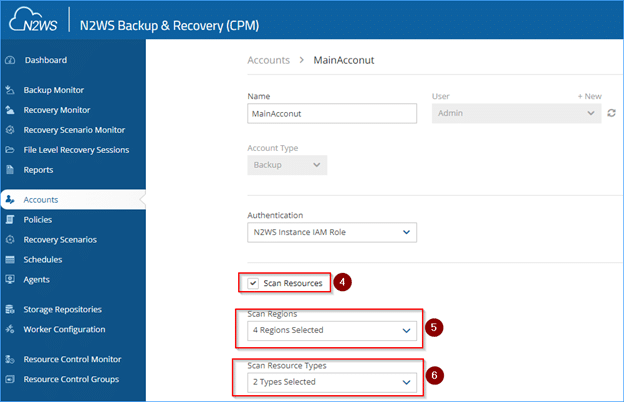
- (4) Enable the checkbox “scan resources”
- (5) Select which regions to scan
- (6) Select which Resource types to scan
- (7) Repeat for any other relevant account
Step 2: Tagging the Target Resources
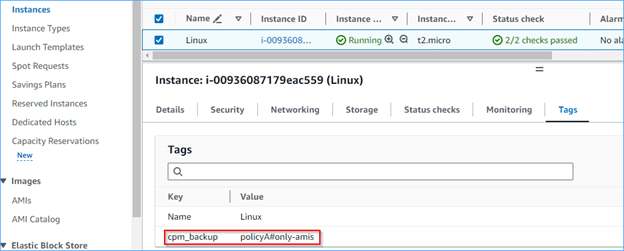
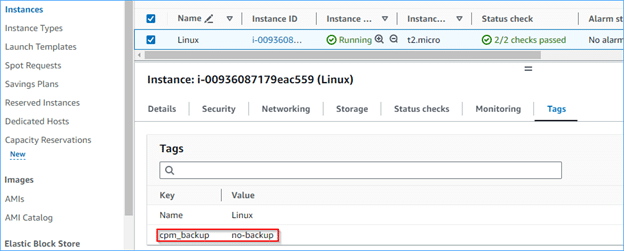
- Go to the resources you want to backup and add a tag with key cpm_backup and value containing the operation you want.
For example, if you want to add a Linux EC2 to a policy called PolicyA, add a tag with that policy name.
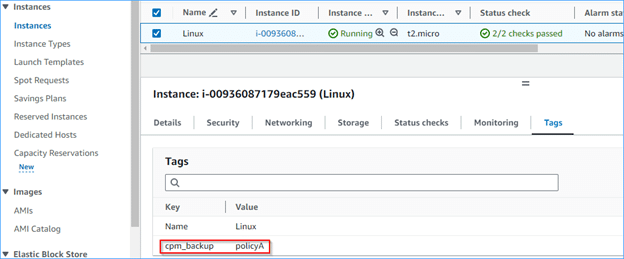
If you want to add the Linux server, but instead of the default snapshot backup you want AMI backup – add a tag with the policy name followed by #only-amis to select AMI backup.
If you want to remove the resource from all policies and exclude it from the Unprotected Resource Report, add no-backup value to the tag.
You can find detailed information and available tag options in our User Guide for Tag-based Backup Management
Step 3: Enabling periodic tag scan.
- (1) Click on Server Settings
- (2) Click on Tag Scan
- (3) Click on Periodically scan resource tags.
- (4) Select the scan interval.
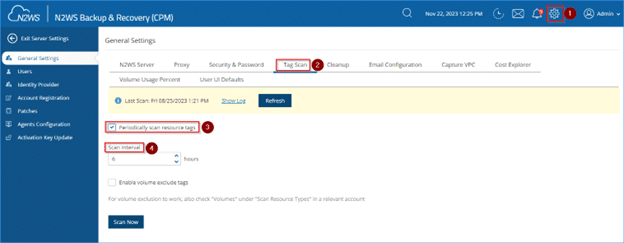
- (5) For testing, you can click on Scan Now to run the scan immediately.
- (6) Wait 10 minutes and check result in the logs by clicking on Show Log
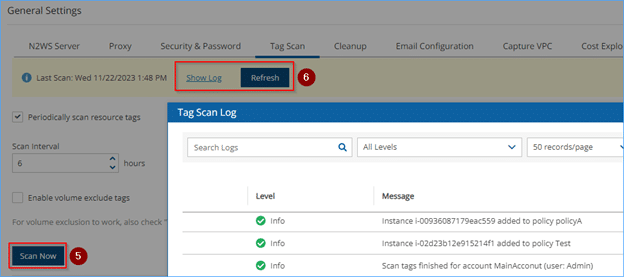
The N2WS Server will now start to periodically scan for tags in the selected regions and resource types.
Looking for more on Tag Management?
- Here’s a short video tutorial on Custom Tags which gives you the option to include a resource in a backup policy using your own existing tag values.
- Here’s our Tag-Based Management User Guide
- More on how to troubleshoot Tag-Based backup
This step-by-step guide will hopefully serve as a launchpad to help you get started using N2WS tag-based backup management. As your environment scales, tagging will greatly help you manage your infrastructure, making the setup of regular backups effortless and efficient.
New to N2WS? Take an interactive demo and see how it works.

Adi is our N2WS Technical Support hero, leading our international support team. He has over a decade of experience working with cloud customers to solve their technical challenges. He's a self-taught AWS, Azure and Python wizard.
N2WS: Providing Automated Backup and Instant Failover Seamlessly
With the ever-growing sophistication of cloud infrastructures, N2WS offers a seamless and efficient solution, ensuring that your data is protected and accessible at all times. Its intuitive interface and robust automation capabilities simplify backup and recovery processes, enabling you to navigate granular backup procedures and immediate failovers in multiple regions and accounts, with ease.
N2WS streamlines operations, saving you time, money, and headaches. Its high level of security and compliance features guarantees your data’s safety, allowing you to focus on what really matters: innovation and growth. As backup operations become more complex, vulnerabilities loom and data storage becomes a signficant expense, N2WS is your trusted partner in keeping your data secure, readily available and low cost at all times.