
What Is Azure SQL Database Restore?
Azure SQL Database is a fully managed relational database service provided by Microsoft as part of the Azure cloud platform. It is built on the SQL Server engine, enabling users to leverage familiar T-SQL syntax, programmability, and data management features.
Azure SQL Database offers several methods for restoring a database, including point-in-time restore, geo-restore, and restoring from backups. You can restore a database to the same or a different instance, potentially overwriting the original or creating a new one. The process varies slightly depending on whether you’re restoring to a managed instance or a single database.
Methods for restoring Azure SQL databases include:
1. Point-in-time restore:
- This allows you to restore a database to a specific point in time within the defined backup retention period.
- You can initiate this process from the Azure portal by navigating to the database, selecting “Restore”, and then choosing the desired point in time.
- You’ll need to specify the target instance and resource group.
2. Geo-restore:
- This method uses geo-replicated backups to restore a database to a different region.
- It’s particularly useful for Azure disaster recovery scenarios.
- Geo-restore is only available for databases configured with geo-redundant backup storage.
3. Deleted database restore:
- Allows recovery of a database that was accidentally deleted within the backup retention period.
- Used to recover data after unintended deletions without requiring prior configuration.
- Requires restoring to the same logical server or managed instance where the original database existed.
4. Active geo-replication:
- Enables creation of up to four continuously synchronized secondary databases in different regions.
- Used for high availability, disaster recovery, and read scale-out scenarios.
- Requires prior configuration of geo-replication and is available only on premium tiers.
5. LTR restore:
- Restores databases from long-term backups retained for compliance or archival purposes.
- Used when historical data must be accessed beyond the standard backup retention window.
- Requires an LTR policy to be configured in advance to define retention duration and frequency.
This is part of a series of articles about Azure backup
In this article:
- Top 5 Methods for Azure SQL Database Restore
- Tutorial: Back up and Restore a Database for Azure SQL Database
- Azure SQL Database Back and Restore Limitations
- Best Practices for Reliable Restores in Azure SQL Database
- Optimizing Azure SQL Database Backups
Top 5 Methods for Azure SQL Database Restore
Point-in-Time Restore (PITR)
Point-in-time restore allows recovery of a database to any moment within the retention period, which ranges from 7 to 35 days depending on the service tier and configuration. It leverages the continuous backup system in Azure SQL Database, which includes full backups every week, differential backups every few hours, and transaction log backups every 5–10 minutes.
This makes it possible to restore a database to the exact second before an unwanted event, such as accidental data deletion or corruption. To perform a PITR, users initiate the restore through the Azure portal, PowerShell, or CLI, and specify a restore point. The process creates a new database on the same server, separate from the original, so the original remains unchanged. PITR is often used for operational recovery and testing purposes.
Note: Because PITR does not support “in-place” restoration, you’ll need to redirect applications or rename databases after validation before resuming production workloads.
Geo-Restore
Geo-restore enables recovery of an Azure SQL Database in any region using the most recent geo-replicated backup. These backups are stored automatically in geo-redundant storage, providing a fail-safe against regional outages. Geo-restore does not require prior setup and is available for all databases by default.
The recovery point from geo-redundant backups can lag by up to an hour due to the nature of replication. To initiate geo-restore, users choose the target region and provide a new name for the database. This method is typically used during disaster recovery when the original region is unavailable or severely degraded. Although it has higher RTO and RPO compared to active geo-replication, it is simple and widely available.
Deleted Database Restore
When a database is deleted, Azure retains its backups for the remainder of the configured PITR retention period. This allows administrators to restore the database as it existed at the time of deletion. The process is similar to PITR but pre-populates the restore point with the deletion timestamp, simplifying recovery in accidental delete scenarios.
Users can restore a deleted database via the Azure portal or scripting tools. The restored instance must be given a new name, and it is created in the same logical server or managed instance where the original database resided. This method ensures that accidental deletions don’t result in permanent data loss, provided recovery is initiated within the retention window.
However, if the entire SQL server is deleted, all backups — including those for deleted databases — are permanently lost. This makes accidental or malicious server deletion a critical risk to plan for. Solutions like N2W can maintain off-server, immutable copies, protecting against total backup loss.
Active Geo-Replication
Active geo-replication supports the creation of up to four readable secondary databases in different regions. These replicas are continuously synchronized with the primary database using asynchronous replication. This setup provides low RTO and minimal data loss in failover scenarios, making it suitable for mission-critical applications.
To use this feature, geo-replication must be configured ahead of time. Each secondary can be promoted to primary, either manually or as part of a failover strategy. In addition to high availability, active geo-replication also supports read scale-out workloads by allowing read-only queries on the secondary databases. However, because it’s a premium feature, it incurs additional costs and requires careful planning.
Long-Term Retention (LTR) Restore
LTR restore allows recovery of a database from backups retained for up to 10 years. This feature is for compliance and archival needs where regulations require data to be preserved for extended periods. LTR policies are configured per database and define how frequently backups are copied to long-term storage and how long they are kept.
LTR supports weekly, monthly, and yearly retention patterns. These backups are stored in Azure Blob Storage and can be restored to a new database at any time, even after the original has been deleted. While PITR is limited to the short-term backup window, LTR gives organizations a way to access historical data long after it is no longer needed for active operations.
Related content: Read our guide to Azure SQL database backup
Tutorial: Back up and Restore a Database for Azure SQL Database
This tutorial shows how to back up and restore an Azure SQL Database instance. Instructions are adapted from a Microsoft training unit.
Restore a Database to a Specific Point in Time
To perform a point-in-time restore (PITR), follow these steps using the Azure portal:
- Go to the SQL databases page in the Azure portal.
- Select the database you want to restore.
- On the database overview page, select Restore.
- In the restore pane:
- Choose Point-in-time as the restore type.
- Select the desired restore timestamp.
- Provide a new name for the database (restore in place is not supported).
- Choose the target server.
- Click Review + create, then Create to start the restore.

Ensure the target database name does not already exist on the server. Restore will fail if the name is in use.
You can also restore using PowerShell, CLI, or REST API. For example, in PowerShell:
Restore-AzSqlDatabase `

  -FromPointInTimeBackup `

  -ResourceGroupName "myResourceGroup" `

  -ServerName "mySqlServer" `

  -TargetDatabaseName "myRestoredDb" `

  -PointInTime "2023-12-01T10:00:00Z" `

  -ResourceId "/subscriptions/xxxx/resourceGroups/myResourceGroup/providers/Microsoft.Sql/servers/mySqlServer/databases/myDatabase"
Restore a Deleted Database
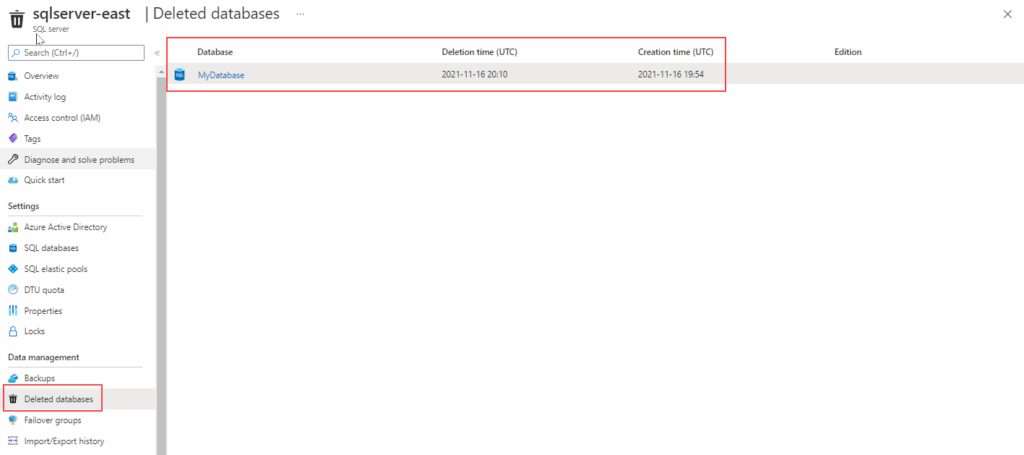
If a database has been deleted but the server still exists, it can be recovered using the Azure portal:
- Navigate to the SQL server’s Overview page.
- Click Deleted databases from the left-hand menu.
- Select the deleted database to restore.
- Provide a new name for the restored database.
- Click OK to start the restore process.
The restore uses the latest available backup before deletion and creates a new database on the same server.
Backups and Accelerated Database Recovery
All backups are managed by Microsoft and stored in read-access geo-redundant storage, making them resilient to datacenter failures. If the server is deleted, all associated backups are permanently lost and cannot be recovered.
Azure SQL Database uses Accelerated Database Recovery (ADR) by default. ADR improves recovery time for long-running transactions by avoiding traditional rollback processing.
This is particularly valuable for point-in-time restores, where large transactions might otherwise delay recovery. ADR allows the database to become available sooner by truncating undo operations and enabling faster crash recovery.
Manual Backup with SQL Managed Instance
Manual backups using T-SQL are only supported on Azure SQL Managed Instance, not on Azure SQL Database. On managed instances, you can back up to Azure Blob Storage using the BACKUP DATABASE command:
BACKUP DATABASE contosoTO URL = 'https://myacc.blob.core.windows.net/mycontainer/contoso.bak' WITH COPY_ONLY;Note: COPY_ONLY is required because SQL Managed Instance maintains the log chain.
This approach requires configuring access credentials for the blob container.
Azure SQL Database Back and Restore Limitations
While Azure SQL Database offers backup and restore features, there are some limitations that users should consider when planning their backup strategies. These limitations were taken from the G2 platform:
- Point-in-time restore (PITR) retention: The maximum retention period for PITR is 35 days. If longer retention is required, users must set up a Long-Term Retention (LTR) policy.
- No table-level restore: Azure SQL Database does not support the restoration of individual tables. To recover data, the entire database must be restored, which may consume more time and resources.
- Backup interval limitations: The frequency of transaction log backups is every 5 to 10 minutes, which may not be ideal for scenarios with stricter recovery point objectives (RPO).
- Restore time and resources: Restoring large databases can be time-consuming and resource-intensive, impacting performance during the recovery process.
- Dependency on geo-redundant storage: While backups are stored in geo-redundant storage, recovery from geo-replicated backups may incur delays, as the replication can lag by up to an hour.
- Backup failure on server deletion: If the SQL server is deleted, all associated backups are lost and cannot be recovered, potentially leading to data loss.
- Azure SQL Database backups are service-managed: This means you’re tied to Azure’s default backup cadence (weekly full, differential every few hours, transaction logs every 5–10 minutes), which may not align with stricter RPO requirements unless you layer on additional protection.
Best Practices for Reliable Restores in Azure SQL Database
Organizations should consider these practices to enable successful restores when using Azure SQL Database.
1. Implement Geo-Redundant Storage
Geo-redundant storage (GRS) strengthens data protection by replicating backups to a secondary Azure region, far from the primary location. If a regional outage or disaster occurs, it retains access to recent backups for recovery, ensuring business continuity in major incidents. GRS is simple to enable during database creation or later via service tier configuration.
Choosing geo-redundancy comes with a cost, but the risk-mitigation benefits justify the investment for enterprise workloads or compliance-driven industries. With automatic replication, administrators have peace of mind that backups are not just stored but distributed geographically, decreasing the risk of data loss due to regional failures or service incidents impacting a single location.
2. Document and Automate Restore Processes
Documenting restore procedures ensures the team knows the steps for different recovery scenarios, reducing confusion and errors during incidents. All restore options—PITR, geo-restore, deleted database, and LTR—should be documented in a clear, accessible format, covering prerequisites, exact commands, permissions required, and post-restore tasks.
Reference documentation should be reviewed and updated after every major Azure or process change. Automation further minimizes risk by standardizing recovery actions and reducing reliance on manual input during critical events. Automated scripts or Azure Runbooks can initiate restores, test recovery, and integrate notification systems for completion or errors.
3. Regularly Test Restore Procedures
Reliability of restores depends on consistent, periodic verification. Regularly scheduled test restores validate the integrity of backups and the accuracy of restore documentation and automation scripts. These tests should use representative samples of databases and span different restore scenarios, from point-in-time recovery to disaster region geo-restores.
Without testing, organizations risk discovering issues only in live incidents, which can amplify downtime and data loss. Testing also identifies drift in procedures, configuration mismatches, and unexpected changes in Azure’s backup or restore policies. Document the results of each test, address any discrepancies, and adapt the runbook or scripts as necessary.
4. Plan for Large Database Restores
Restoring large databases in Azure SQL Database can take significantly more time due to the increased volume of data being processed and transferred. Administrators need to understand that the restore duration scales with database size, network throughput, and the chosen restoration method.
For critical databases, pre-calculating restore times based on test restores is essential to set realistic recovery time objectives (RTOs) and plan for extended downtime if necessary. Where possible, stagger restore operations or prioritize critical workloads when restoring multiple large databases. Ensure that compute and IOPS resources are sufficient for both the source and target environments to avoid additional bottlenecks.
5. Use Alerts for Backup Failures
Azure provides tools to create alerts for backup failures using Azure Monitor and SQL metrics. Setting up automated notifications ensures that the right personnel are informed immediately if a scheduled backup does not complete successfully. Early warning allows administrators to investigate and resolve problems before they threaten data recoverability or compliance.
Configure alerts not only for outright backup failures, but also for unusual delays, missed schedules, or changes in backup size or frequency. Periodically review and refine alert criteria as the environment evolves and new risks are identified.
Optimizing Azure SQL Database Backups with N2W
Even with Azure’s built-in backup and restore tools, many organizations face gaps:
- Recovery only works within Azure’s retention limits.
- No “in-place” restore for PITR.
- All backups vanish if the server is deleted.
- Cross-region or cross-cloud restore workflows aren’t native.
That’s where N2W steps in. With N2W, you can:
- Extend Retention Beyond Azure’s Limits: Archive Azure SQL backups for years, even decades, without relying solely on Microsoft’s retention policy.
- Orchestrate Multi-Resource Restores: Bring back entire environments — SQL DBs, VMs, network configs — in the exact order they’re needed.
- Protect Against Accidental Deletions: Keep immutable backups in a “clean” DR account with no delete permissions, creating a true air gap.
- Cut Storage Costs: Archive infrequently accessed backups to cheaper storage tiers automatically, with instant recall when needed. Also—unlike Azure Backup—we charge a flat rate, regardless of how big your VM might be.
Because N2W runs inside your cloud account using secure API calls, your data never leaves your control — and your recovery options expand well beyond the Azure portal.
✅ Learn more about Cross-Cloud in our free Guide to Multi-Cloud Backup