In the scalable and ever-growing world of AWS, tagging AWS resources has proven to be the most effective way to manage AWS infrastructure. However, it becomes necessary to implement a proper tagging strategy to meet your organizations’ needs while also adhering to best practices.
AWS Tags are customer-defined labels that are useful for grouping AWS resources according to teams, environments, applications, roles, etc. These tags help manage, filter, and search AWS resources.
Additionally, the tags help set up cost management and automation that allow organizations to manage AWS resources easily, either by using a console or by programmatically using AWS APIs. The majority of AWS resources support tagging. Some of the advantages of using these resources are as follows:
- Filtering resources or creating resource groups,
- Setting up a cost allocation strategy for certain resources,
- Viewing a detailed billing summary tag-wise,
- Setup Identity and Access Management policies according to tags, and
- Setup automation through running automation scripts that will take snapshots of the instance with a common tag.
Tags are easy to modify, allowing you adjust them according to your changing business needs.
Tag-Based Backup Using N2WS Backup & Recovery
N2WS Backup & Recovery helps you leverage these tags to manage your backups as well as set up tag-based continuous AWS backup and recovery solutions for your organization. To back up EBS volumes, you can create a specific tag for it and schedule a tag scan with N2WS. N2WS will scan your account on a preset schedule and set up the backup policy accordingly. These features are advantageous in a variety of cases.
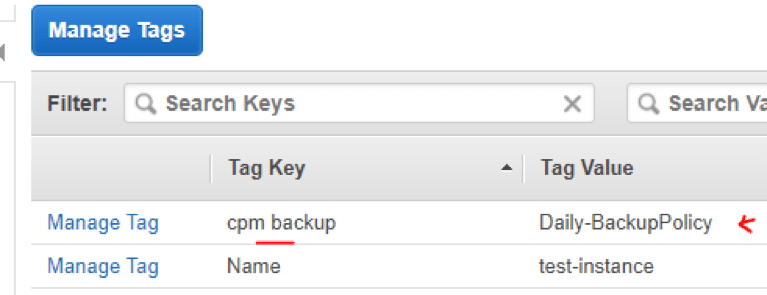
For example, let’s say you are running multiple EC2 instances (having app/web/DB servers) that have persistent storage attached and need to be backed up regularly. In order to back up continuously, you tag those instances with a “cpm backup” tag.
This way, whenever N2WS performs scans on the AWS account, a backup (AMI or snapshot) is taken of EBS volumes of application servers after detecting a corresponding tag. N2WS also detects changes in tags over time, so if an instance is terminated, N2WS will automatically stop backing it up. Additionally, if new instances are launched, N2WS will perform a backup of those instances as per the backup policy. You can follow this step-by-step guide to set up tag-based backup.
Setting up and Managing Tag-Based Backups
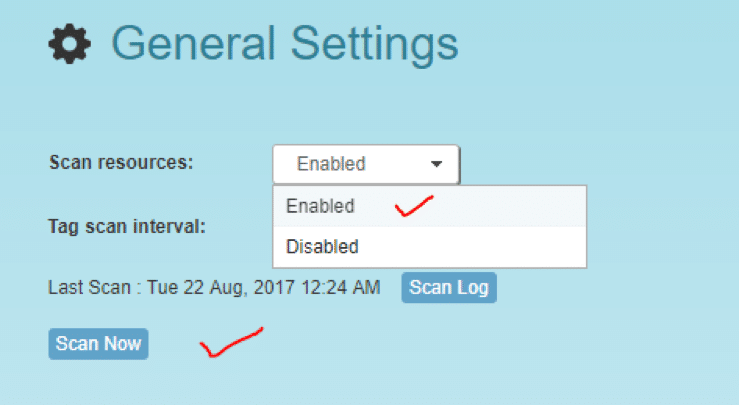
To get started with tag-based backup, you must first enable scans from your N2WS console. Log into N2WS console and navigate to the “General Settings” menu. Then, set the “Scan resources” option to “Enabled,” as shown in the image below.

If all settings are properly configured, N2WS will start scanning and setting up automated backup. If there is any syntactical error in the configuration, it will throw an error. Check the scan log for all critical errors that can appear; these errors point to a specific resource or mistake that prevents the automation from working properly. As shown in the image below, a very peculiar error appears and says the “Policy doesn’t exist/attached to account.”

The only way to prevent such errors is to avoid five syntactical errors while setting up tag-based backup. We discuss these five common errors in the following section.
Potential Issues with Tag-Based Backup Setup and Management
The first thing you should do to find an error is to check that the tag is attached to the instance. To do this, go to AWS console. From there, go to EC2, and then to Tags.

Look for the tag called “cpm backup” and make sure the value of the “cpm backup” key is in line with the documentation guidelines.
Possible Errors That Can Occur with a Tag Value
In order to use tag-based backup most effectively, one needs to be aware of and avoid all potential pitfalls that can occur while configuring this feature, as shown below. Use the following tips to avoid these errors:
- When you are listing multiple policy names, make sure they are separated by spaces.
As is shown in the image below, you should never define policies without spaces, or else the backup scan will show an error.


- When creating a new policy, verify using ‘:’ and not ‘;’. The syntax is “new_policy1:existing_policy1”.


- Use a valid name for a new policy or it will not be created (the error message will be added to the scan log). Always use alphanumeric format for policy names, as shown below.


If you do not use the alphanumeric name, the new policy will not be created, as shown in this scan log.
- Make sure you are using the correct names for existing/template policies. Set the correct matching name of the existing policies/template in the tag value, as is shown below.

- Resource scanning order is not defined, so use policy names as existing/template only if you are sure that it exists in N2WS—whether it was defined manually or scanned previously. Make sure the policy names are valid or the scan will not work properly.

Conclusion
N2WS is an ideal solution for continuous and automatic backup in AWS cloud. If you have an environment with hundreds or thousands of instances, it becomes very difficult to locate every resource and fix the issues. AWS Tags help manage infrastructure dynamically while allowing you to set up automations simply by using tags.
Additionally, tagging provides the ability to perform automated, scheduled, and continuous backup very easily via N2WS. It also allows you to back up and recover a large scale of resources and servers on multiple AWS accounts. To learn more, check out this link to see how N2WS backup works.
