
Assumptions
Before we get started, this post is going to assume the following:
- You are familiar with Amazon S3, Amazon EC2 and Amazon EBS volumes.
- You know how to provision an EC2 instance, Amazon S3 bucket and EBS volumes.
- You know how to log into a Linux EC2 instance.
- You are aware of the concepts of Access Key and Secret Access Key for IAM users.
- You are aware of the concept of IAM roles.
Environment Details
- Region: US-East (Northern Virginia)
- Linux Operating System: Amazon Linux
Initial Configuration Procedure
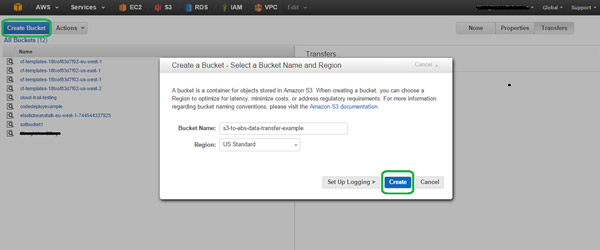
Provision an S3 Bucket
To provision an S3 bucket, you need to log into the AWS Console and navigate to S3 services. Click on ‘Create Bucket’, provide a name for your bucket and choose a region. Next, click on ‘Create’ to create your S3 bucket.
At first, the S3 bucket will be empty. 
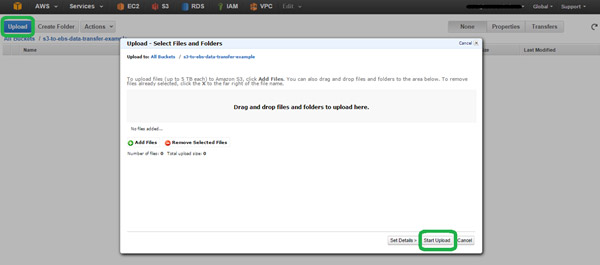
Upload Files to an Amazon S3 Bucket
When you click on ‘Upload’, you will receive file uploading options (e.g., drag and drop or click on ‘Add Files’).
Once the files are uploaded, you can browse through them directly. 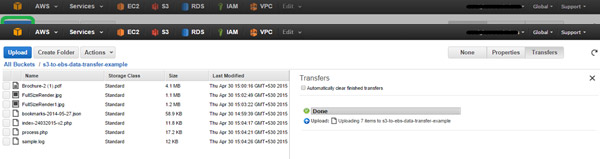
Launch Your Instances with or without an IAM Role
There are two ways in which your instances can access S3 buckets: by assigning IAM roles during your instance launch or by configuring access keys and secret access keys on your instances.
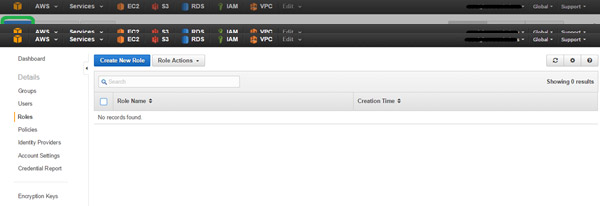
1. Assigning IAM Roles During Instance Launches
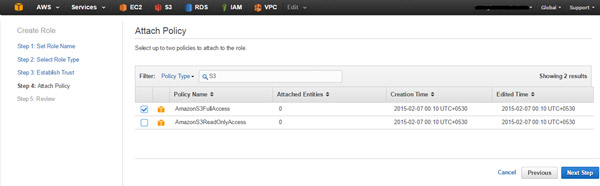
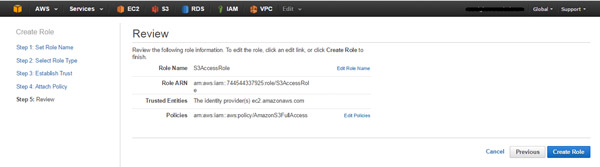
This process requires you to ensure that IAM roles with the appropriate permissions are already created. If not, they need to be provisioned. For the sake of this article, we have created an IAM role with full S3 permissions. To create an IAM role, please navigate to IAM in the AWS Management Console and follow the steps outlined below:
A. Click on ‘Create Role’
B. Provide a name for your IAM role. 
C. Select a role type
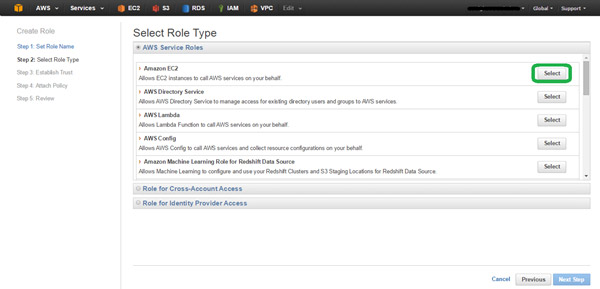
D. Attach a policy
 E.
E.
Review and create
Once done, you can assign the role to your instance and launch. During the instance launch, enter the IAM role that you created under the “Configure Instance” section. 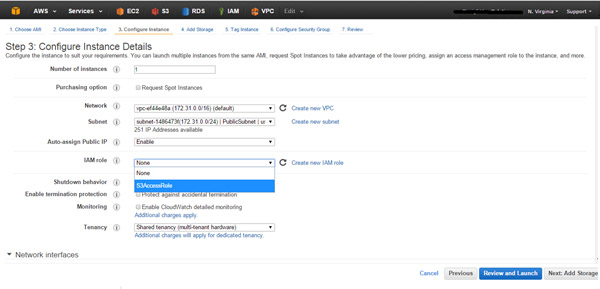
That’s it. These simple steps will launch your instance using IAM role.
2. Configuring Access Keys and Secret Access Keys on Your Instance
If you plan on accessing your S3 bucket and S3 objects using Access Keys and Secret Access Keys, nothing additional needs to be done while launching the instance.
Configure Your Instance to Access the S3 Bucket
In order for your instance to access your S3 bucket, configure the AWS CLI on your instances. S3 buckets are already pre-bundled on Amazon Linux instances. However, S3 bucket access needs to be manually configured for other Linux instances. Please refer to the links below:
Follow these docs to install using PIP.
To install using Bundled Installer, follow these docs.
And follow these docs for Windows Instances.
After you’ve installed the AWS CLI, you need to ensure that it is properly configured. If you are using an IAM role, nothing additional needs to be done. But for Access Key and Secret Access Key users, you need to follow the additional step of configuring the AWS CLI to use your Access Key and Secret Access Key.
Log into your EC2 instance and execute the command below:
# aws configure This command will prompt you to enter your Access Key, Secret Access Key, region and output format.

Verify Access to Your S3 Buckets
Before you start copying data, it is good to verify access to your S3 buckets. In order to do so, we will use the AWS CLI commands. To view a list of S3 buckets, type the following command:
# aws s3 ls 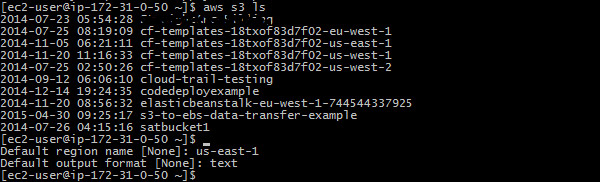
To view the content of your S3 bucket (e.g., s3-to-ebs-data-transfer-example), type the following command:
# aws s3 ls s3://s3-to-ebs-data-transfer-example 
Copy Data to Your S3 Bucket
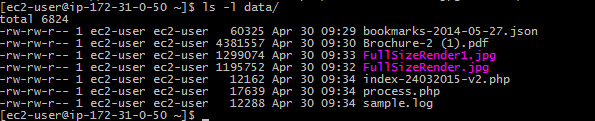
In order to copy data to your S3 bucket, please ensure that you’ve already created a destination directory. If not, please create a one: # mkdir data If you want to copy a specific file from your S3 bucket to your destination directory on your EBS volume:
# aws s3 cp s3://s3-to-ebs-data-transfer-example/sample.log data/ ![]()
If you want to copy all files recursively from your S3 bucket to your destination directory on your EBS volume:
# aws s3 cp s3://s3-to-ebs-data-transfer-example/ data/ --recursive 
To verify whether the files were properly copied, please browse your destination directory:
Apart from using the AWS CLI commands, Windows users can copy files from S3 to EBS volumes by using RDP into a Windows instance. After you connect to the AWS Management Console, you can directly copy files from the S3 Console to your EBS volumes. For this, you need to ensure that the correct login credentials (username, password, IAM URL) are readily available.
N2WS offers a solution that enables you to further simplify the process of using snapshots. N2WS Backup & Recovery is an enterprise-class backup-recovery and disaster recovery solution for the EC2 compute cloud.
N2WS is available as a service model that allows users to manage multiple AWS accounts and configure policies and schedules to take automated snapshot backups. It also has a Windows agent to consistently back up Windows applications. N2WS allows you to recover a volume from a snapshot, increase its size and switch it with an existing attached volume, in a single step.
To see the different editions with pricing and details, refer to the N2WS pricing page.
