
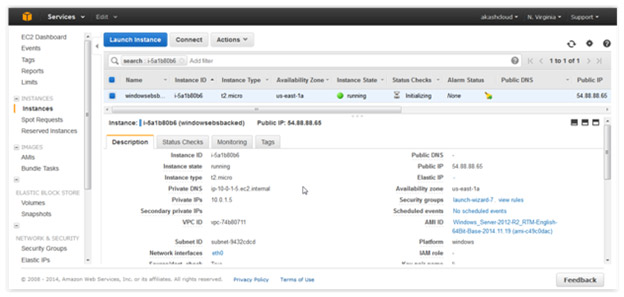
Step-by-Step Instructions This article demonstrates how to increase the size of an EBS volume that is attached as a root device to an EC2 instance with a Windows Server 2012 OS. In the example below, an EC2 Windows instance is launched with a 30GB root device.
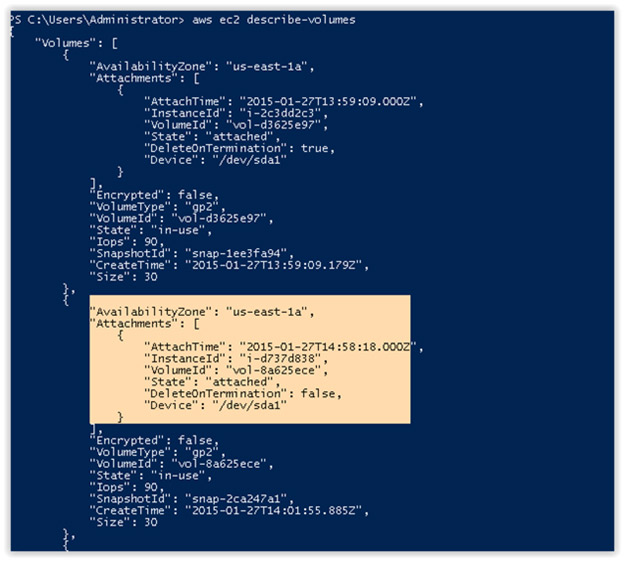
The information in the screenshot above assumes the you have setup the CLI in a local machine. When you want to check the details of a volume, use the following command: aws ec2 describe-volumes Take note of the DeleteOnTermination flag’s attribute value for the volume as you may need to set the same value for the new volume.
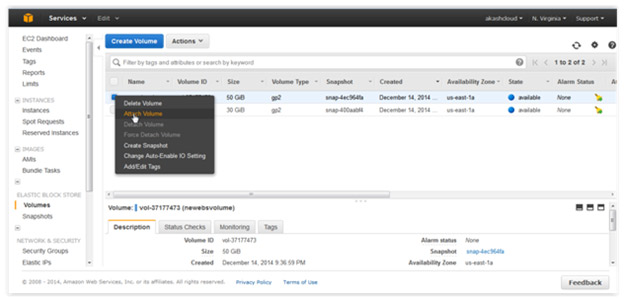
Here, you can take a snapshot and create a new, larger, 50GB volume in same Availability Zone. The new volume can then be attached as a root device to the instance after temporarily stopping that instance. For demonstration purposes, the size of this root device will be increased, however the same steps can be applied to any volume attached to an EC2 instance. If the volume is not a root device, the instance does not have to be stopped, but AWS does recommend disconnecting or unmounting the device before taking snapshots so as to prevent the application from crashing if the process gets stuck along the way.
After the Windows instance is launched, connect to it via RDP. (Note: Ensure that you have already allowed remote connections on the Remote tab in the system properties wizard.)

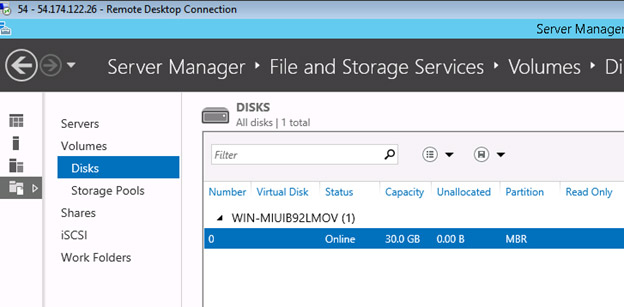
Once you have logged into the system, go to Server manager > File and Storage services > Disks, as shown below. The Disks section shows that the size of the drive is 30GB.
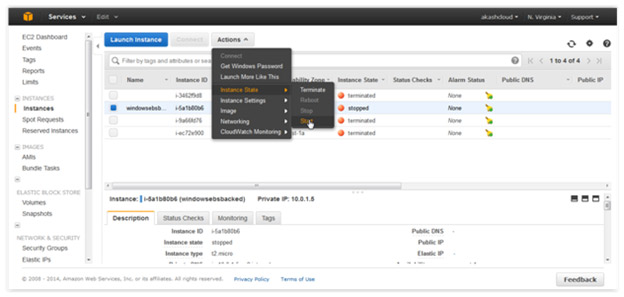
Next, stop the running instance as shown below or using CLI. (If this is not a root volume/device, there is no need to stop the instance.)

Using CLI:
aws ec2 stop-instances --instance-ids 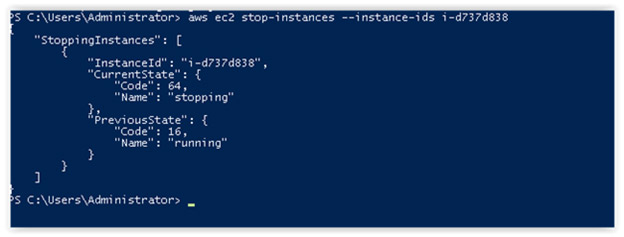
Detach the volume from the previously stopped instance as shown below or using CLI.
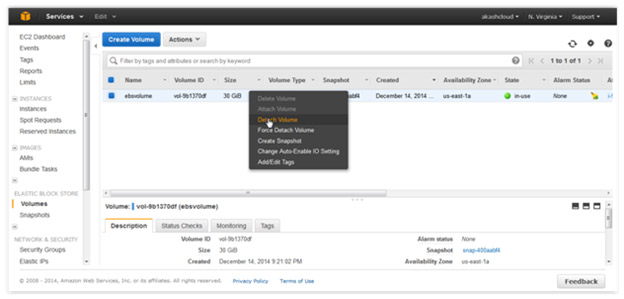
Using CLI:
aws ec2 detach-volume --volume-id 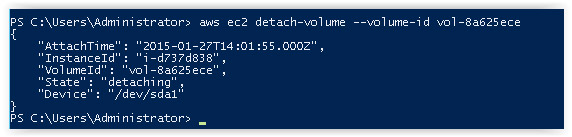
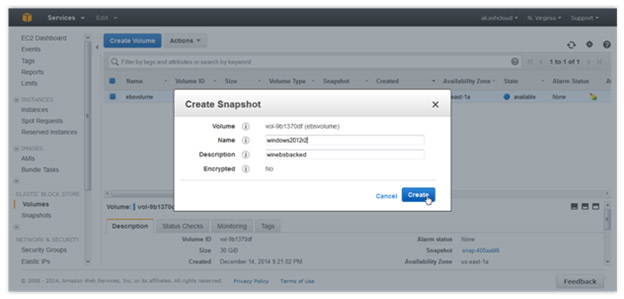
Create a snapshot from the selected Windows volume as shown below or using CLI.
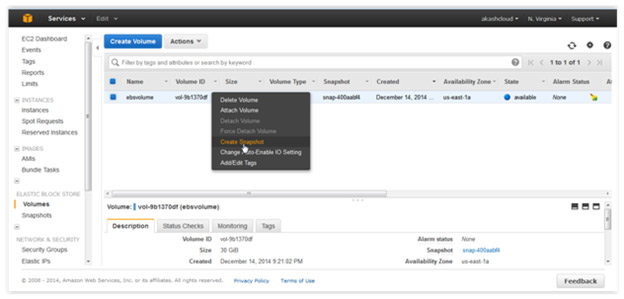
Using CLI:
aws ec2 create-snapshot --volume-id --description "" 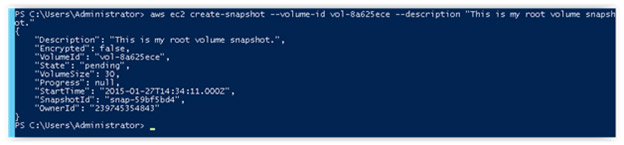
Provide the appropriate details while creating the snapshot.
Create the volume from a previously generated snapshot. Remember to take note of the previously launched instance’s AZ.
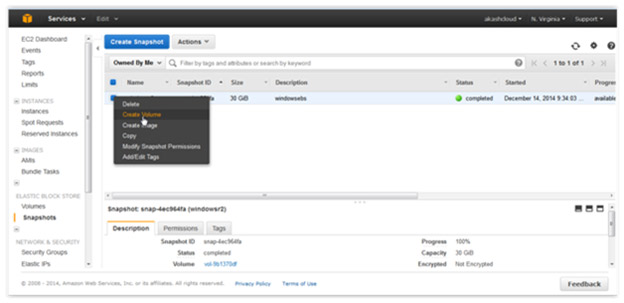
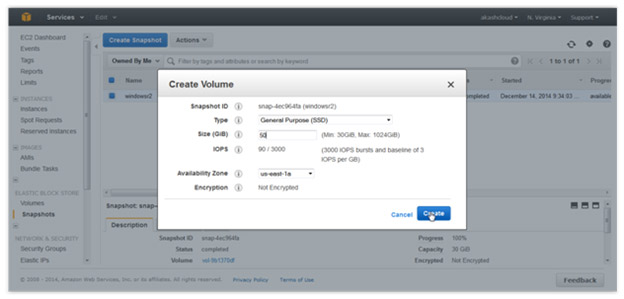
Next, resize the volume from 30GB to 50GB. Specify the AZs and select the type of volume. (Note: The volume must be created in the AZ where the present instance is in a stopped state. If the volume and the instance are in different zones, they cannot be attached.)
Using CLI:
aws ec2 create-volume --size 50 --region us-east-1 --availability-zone us-east-1a --snapshot-id --volume-type <gp2/io1/Default is standard> 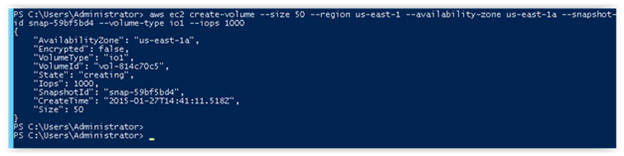
We created IOPS volume with the command above. You can also create General Purpose or Magnetic (standard) volumes, as needed.
Attach the new volume to the stopped instance as shown below or using CLI.
Using CLI:
aws ec2 attach-volume --volume-id --instance-id --device /dev/sda1 
Start the instance after the new root volume has been attached.
Using CLI:
aws ec2 start-instances --instance-ids 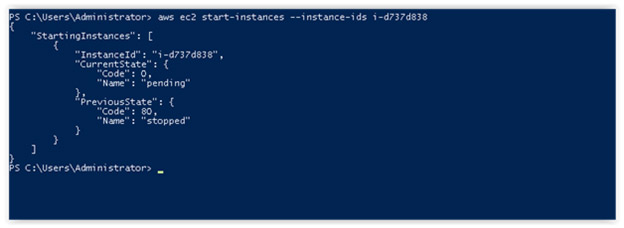
Connect to the Windows instance using RDP (mstsc).
Log onto the Windows server again and go to Server manager > File and Storage services > Disks, as shown below. The Disks section shows that the size of the drive is now 50GB.

The original volume was 30GB and we increased it by creating a new 50GB volume. So, the 20GB increase is still unallocated. If you want to enlarge the volume to 50GB by allocating this 20GB, go to Disk Management Utility, select the drive (in this case, the C Drive), rIght-click and select Expand. (Note: If you do not need the old volume (original 30GB), then delete it to save costs.)
After the volume is created, we advise changing the DeleteOnTerminate flag as needed. You can set the flag with CLI, as shown below:
aws ec2 modify-instance-attribute --instance-id --block-device-mappings "[{\"DeviceName\": \"/dev/sda1\",\"Ebs\":{\"DeleteOnTermination\":false}}]"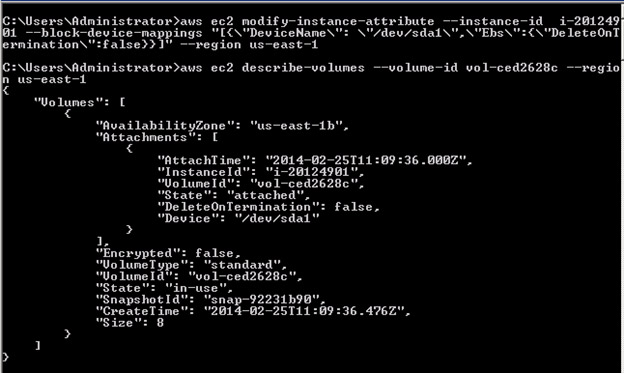
In order to check the volume flag (as shown above), use the command:aws ec2 describe-volumes –volume-idWe also recommended deleting the original volume (detached in step#4).
Again, the steps outlined above show how the size of a root volume can be increased from 30GB to 50GB. These steps can be easily followed to increase the size of any attached EBS volumes. As previously mentioned, if the volume is not a root volume, you don’t have to stop the instance. (Note:
If you do not want to use the snapshot or old volume, it can be removed to save costs.)
EBS snapshots are very handy when it comes to point-in-time backup because they achieve high availability and disaster recovery. In this article, we used snapshots to change the size of an EBS volume.
N2Ws offers a solution that enables you to further simplify the process of using snapshots. N2WS Backup & Recovery (N2W) is an enterprise-class backup, recovery, and disaster recovery solution for the EC2 compute cloud. N2W is available as a service model that allows users to manage multiple AWS accounts and configure policies and schedules to take automated snapshot backups. It also has a Windows agent to consistently back up Windows applications. N2W allows you to recover a volume from a snapshot, increase its size and switch it with an existing volume for an instance, in a single step.
Read Also