Amazon EBS volumes are persistent block level storage that are offered by Amazon Web Services (AWS). Whenever you create either a magnetic volume, an SSD volume (gp2) or Provisioned IOPS based SSD volume, all storage blocks are immediately allocated to you. However, when each individual block is accessed for the first time within those volumes, you might experience a 5-50% increase in I/O latency.
This happens because when you try to access a block within one of the volumes mentioned above, the block needs to either be wiped clean or restored from a snapshot. This becomes a problem for performance-intensive workloads that require fast read and write operations.
In order to avoid this latency for performance-intensive workloads, you can pre-warm your EBS volume before you use it. Pre-warming basically reads/writes every block of your volume so that a thin provisioned volume becomes thick and accessing new blocks doesn’t result in performance degradation.
This guide will walk you through pre-warming on your Linux and Windows instances. This article will cover how to pre-warm a new EBS volume and how to pre-warm an EBS volume that has been restored from an EBS snapshot. Learn more about when you should use EBS pre-warming for data restoration.
Pre-Warming a New EBS Volume – Linux
Note: The following procedure will only work with new EBS volumes. Due to the fact that it wipes out old data on EBS volumes, if you want to pre-warm your EBS snapshots, please refer to the section below. 1. Launch your EC2 instance. 2. Create and attach the EBS volume to your EC2 instance (optional).
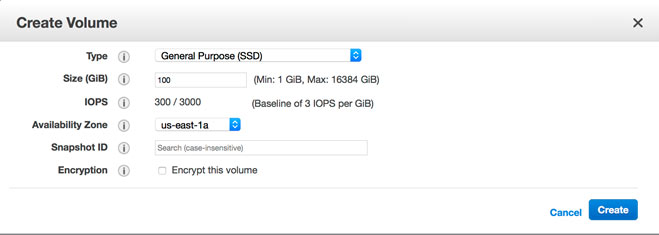
If you have already launched an EC2 instance with an additional EBS volume that will be pre-warmed, you can skip this step. If not, create an EBS volume in the same availability zone as your EC2 instance and attach it to your instance on any mount point. In order to create EBS volumes, go to the AWS EC2 Console, select ‘EBS Volumes’ on the left hand side and click on ‘Create Volume’.

3. Identify your EBS volume. In order to ensure that you are pre-warming the right volume, please use the lsblk command to list your EBS volumes. Select the one that needs to be pre-warmed. # lsblk

Before you proceed with pre-warming, ensure that your EBS volume is not mounted. If it is, use the command below to unmount it: # umount <mount-point> For example, if your volume is mounted on folder called ‘mount point’, you can use the command below:

4. Pre-warm your EBS volume In order to pre-warm an EBS volume on your Linux instance, you can use the following dd command: # dd if=/dev/zero of=/dev/xvdX bs=1M

This operation might take time depending on the size of the volume. Once complete, however, your EBS volume will be pre-warmed and ready for use.
Pre-Warm New EBS Volumes – Windows
Note: The following procedure will only work with new EBS volumes. Due to the fact that it wipes out old data on EBS volumes, if you want to pre-warm your EBS snapshots, please refer to the section below. 1. Launch your EC2 instance. 2. Create your EBS volume and attach it to your EC2 instance (optional): If you have already launched an EC2 instance with additional EBS volume that will be pre-warmed, you can skip this step. If not, please create an EBS volume in the same availability zone as your EC2 instance and attach it to your instance on any mount point.

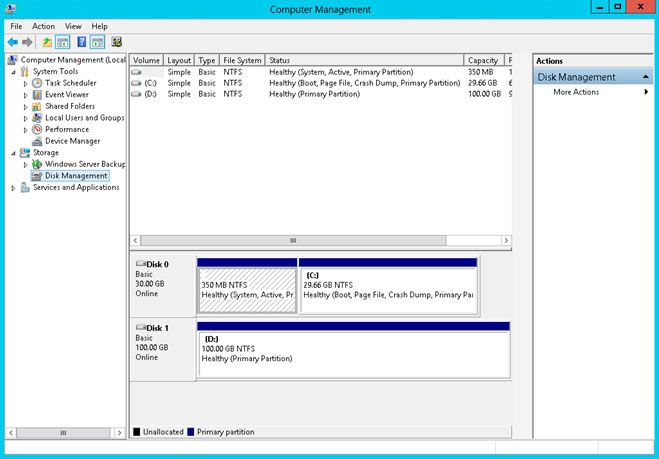
3. Identify your EBS volume. Go to ‘Disk Management’, which is under ‘Computer Management’ in ‘Administrative Tools’, and review your EBS volumes. In this case, we mounted a 100GB EBS volume on drive D to be pre-warmed.

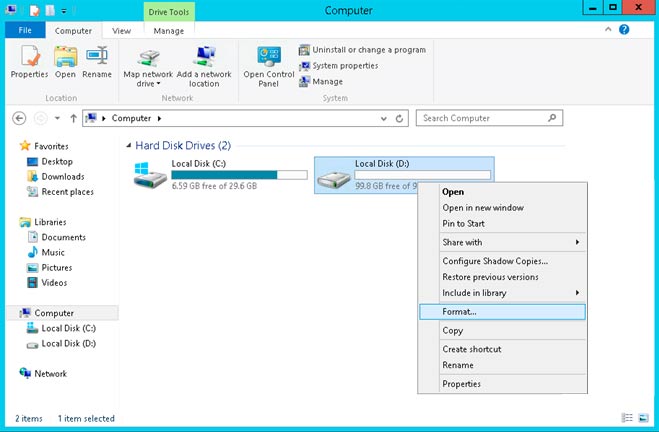
4. Pre-warm your EBS volume. The easiest approach to pre-warming an EBS volume in Windows is to go to Windows Explorer, right click on your volume and click on ‘Format’. This operation will wipe out any existing data and will pre-warm your volume. Please make sure not to use “Quick Format”, since this type of format writes only the file-system metadata and does not really write all the blocks on the disk.


For those of you who use the CLI, go to ‘Command Prompt’ in Windows and type the command below: C:\> format drive_letter: /p:1
This will format your volume and prepare it for use.
Pre-Warm an EBS Volume from a Snapshot – Linux
If you want to pre-warm an EBS volume that was restored from an EBS snapshot, you have to use a different approach than the ones outlined above. As mentioned earlier, the approaches above will basically erase all of the data on your newly created EBS snapshot. In order to pre-warm an EBS volume that was restored from an EBS snapshot, you can leverage the dd command to:
- Pre-warm existing data in which case dd will read and pre-warm your existing data from snapshots. Because this is a read operation, it won’t pre-warm unused space from restored snapshot.
In order to perform this operation, use the dd command to read blocks that contain data and write on them using ‘/dev/null’. This will only pre-warm existing data blocks. The syntax to perform this is: # sudo dd if=/dev/xvdX of=/dev/null bs=1M For example:

- Pre-warm existing data and un-used space with a read and write back operation where a command reads your blocks and writes them back to the same location. This pre-warms your complete volume and existing data won’t be erased.
You can use the following command: # sudo dd if=/dev/xvdX of=/dev/xvdX conv=notrunc bs=1M For example:

That’s it. Your EBS volume is pre-warmed and ready for use.
Pre-Warm an EBS Volume from a Snapshot – Windows
In order to pre-warm EBS volumes from snapshots, you need to use a dd command in Windows. Once the dd command is installed, you can use the command below to list your attached volumes. C:\> wmic diskdrive get size,deviceid

To pre-warm your EBS volume, please use the command below: C:\> dd if=\\.\PHYSICALDRIVEn of=/dev/null bs=1M –progress –size For example:

Once complete, your volume will be pre-warmed and ready for use. N2WS Backup & Recovery is an enterprise-class backup-recovery and disaster recovery solution for AWS EC2. N2WS is available as a service model that allows users to manage multiple AWS accounts and configure policies and schedules to take automated snapshot backups. It also has a Windows agent to consistently back up Windows applications.
N2WS allows you to recover a volume from a snapshot, increase its size and switch it with an existing attached volume in a single step.