N2WS Backup & Recovery (formerly known as Cloud Protection Manager or N2W) released version 2.4, which includes four exciting new enhancements: Archive Snapshots to Amazon S3: Reduced Long-Term Retention and Storage Costs, Cross-Account Incremental Backups, VPC Capture & Clone, and Enhanced RESTful API.
In this article, we cover Archive Snapshots to Amazon S3: Reduced Long-Term Retention and Storage Costs and Cross Account Incremental Backups. Our next post will cover the other two features. Archive Snapshots to Amazon S3: Reduced Long-Term Retention and Storage Costs is an excellent feature that significantly reduces the cost of storage from Amazon EBS snapshots, but allows you firmer control on long-term storage retention and its related cost.
An excellent use case is when businesses are required by regulatory requirements to keep backups for seven years. When you consider backing up all the required systems for that length of time, the monthly storage cost is enormous. Furthermore, the need to restore is infrequent, so storing all those backups is very high overhead. Why not move those backups to Amazon S3, where they are far more durable and cheaper, and then pull them for recovery when needed? Amazon endorses the mantra of designing for failure.
Fortify your cloud across every critical dimension.
- Efficiency + Optimization
- Security + Control
- Orchestration + Visibility
While most organizations build VPCs, AZs, Regions, and their stacks in HA, to really take full advantage of Amazon’s redundancy capabilities, many organizations are also seeing the benefit of having DR span across AWS Accounts. Normally this would require an exponential investment in DR, but N2WS Backup & Recovery allows you to easily copy backups to a DR account for quick recovery. Cross-account DR snapshots were not new to N2WS Backup & Recovery, but prior to version 2.4, each copy was a full snapshot. Even though this is an excellent feature, it duplicated costs. Now, Cross-Account Incremental Backup significantly reduces the DR cost of operating backups. Let’s dive in and see these features in action.
Assumptions and Environment
Step-by-step assumptions:
- You currently have a server on AWS running N2WS Backup & Recovery, with the following configured:
- A login account with privileges to configure policies, schedules, agents, and recovery.
- An AWS IAM Role set up for the N2WS Backup & Recovery instance to allow access to Amazon S3 and Amazon EC2 resources. Get the minimum required permissions here.
Environment used for this guide:
- 1 N2WS Backup & Recovery server
- 1 AWS Linux2 server (Prodweb-1) (backup/recovery target)
- 1 S3 Bucket: n2ws-prod-backups-demo
- 2 AWS Regions: us-east-1 (Primary), eu-west-2 (Secondary)
- 2 AWS accounts
Step 1: Create Prodweb1 Backup Schedules
First you should create two schedules for standard Amazon EC2 backups. Later in this guide, we will modify them to support backups to Amazon S3. You can use any variety of archiving that fits your needs. In this example, there will be daily backups that will archive to Amazon S3 after two days and hourly backups that archive to Amazon S3 after 23 backups.
- Login to the N2WS Backup & Recovery web console.
- Click the Schedules tab.
- Click + New Schedule.
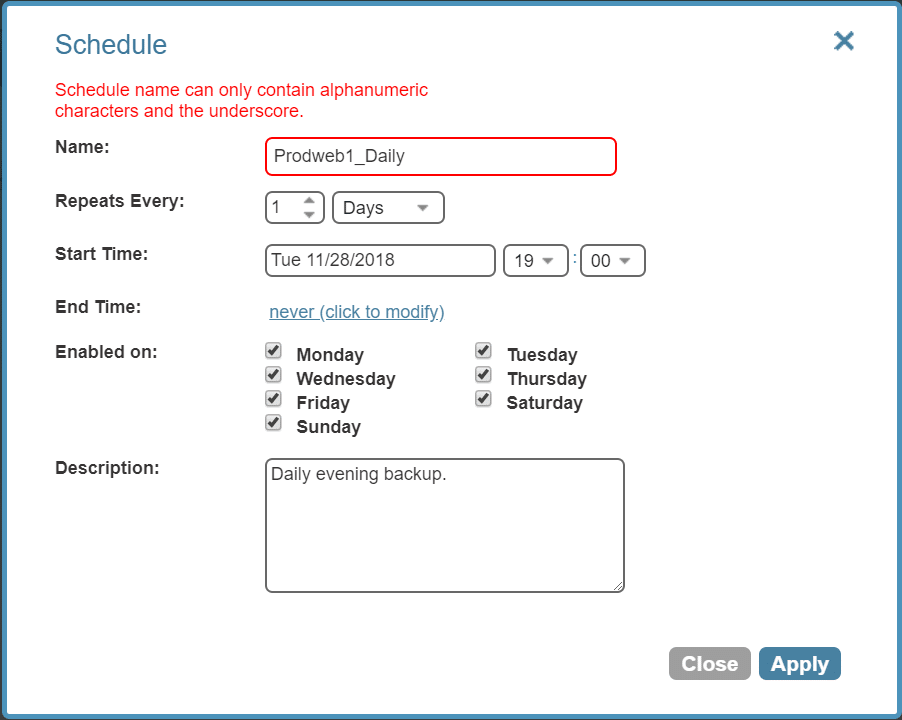
- In the “Schedule” window, enter:
- Name: Prodweb1_Daily
- Repeats Every: 1 Days
- Start Time: Make this time at least an hour from now
- End Time: never
- Enabled on: Choose the days you need
- Description: Daily evening backup.
- Click Apply.
- Click + New Schedule.
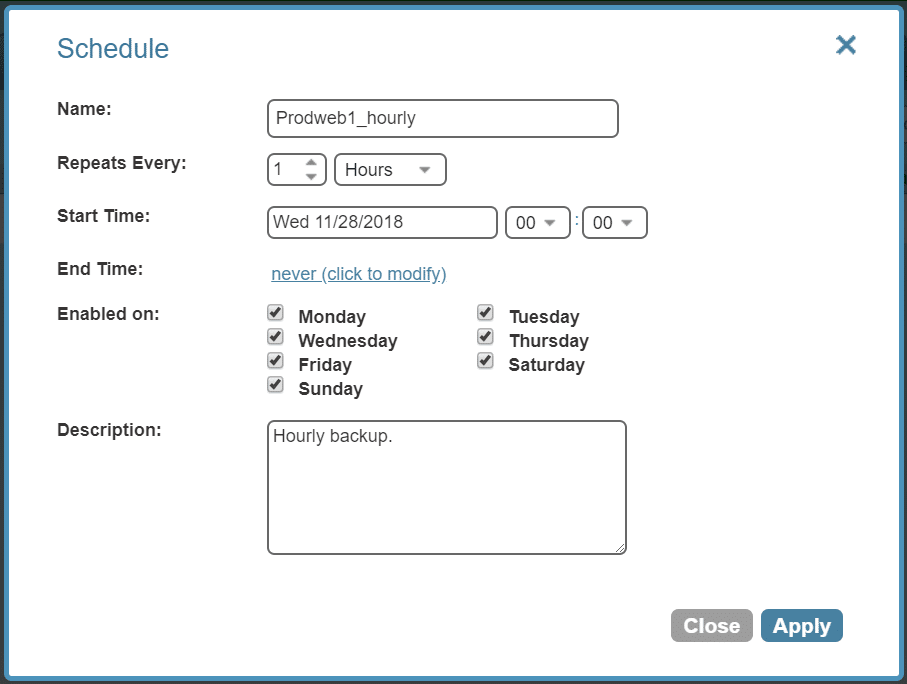
- In the “Schedule” window, enter:
- Name: Prodweb1_Hourly
- Repeats: 1 Hours
- Start Time: Make this time at least an hour from now
- End Time: never
- Enabled on: Choose all days
- Description: Hourly backup.
- Click Apply.
Step 2: Create Prodweb1 Daily Backup Policy
- In N2WS Backup & Recovery, click the Policies tab.
- Click + New Policy.
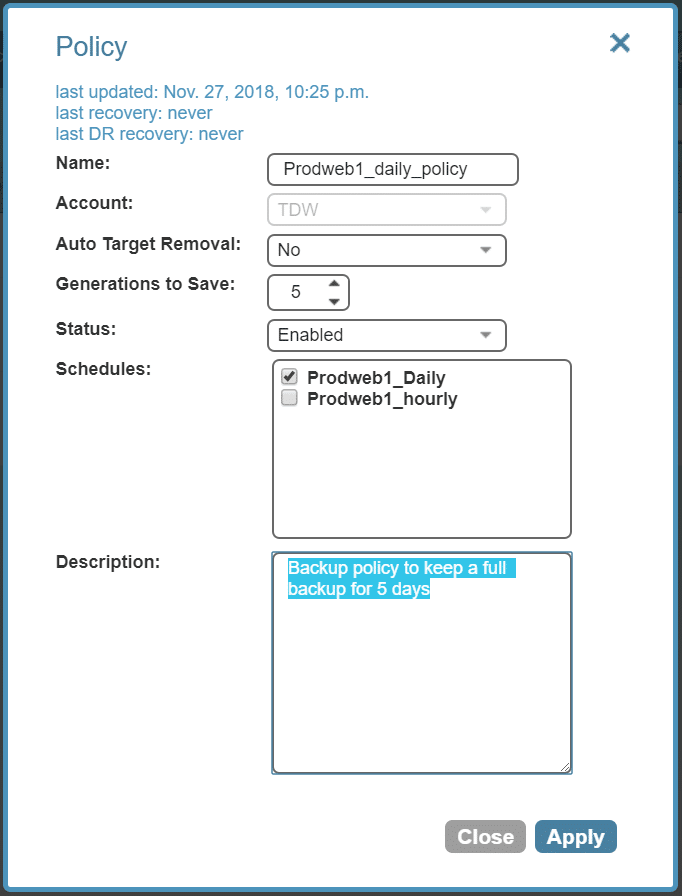
- In the “Policy” window, enter:
- Name: Prodweb1_Daily_policy
- Account: Your IAM user account
- Auto Target Removal: No
- Generations to Save: 5
- Status: Enabled
- Schedules: ☑ Prodweb1_Daily
- Description: Backup policy to keep a full backup for 5 days
- Click Apply.
- Click + New Policy.
- In the “Policy” window, enter:
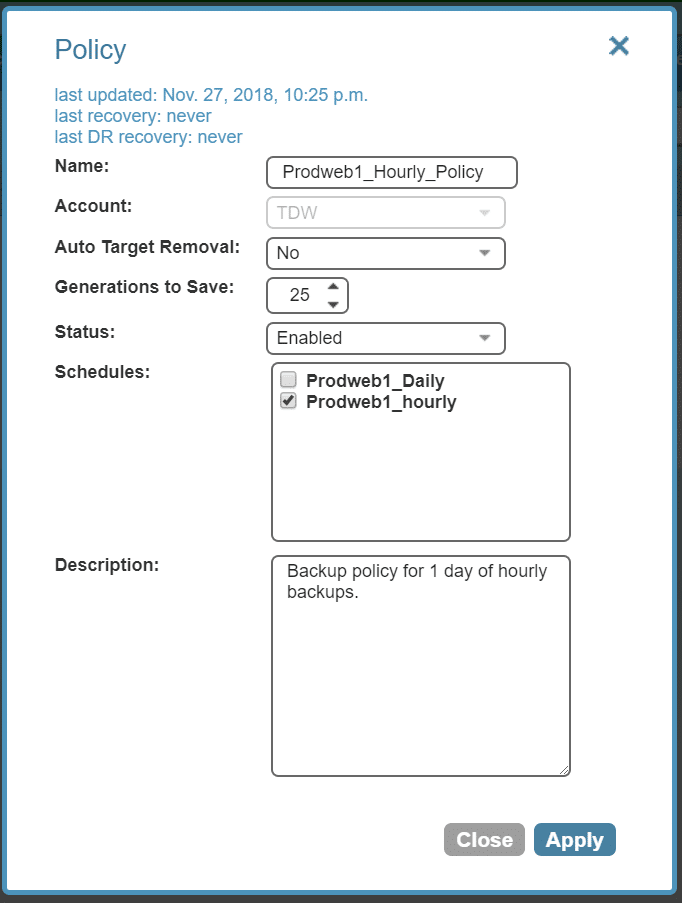
- Name: Prodweb1_Hourly_Policy
- Account: Your IAM user account
- Auto Target Removal: No
- Generations to Save: 25
- Status: Enabled
- Schedules: ☑ Prodweb1_Hourly
- Description: Backup policy for 1 day of hourly backups.
- Click Apply.
Step 3: Assign Backup Targets
- In the “Policies” tab, on the Prodweb1_daily_policy, click Backup Targets (under the “configure” column).
- Click + Add Instances.
- Check the box next to the Prodweb1 instance.

- Click Add Selected.
- Click Close.
- In the “Policies” tab, on the Prodweb1_Hourly_Policy, click Backup Targets (under the “configure” column).
- Click + Add Instances.
- Check the box next to the Prodweb1 instance.
- Click Add Selected.
- Click Close.
- Click Back to Policies.
- You should now see your server in the backup targets.
Backups should now happen automatically. If you want to force a backup to occur, click the run ASAP button to the left of either policy.

- Click Configure (under the “Actions” column).
- You can select all devices to take an AMI. In this example, we are performing a database dump every two hours, so we will only select the volume used for backups (/dev/sdd in this configuration).
- Check Enabled next to your backup volume. Set the “Backup Options” to Snapshots only.
- Click Apply.

Step 4: Enable Cross-Account DR
Here we will set up our daily backups to be cross-account snapshots.
- In the “Policy” tab, to the right of the policy Prodweb1_daily_policy, click DR.
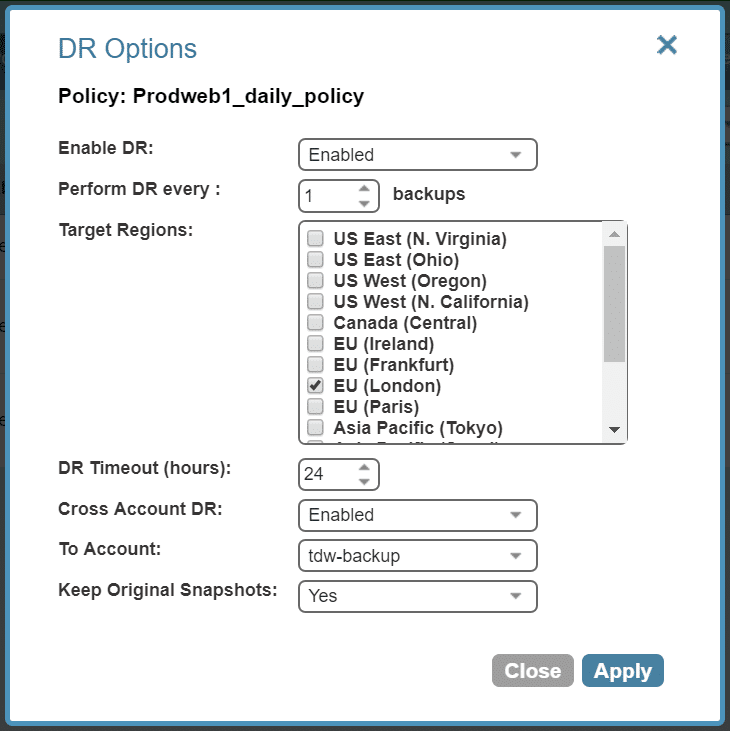
- In the “DR Options” window, enter:
- Enable DR: Enabled
- Perform DR ever: 1 backups
- Target Regions: EU (London)
- DR Timeout (hours): 24 (default)
- Cross Account DR: Enabled
- To Account: Select your 2nd Account
- Keep Original Snapshots: Yes
Step 5: Create cpmdata Policy
This policy is required for Amazon S3 backups and may already be created in your account if you’re a current customer. If so, the policy should be called “cpmdata.” It is used to backup N2W configuration.
- In the “Policy” tab, click + New Policy.
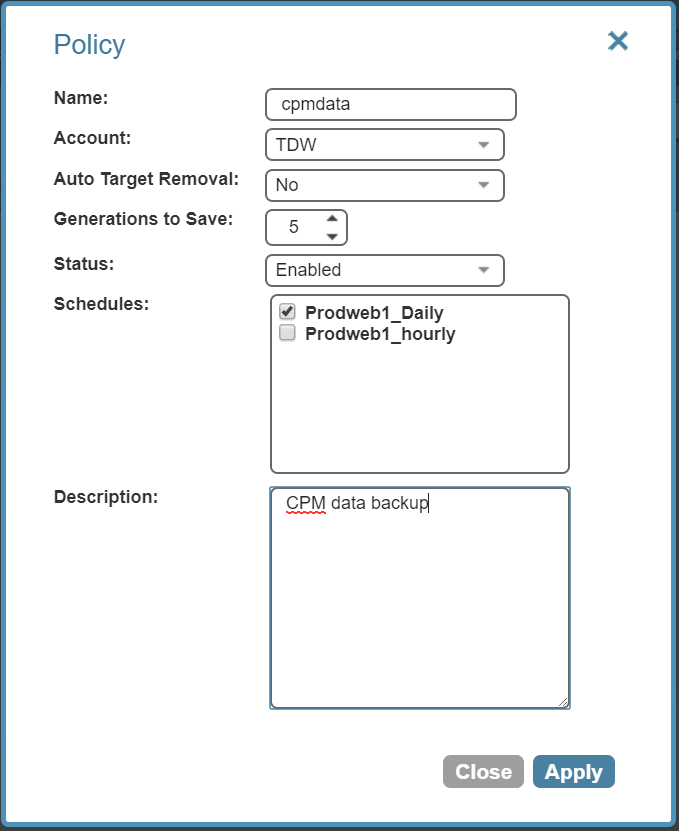
- In the “Policy” window, enter:
- Name: cpmdata
- Account: Your IAM user account
- Auto Target Removal: No
- Generations to Save: 5
- Status: Enabled
- Schedules: ☑ Prodweb1_Daily (or any other daily policy)
- Description: N2W data backup
- Click Apply.
- If this is a new policy, click the run ASAP button to the right of the cpmdata policy. It should take less than two minutes to complete.
Step 6: Create Amazon S3 Backups of Snapshots
Now that your backups are running, they will all leverage Amazon EC2 snapshot technology. But one of the biggest new features in N2WS Backup & Recovery is the ability to archive certain backups to Amazon S3. This can reduce the storage cost of your backups by up to 98%!
To perform the copy, this feature requires AWS workers to be launched in your AWS account. It also requires a policy and a repository.
Now let’s configure the necessary items to start backing up your snapshots to Amazon S3.
Workers
- In the N2WS Backup & Recovery UI, at the very bottom of the screen, you’ll see a menu with links. Click Configure workers for S3 operations.
- Click + New Worker Configuration.
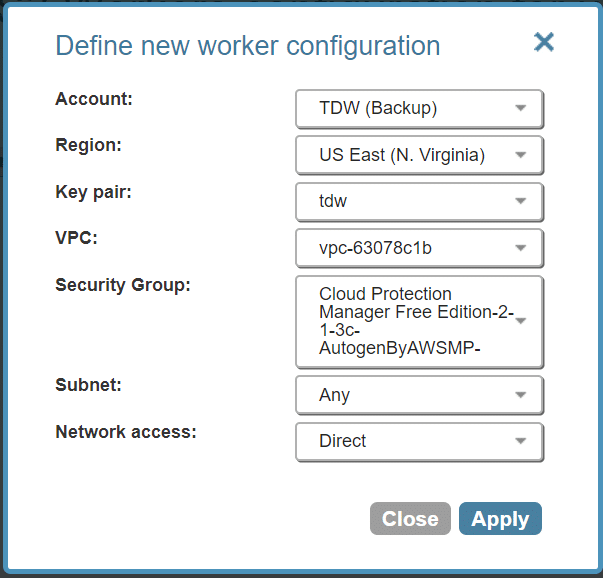
- In the “Define new worker configuration” window, enter:
- Account: Primary Account
- Region: US-East (N. Virginia)
- Key Pair: A keypair you have precreated OR Don’t use a keypair (disables your access)
- VPC: A VPC you created
- Security Group: A N2W security group
- Subnet: Any
- Network access: Direct
- Click Apply.
S3 Repository
Important: Use a new bucket for this operation and storage. Ensure your S3 bucket has encryption enabled.
- In the top menu in the console, click the S3 Repositories button.
- Click + Create New S3 Repository.
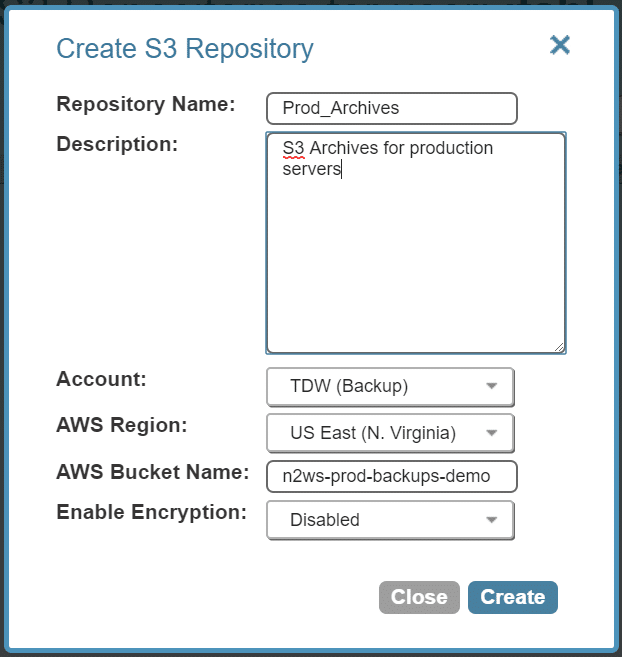
- In the “Create S3 Repository” window, enter:
- Repository Name: Prod_Archives
- Description: S3 Archives for production servers
- Account: Select your account configured in N2W. If you have multiple accounts, pick the same account as your Prodweb1 server.
- AWS region: US-East (N. Virgina)
- AWS Bucket Name: n2ws-prod-backups-demo (your bucket name here)
- Enable Encryption: Disabled Note: If you wish to enable, this password is seperate from AWS server-side encryption and is used for client-side encryption key generation.)
- Click Create.
Step 7: Enable Amazon S3 Copy
Now we will configure our policies to include Amazon S3 archiving. The goal will be to archive all daily backups and keep them for a full month. Then we will archive all hourly backups for five days and set every other hourly backup to Amazon S3. This effort reduces the cost of having all those backups sitting as snapshots.
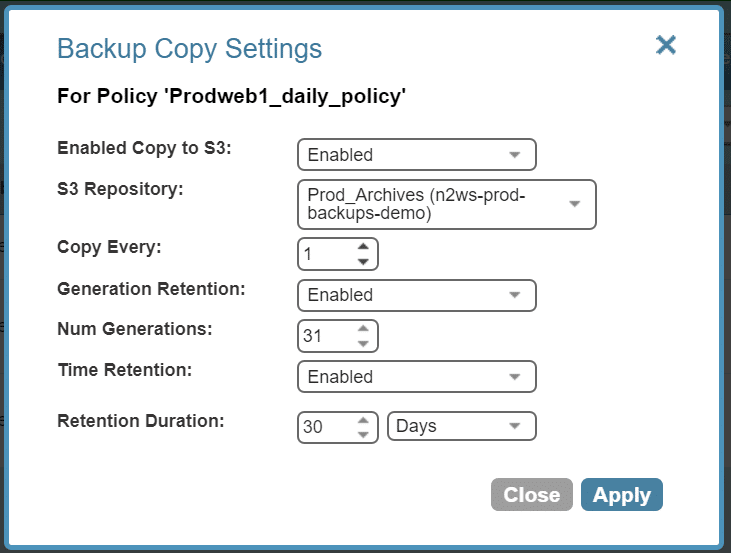
- In the “Policies” tab, on the Prodweb1_daily_policy, click Copy to S3.
- In the “Backup Copy Settings” window, enter:
- Enabled Copy to S3: Enabled
- S3 Repository: Prod_Archives (your-bucket-name)
- Copy Every: 1
- Generation Retention: Enabled
- Num Generations: 31
- Time Retention: Enabled
- Retention Duration: 30 Days
- Click Apply.
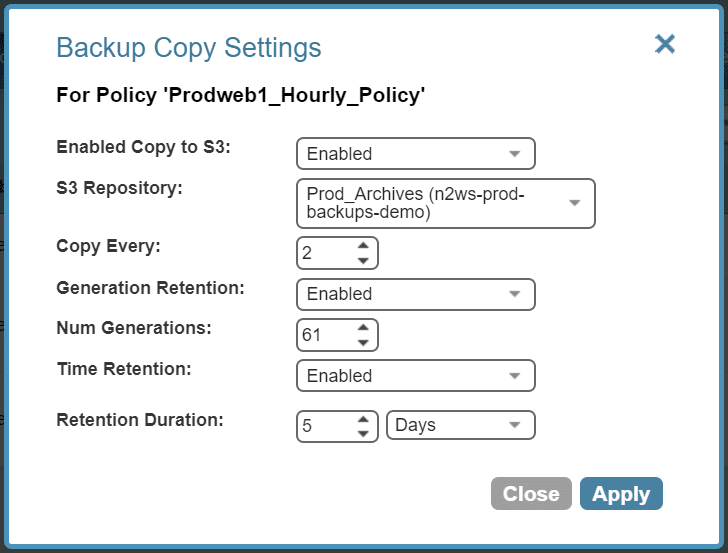
- In the “Policies” tab, on the Prodweb1_hourly_policy, click Copy to S3.
- In the “Backup Copy Settings” window, enter:
- Enabled Copy to S3: Enabled
- S3 Repository: Prod_Archives (your-bucket-name)
- Copy Every: 2
- Generation Retention: Enabled
- Num Generations: 61
- Retention Duration: 5 Days
- Click Apply.
You will now start seeing Amazon S3 backups being archived to your Amazon S3 bucket in your “Backup Monitor” tab.

Step 8: Restoring from Amazon S3 Backup
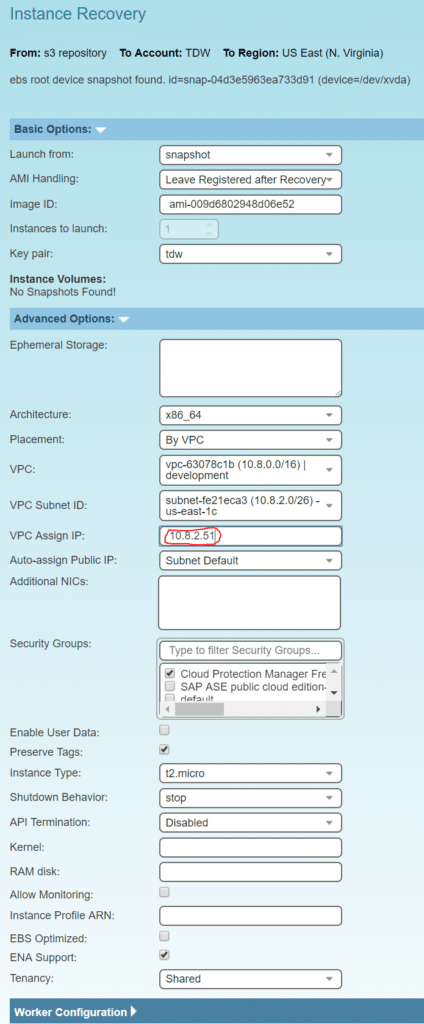
This example will perform a full system restore from an Amazon S3 backup. Just for demonstration, we have stopped the original instance being backed up. Under Step 5, you will see that another IP is assigned. This is to prevent a conflict. If your original instance was terminated, you can leave the “Advanced Options” unmodified to recreate an exact copy with configuration of the backed-up instance.
- In the “Backup Monitor” tab, find a backup where “S3 Copy Status” shows “Completed Successfully.”
- Under the “Actions” column for that backup, click Recover.
- Under “Recovery Panel,” click the dropdown menu below “Restore from” and choose S3 repository (Prod_Archives).
- Under the “Recovery” column of Prodweb1, click Instance.

- Under “Basic Options,” enter:
- Launch from: snapshot
- AMI Handling: Leave Registered after Recovery
- Image ID: Leave the ami-id that is entered
- Instances to Launch: Skip
- Key pair: Use the key pair you used to launch Prodweb1.
- Expand “Advanced Options.”
- VPC Assign IP: Change this to a free IP
- Click Recovery Instance.
- Click OK when the window appears to confirm the recovery operation. You will be taken to a status window for the recovery. This will take several minutes.
Note: Don’t forget to click the refresh double arrow to update the progress.

Here you can see the recovered server beside the backed up server! N2WS Backup & Recovery handles all the Amazon S3 operations for you automatically.

Summary
As you can see, Archive Snapshots to Amazon S3: Reduced Long-Term Retention and Storage Costs and Cross Account Incremental Backups are high-value additions to N2WS Backup & Recovery. Both features will keep your backup and recovery efficient and even more cost-effective, whether you’re upgrading or just now signing up.
In our next article , we will cover the other two new features we’ve unveiled: VPC Capture & Clone and Enhanced RESTful API.